Fujitsu P50XHA10 User Manual - Page 35
Setting The Input Terminals
 |
View all Fujitsu P50XHA10 manuals
Add to My Manuals
Save this manual to your list of manuals |
Page 35 highlights
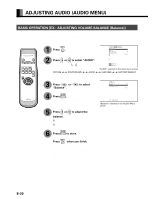
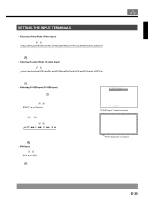
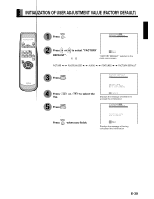
English SETTING THE INPUT TERMINALS • Selecting Video Mode (Video Input) You can use this option to select the desired video mode of pictures it will receive to the Video Input terminal. Each time you press or , one of the available modes appears in the following sequence: Auto1: Automatically selects NTSC, PAL and SECAM. Auto2: Automatically selects NTSC and M-PAL. Other than Auto: You need to select a system appropriate to the input signal. Press to store. • Selecting S-video Mode (S-video Input) You can use this option to select the desired video mode of pictures it will receive to the Video Input terminal. Each time you press or , one of the available modes appears in the following sequence: Auto1: Automatically selects NTSC, PAL and SECAM. Auto2: Automatically selects NTSC and M-PAL. Other than Auto: You need to select a system appropriate to the input signal. Press to store. • Selecting D-SUB Input (D-SUB Input) You can use this option to select the signal system it will receive to D-SUB Input terminal. (1) Select D-SUB Input and press . D-SUB Input screen appears. (2) Select the signal system to receive. Each time you press or , one of the available choices appears in the following sequence: RGB-PC Decoder RGB-PC: For using RGB for PC Decoder: For using digital broadcast tuner (3) Press or to select Mask. (4) Select Decoder by FUNCTION to set up Mask. Each time you press or , one of the available choices appears in the following sequence: Off: Does not mask. Number: Masks the fringe (top, bottom, right and left) of the screen by the number of pixels specified. (5) Press to store. • DVI Input You can select the signal method input to the DVI input terminal. Each time or is pressed, the setting is changed. DVI1 DVI2 DVI1: Used when connecting to a PC. DVI2: Used when connecting to a DVD player or digital tuner. Press to store. * Set according to the signal method before connecting peripheral device. "111111111111111111D222222222222222222-333333333333333333S444444444444444444U555555555555555555B666666666666666666I777777777777777777n888888888888888888p999999999999999999u000000000000000000t"111111111111111111s222222222222222222e333333333333333333le444444444444444444c555555555555555555t666666666666666666io777777777777777777n888888888888888888s999999999999999999c000000000000000000re111111111111111111e222222222222222222n333333333333333333444444444444444444555555555555555555666666666666666666777777777777777777888888888888888888999999999999999999000000000000000000111111111111111111 This fringe part is masked. * On-screen information disappears if you do not take any action for about 60 seconds. E-35
-
 1
1 -
2
-
3
-
4
-
5
-
6
-
7
-
8
-
9
-
10
-
11
-
12
-
13
-
14
-
15
-
16
-
17
-
18
-
19
-
20
-
21
-
22
-
23
-
24
-
25
-
26
-
27
-
28
-
29
-
 30
30 -
 31
31 -
 32
32 -
 33
33 -
 34
34 -
 35
35 -
 36
36 -
 37
37 -
 38
38 -
 39
39 -
 40
40 -
41
-
42
-
43
-
44
-
45
 |
 |
