Ganz Security DR16HD DIGIMASTER H.264 Manual - Page 54
Alarm Recording, Panic Recording
 |
View all Ganz Security DR16HD manuals
Add to My Manuals
Save this manual to your list of manuals |
Page 54 highlights
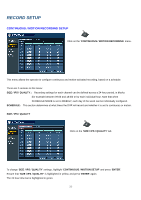
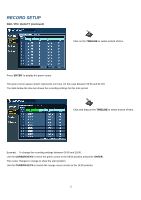
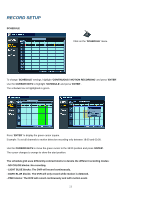
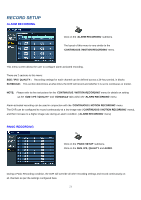
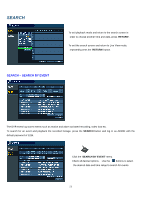
RECORD SETUP ALARM RECORDING Click on the 'ALARM RECORDING' submenu. The layout of this menu is very similar to the 'CONTINUOUS / MOTION RECORDING' menu. This menu screen allows the user to configure alarm-activated recording. There are 2 sections to this menu: SIZE / IPS / QUALITY:: Recording settings for each channel can be defined across a 24-hour period, in blocks SCHEDULE: This section determines at what times the DVR will record and whether it is set to continuous or motion. NOTE: Please refer to the instructions for the 'CONTINUOUS / MOTION RECORDING' menu for details on setting up the 'SIZE / IPS / QUALITY' and 'SCHEDULE' tabs within the 'ALARM RECORDING' menu. Alarm-activated recording can be used in conjunction with the 'CONTINUOUS / MOTION RECORDING' menu. The DVR can be configured to record continuously at a low image rate ('CONTINUOUS / MOTION RECORDING' menu), and then increase to a higher image rate during an alarm condition. ('ALARM RECORDING' menu) PANIC RECORDING Click on the 'PANIC SETUP' submenu. Click on the SIZE, IPS, QUALITY and AUDIO. During a Panic Recording condition, the DVR will override all other recording settings and record continuously on all channels as per the settings configured here. 54
-
 1
1 -
2
-
3
-
4
-
5
-
6
-
7
-
8
-
9
-
10
-
11
-
12
-
13
-
14
-
15
-
16
-
17
-
18
-
19
-
20
-
21
-
22
-
23
-
24
-
25
-
26
-
27
-
28
-
29
-
30
-
31
-
32
-
33
-
34
-
35
-
36
-
37
-
38
-
39
-
40
-
41
-
42
-
43
-
44
-
45
-
46
-
47
-
48
-
 49
49 -
 50
50 -
 51
51 -
 52
52 -
 53
53 -
 54
54 -
 55
55 -
 56
56 -
 57
57 -
 58
58 -
 59
59 -
60
-
61
-
62
-
63
-
64
-
65
-
66
-
67
-
68
-
69
-
70
-
71
-
72
-
73
-
74
-
75
-
76
-
77
-
78
-
79
-
80
 |
 |
