Garmin ECHOMAP UHD 72sv Owners Manual - Page 7
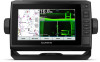
ECHOMAP UHD 70/90 Front View
 |
View all Garmin ECHOMAP UHD 72sv manuals
Add to My Manuals
Save this manual to your list of manuals |
Page 7 highlights
Introduction WARNING See the Important Safety and Product Information guide in the product box for product warnings and other important information. ECHOMAP UHD 60 Front View Power key Automatic backlight sensor Keys microSD® memory card slot NOTICE Each time you place the device in the cradle, you should make sure the device is firmly secured in the cradle, the cables are fully pushed into the device and cradle, and the locking bracket is snapped firmly closed. There is an audible click when the locking bracket is installed correctly. If the cables are not fully seated and the device is not firmly secured, it can lose power or stop working. The device can also fall out of the cradle and become damaged if it is not firmly secured. Device Keys Turns on and off the device when held. Opens a shortcut menu to backlight, color mode, and sonar transmission when quickly pressed and released. Scrolls through the brightness levels when pressed repeatedly. Zooms out of a chart or view. Zooms in to a chart or view. Scrolls, highlights options, and moves the cursor. SELECT Acknowledges messages and selects options. BACK Returns to the previous screen. MARK Saves the present location as a waypoint. HOME Returns to the Home screen. Takes a screenshot when held. MENU Opens a menu of options for the page, when applicable. Closes a menu, when applicable. Takes a screenshot when held. ECHOMAP UHD 70/90 Front View Power key Automatic backlight sensor Touchscreen Shortcut keys microSD memory card slot Device Keys Turns on and off the device when held. Opens a shortcut menu to backlight, color mode, and sonar transmission when quickly pressed and released. Scrolls through the brightness levels when pressed repeatedly. 1 2 3 4 Assigns a shortcut key to the active screen when held. Opens the assigned screen when pressed. Assigning a Shortcut Key You can quickly open commonly used screens by assigning a shortcut key. You can create a shortcut to screens such as sonar screens and charts. 1 Open a screen. 2 Hold a shortcut key, and select OK. TIP: The shortcut is also saved to the Frequently Used category with the shortcut key number. Tips and Shortcuts • Press to turn on the chartplotter. • From any screen, press repeatedly to scroll through the brightness levels. This can be helpful when the brightness is so low you cannot see the screen. • Hold a numbered key to create a shortcut to a screen. • Select HOME from any screen to return to the Home screen. • Select MENU to open additional settings about that screen. • Select MENU to close the menu when finished. • Press to open additional options, such as adjusting the backlight and locking the touchscreen. • Press , and select Power > Turn Off Device, or hold until the Turn Off Device bar fills to turn off the chartplotter, when available. • Press , and select Power > Sleep Device to set the chartplotter to standby mode, when available. Downloading the Manuals from the Web You can get the latest owner's manual and translations of manuals from the Garmin® website. 1 Go to garmin.com/manuals/ECHOMAPUHD. 2 Download the manual. Garmin Support Center Go to support.garmin.com for help and information, such as product manuals, frequently asked questions, videos, software updates, and customer support. Inserting Memory Cards You can use optional memory cards with the chartplotter. Map cards allow you to view high-resolution satellite imagery and aerial reference photos of ports, harbors, marinas, and other points of interest. You can use blank memory cards to record Garmin Quickdraw™ Contours mapping, record sonar (with a compatible transducer), transfer data such as waypoints and routes to another compatible chartplotter or a computer, and use the ActiveCaptain® app. This device supports up to a 32 GB microSD memory card, formatted to FAT32. Speed class 4 or greater required. Introduction 1
-
 1
1 -
 2
2 -
 3
3 -
 4
4 -
 5
5 -
 6
6 -
 7
7 -
 8
8 -
 9
9 -
 10
10 -
 11
11 -
 12
12 -
13
-
14
-
15
-
16
-
17
-
18
-
19
-
20
-
21
-
22
-
23
-
24
-
25
-
26
-
27
-
28
-
29
-
30
-
31
-
32
-
33
-
34
-
35
-
36
-
37
-
38
-
39
-
40
-
41
-
42
-
43
-
44
-
45
-
46
-
47
-
48
-
49
-
50
-
51
-
52
 |
 |
