Garmin Edge 810 Owner's Manual - Page 13
Locations - navigation
 |
View all Garmin Edge 810 manuals
Add to My Manuals
Save this manual to your list of manuals |
Page 13 highlights
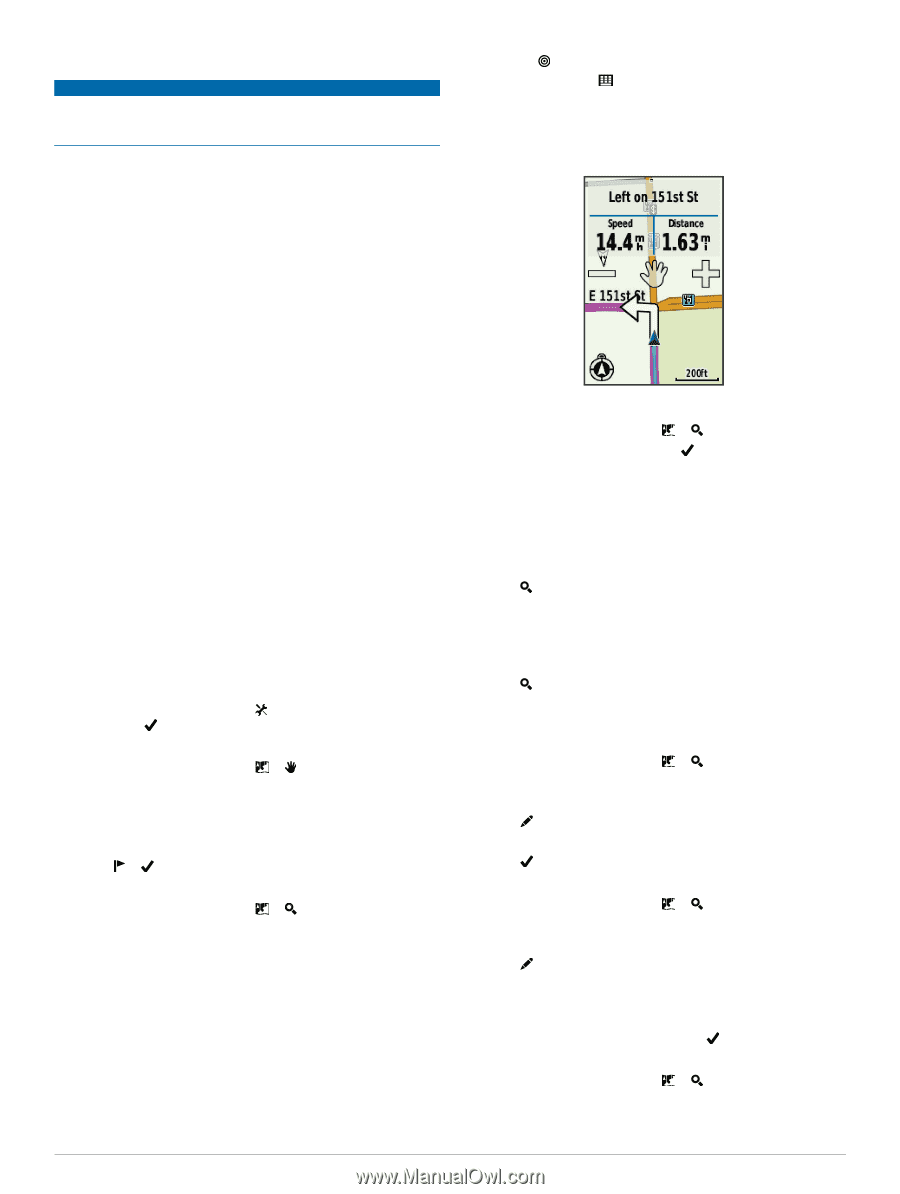
Deleting Files NOTICE If you do not know the purpose of a file, do not delete it. Your device memory contains important system files that should not be deleted. 1 Open the Garmin drive or volume. 2 If necessary, open a folder or volume. 3 Select a file. 4 Press the Delete key on your keyboard. Disconnecting the USB Cable If your device is connected to your computer as a removable drive or volume, you must safely disconnect your device from your computer to avoid data loss. If your device is connected to your Windows computer as a portable device, it is not necessary to safely disconnect. 1 Complete an action: • For Windows computers, select the Safely Remove Hardware icon in the system tray, and select your device. • For Mac computers, drag the volume icon to the trash. 2 Disconnect the cable from your computer. Navigation This section describes navigation features and settings. Navigation settings also apply to navigating courses (page 4). • Locations and finding places (page 9) • Route settings (page 10) • Optional maps (page 10) • Map settings (page 10) Locations You can record and store locations in the device. Saving Your Location You can save your present location, such as your home or parking spot. From the home screen, select > System > GPS > Mark Location > . Saving Locations from the Map 1 From the home screen, select > . 2 Browse the map for the location. 3 Select the location on the map. Location information appears at the top of the map. 4 Select the information bar at the top of the screen. 5 Select > to save the location. Navigating to a Location 1 From the home screen, select > . 2 Select an option: • Select Locations to navigate to a saved location. • Select Recent Finds to navigate to one of the last 50 locations you have found. • Select Coordinates to navigate to known coordinates. • Select All POIs (requires routable maps) to navigate to a point of interest. • Select Addresses (requires routable maps) to navigate to a specific address. • Select Intersections to navigate to the intersection of two streets. • Select Cities to navigate to a city. • Select to narrow your search. 3 If necessary, select to enter specific search information (optional for locations, POIs, and cities only). 4 Select a location. 5 Select RIDE. 6 Follow the on-screen instructions to your destination. Navigating to Known Coordinates 1 From the home screen, select > > Coordinates. 2 Enter the coordinates, and select . 3 Follow the on-screen directions to your destination. Navigating Back to Start At any point during your ride, you can return to the starting point. 1 Go for a ride (page 3). 2 During your ride, tap the screen to view the timer overlay. 3 Select > Back to Start > RIDE. The device navigates you back to the starting point of your ride. Stopping Navigation 1 Tap the screen to view the timer overlay. 2 Select > Where To > Stop Navigation. Projecting a Location You can create a new location by projecting the distance and bearing from a marked location to a new location. 1 From the home screen, select > > Locations. 2 Select a location. 3 Select the information bar at the top of the screen. 4 Select > Project Waypoint. 5 Enter the bearing and distance to the projected location. 6 Select . Editing Locations 1 From the home screen, select > > Locations. 2 Select a location. 3 Select the information bar at the top of the screen. 4 Select . 5 Select an attribute. For example, select Change Elevation to enter a known altitude for the location. 6 Enter the new information, and select . Deleting Locations 1 From the home screen, select > > Locations. 2 Select a location. 3 Select the information bar at the top of the screen. Navigation 9
-
 1
1 -
2
-
3
-
4
-
5
-
6
-
7
-
 8
8 -
 9
9 -
 10
10 -
 11
11 -
 12
12 -
 13
13 -
 14
14 -
 15
15 -
 16
16 -
 17
17 -
 18
18 -
19
-
20
-
21
-
22
 |
 |