Garmin GPSMAP 6012 Owner's Manual - Page 63
Device Configuration, Basic Device Configuration Questions, Simulator Mode
 |
View all Garmin GPSMAP 6012 manuals
Add to My Manuals
Save this manual to your list of manuals |
Page 63 highlights
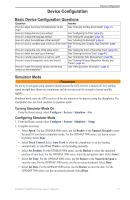
Device Configuration Device Configuration Basic Device Configuration Questions Question Answer How do I adjust the amount of detail shown on the map? See "Changing the Map Zoom Detail" (page 11). How do I change the time zone setting? See "Configuring the Time" (page 61). How do I change the language setting? See "Setting the Language" (page 58). How do I adjust the brightness of the backlight? See "Adjusting the Backlight" (page 3). How do I show a compass tape at the top of the chart? See "Showing the Compass Tape Data Bar" (page 65). How do I change the color of the active track? See "Setting the Color of the Active Track" (page 39). How do I delete the track log on the map? See "Clearing the Active Track" (page 41). How do I transfer waypoints to a memory card? See "Chartplotter Data Management" (page 69). How do I erase all waypoints, route, and tracks? See "Deleting All Saved Waypoints, Routes, and Tracks" (page 41). How do I check the software version and the map version on the chartplotter? See "Viewing System Information" (page 4). Simulator Mode WARNING Do not try to navigate using simulator mode because the GPS receiver is turned off. Any satellite signal strength bars shown are simulations and do not represent the strength of actual satellite signals. Simulator mode turns the GPS receiver off for use indoors or for practice using the chartplotter. The chartplotter does not track satellites in simulator mode. Turning Simulator Mode On From the Home screen, select Configure > System > Simulator > On. Configuring Simulator Mode 1. From the Home screen, select Configure > System > Simulator > Setup. 2. Complete an action: • Select Speed. For the GPSMAP 6000 series, use the Rocker or the Numeric Keypad to enter the speed of your boat in simulator mode. For the GPSMAP 7000 series, use the on-screen keyboard. Select Done. • Select Track Control. Select Auto Track to allow the chartplotter to set the heading automatically, or select User Track to set the heading manually. • Select Set Position. For the GPSMAP 6000 series, use the Rocker to select the simulated position of your boat. For the GPSMAP 7000 series, touch the navigation chart. Select Select. • Select Set Time. For the GPSMAP 6000 series, use the Rocker or the Numeric Keypad to enter the time. For the GPSMAP 7000 series, use the on-screen keyboard. Select Done. • Select Set Date. For the GPSMAP 6000 series, use the Rocker to enter the date. For the GPSMAP 7000 series, use the on-screen keyboard. Select Done. GPSMAP® 6000/7000 Series Owner's Manual 57
-
 1
1 -
2
-
3
-
4
-
5
-
6
-
7
-
8
-
9
-
10
-
11
-
12
-
13
-
14
-
15
-
16
-
17
-
18
-
19
-
20
-
21
-
22
-
23
-
24
-
25
-
26
-
27
-
28
-
29
-
30
-
31
-
32
-
33
-
34
-
35
-
36
-
37
-
38
-
39
-
40
-
41
-
42
-
43
-
44
-
45
-
46
-
47
-
48
-
49
-
50
-
51
-
52
-
53
-
54
-
55
-
56
-
57
-
 58
58 -
 59
59 -
 60
60 -
 61
61 -
 62
62 -
 63
63 -
 64
64 -
 65
65 -
 66
66 -
 67
67 -
 68
68 -
69
-
70
-
71
-
72
-
73
-
74
-
75
-
76
-
77
-
78
-
79
-
80
-
81
-
82
-
83
-
84
-
85
-
86
-
87
-
88
-
89
-
90
-
91
-
92
-
93
-
94
-
95
-
96
-
97
-
98
-
99
-
100
-
101
-
102
-
103
-
104
-
105
-
106
-
107
-
108
-
109
-
110
-
111
-
112
-
113
-
114
-
115
-
116
-
117
-
118
-
119
-
120
-
121
-
122
-
123
-
124
-
125
-
126
-
127
-
128
-
129
-
130
-
131
-
132
 |
 |