Gateway E-4620 6-bay mBTX Pro Hardware Reference Guide. (for computers with Wi - Page 62
Replacing the power supply
 |
View all Gateway E-4620 manuals
Add to My Manuals
Save this manual to your list of manuals |
Page 62 highlights
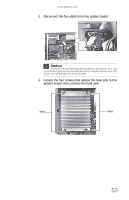
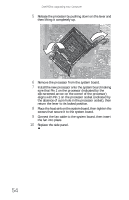
CHAPTER 4: Upgrading Your Computer 7 Push the battery release tab. The battery pops out of the socket. 8 Make sure that the positive (+) side of the new battery is facing up, then press the battery into the socket until it snaps into place. 9 Return the computer to an upright position, then replace the side panel. 10 Reconnect all external cables and the power cord. 11 Turn on your computer. 12 Open the BIOS Setup utility. 13 In the BIOS Setup utility, restore any settings that you wrote down previously. 14 Save all your settings and exit the BIOS Setup utility. Replacing the power supply To replace the power supply: 1 Remove the side panel by following the instructions in "Opening and closing the case" on page 37. 2 Disconnect the power supply cables from all components (such as hard drives, CD or DVD drives, and the system board), noting their locations and orientation. (You will reconnect the cables after you install the new power supply.) 3 Remove the three screws that secure the power supply to the computer. Screws 56
-
 1
1 -
2
-
3
-
4
-
5
-
6
-
7
-
8
-
9
-
10
-
11
-
12
-
13
-
14
-
15
-
16
-
17
-
18
-
19
-
20
-
21
-
22
-
23
-
24
-
25
-
26
-
27
-
28
-
29
-
30
-
31
-
32
-
33
-
34
-
35
-
36
-
37
-
38
-
39
-
40
-
41
-
42
-
43
-
44
-
45
-
46
-
47
-
48
-
49
-
50
-
51
-
52
-
53
-
54
-
55
-
56
-
 57
57 -
 58
58 -
 59
59 -
 60
60 -
 61
61 -
 62
62 -
 63
63 -
 64
64 -
 65
65 -
 66
66 -
 67
67 -
68
-
69
-
70
-
71
-
72
-
73
-
74
-
75
-
76
-
77
-
78
-
79
-
80
-
81
-
82
-
83
-
84
-
85
-
86
-
87
-
88
-
89
-
90
-
91
-
92
-
93
-
94
-
95
-
96
-
97
-
98
-
99
-
100
-
101
-
102
-
103
-
104
-
105
-
106
-
107
-
108
-
109
-
110
-
111
-
112
-
113
-
114
-
115
-
116
-
117
-
118
-
119
-
120
-
121
-
122
-
123
-
124
-
125
-
126
-
127
-
128
-
129
-
130
-
131
-
132
-
133
-
134
-
135
-
136
-
137
-
138
-
139
-
140
 |
 |
