Gateway LT3114u Service Guide - Page 100
Replacing the LCD Panel, Press down to secure the adhesive holding the Microphone in place.
 |
UPC - 884483848164
View all Gateway LT3114u manuals
Add to My Manuals
Save this manual to your list of manuals |
Page 100 highlights
Replacing the LCD Panel 1. Replace the LCD Panel top edge first as shown. Lower the Panel in to the LCD Module, ensuring the LCD cables are not trapped between the panel and the casing. 2. Ensure the cables and Antennas pass through the hinge wells as shown. 3. Press down to secure the adhesive holding the Microphone in place. 90 Chapter 3
-
 1
1 -
2
-
3
-
4
-
5
-
6
-
7
-
8
-
9
-
10
-
11
-
12
-
13
-
14
-
15
-
16
-
17
-
18
-
19
-
20
-
21
-
22
-
23
-
24
-
25
-
26
-
27
-
28
-
29
-
30
-
31
-
32
-
33
-
34
-
35
-
36
-
37
-
38
-
39
-
40
-
41
-
42
-
43
-
44
-
45
-
46
-
47
-
48
-
49
-
50
-
51
-
52
-
53
-
54
-
55
-
56
-
57
-
58
-
59
-
60
-
61
-
62
-
63
-
64
-
65
-
66
-
67
-
68
-
69
-
70
-
71
-
72
-
73
-
74
-
75
-
76
-
77
-
78
-
79
-
80
-
81
-
82
-
83
-
84
-
85
-
86
-
87
-
88
-
89
-
90
-
91
-
92
-
93
-
94
-
 95
95 -
 96
96 -
 97
97 -
 98
98 -
 99
99 -
 100
100 -
 101
101 -
 102
102 -
 103
103 -
 104
104 -
 105
105 -
106
-
107
-
108
-
109
-
110
-
111
-
112
-
113
-
114
-
115
-
116
-
117
-
118
-
119
-
120
-
121
-
122
-
123
-
124
-
125
-
126
-
127
-
128
-
129
-
130
-
131
-
132
-
133
-
134
-
135
-
136
-
137
-
138
-
139
-
140
-
141
-
142
-
143
-
144
-
145
-
146
-
147
-
148
-
149
-
150
-
151
-
152
-
153
-
154
-
155
-
156
-
157
-
158
-
159
-
160
-
161
-
162
-
163
-
164
-
165
-
166
-
167
-
168
-
169
-
170
-
171
-
172
-
173
-
174
-
175
-
176
-
177
-
178
-
179
-
180
 |
 |

90
Chapter 3
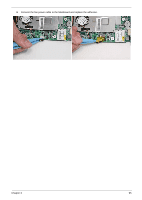
Replacing the LCD Panel
1.
Replace the LCD Panel top edge first as shown. Lower the Panel in to the LCD Module, ensuring the LCD
cables are not trapped between the panel and the casing.
2.
Ensure the cables and Antennas pass through the hinge wells as shown.
3.
Press down to secure the adhesive holding the Microphone in place.