Gateway LT3114u Service Guide - Page 118
Replacing the Card Reader Board, Place the board into the Lower Cover
 |
UPC - 884483848164
View all Gateway LT3114u manuals
Add to My Manuals
Save this manual to your list of manuals |
Page 118 highlights
2. Connect the cable to the Bluetooth Module. 3. Press on the adhesive strip to attach the cable to the Lower Cover. 4. Connect the Bluetooth cable to the Mainboard. Replacing the Card Reader Board 1. Place the board into the Lower Cover, right side first so the I/O ports align with the openings in the lower cover. 108 Chapter 3
-
 1
1 -
2
-
3
-
4
-
5
-
6
-
7
-
8
-
9
-
10
-
11
-
12
-
13
-
14
-
15
-
16
-
17
-
18
-
19
-
20
-
21
-
22
-
23
-
24
-
25
-
26
-
27
-
28
-
29
-
30
-
31
-
32
-
33
-
34
-
35
-
36
-
37
-
38
-
39
-
40
-
41
-
42
-
43
-
44
-
45
-
46
-
47
-
48
-
49
-
50
-
51
-
52
-
53
-
54
-
55
-
56
-
57
-
58
-
59
-
60
-
61
-
62
-
63
-
64
-
65
-
66
-
67
-
68
-
69
-
70
-
71
-
72
-
73
-
74
-
75
-
76
-
77
-
78
-
79
-
80
-
81
-
82
-
83
-
84
-
85
-
86
-
87
-
88
-
89
-
90
-
91
-
92
-
93
-
94
-
95
-
96
-
97
-
98
-
99
-
100
-
101
-
102
-
103
-
104
-
105
-
106
-
107
-
108
-
109
-
110
-
111
-
112
-
 113
113 -
 114
114 -
 115
115 -
 116
116 -
 117
117 -
 118
118 -
 119
119 -
 120
120 -
 121
121 -
 122
122 -
 123
123 -
124
-
125
-
126
-
127
-
128
-
129
-
130
-
131
-
132
-
133
-
134
-
135
-
136
-
137
-
138
-
139
-
140
-
141
-
142
-
143
-
144
-
145
-
146
-
147
-
148
-
149
-
150
-
151
-
152
-
153
-
154
-
155
-
156
-
157
-
158
-
159
-
160
-
161
-
162
-
163
-
164
-
165
-
166
-
167
-
168
-
169
-
170
-
171
-
172
-
173
-
174
-
175
-
176
-
177
-
178
-
179
-
180
 |
 |

108
Chapter 3
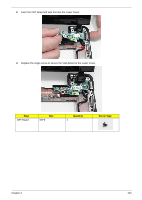
2.
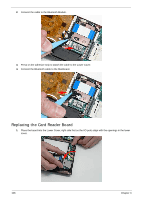
Connect the cable to the Bluetooth Module.
3.
Press on the adhesive strip to attach the cable to the Lower Cover.
4.
Connect the Bluetooth cable to the Mainboard.
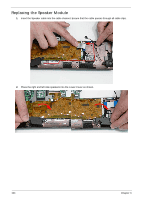
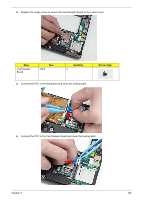
Replacing the Card Reader Board
1.
Place the board into the Lower Cover, right side first so the I/O ports align with the openings in the lower
cover.