GE JVM1790SK Service Manual - Page 22
L. Removing The Turntable Motor, M. Removing Convection Heater, Thermistor And Damper Motor,
 |
UPC - 084691123453
View all GE JVM1790SK manuals
Add to My Manuals
Save this manual to your list of manuals |
Page 22 highlights
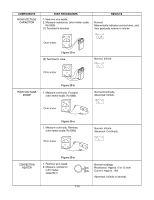
L. REMOVING THE TURNTABLE MOTOR (1) Remove the turntable. (2) Remove the turntable shaft VERY CAREFULLY with a slotted screwdriver. (Figure 21) (3) Remove the base plate by removing 7 screws securing it to the oven cavity. (Figure 22-a) (4) Disconnect the leadwire from the turntable motor terminals. (5) Remove the 2 screws securing the turntable motor to the oven cavity ASS'Y. (Figure 22-b) Figure 20 M. REMOVING CONVECTION HEATER, THERMISTOR AND DAMPER MOTOR (Figure 23) (1) Remove the outer case. (2) Remove the air duct by removing six screws securing it to the oven front plate, guide air and glasswool-L cover. (3) Disconnect the wire leads of air duct. (4) Remove the magnetron. (5) Remove the latch board assembly. (6) Remove the bottom plate by removing four screws. (7) Remove the four net screws securing chamber assembly. (8) Lift the chamber assembly from the oven cavity. (9) Remove three screws securing the heater of the chamber assembly. (10) Lift the convection heater from the chamber assembly. (11) Lift the damper motor from the chamber assembly. Figure 21-a Wire Leads Turntable Motor Figure 22-b NOTES: • Remove the leadwire from the turntable motor VERY CAREFULLY. • Be sure to grasp the connector not the wires when removing. • Warp the blade with tape to avoid scratching the cavity. 7-11 Figure 23
-
 1
1 -
2
-
3
-
4
-
5
-
6
-
7
-
8
-
9
-
10
-
11
-
12
-
13
-
14
-
15
-
16
-
 17
17 -
 18
18 -
 19
19 -
 20
20 -
 21
21 -
 22
22 -
 23
23 -
 24
24 -
 25
25 -
 26
26 -
 27
27 -
28
-
29
-
30
-
31
-
32
-
33
-
34
-
35
-
36
-
37
-
38
-
39
-
40
-
41
-
42
-
43
-
44
-
45
-
46
-
47
-
48
-
49
 |
 |
