GE JXGB90S Use and Care Manual - Page 8
Using the gas surface burners. - two burner gas module
 |
UPC - 084691143420
View all GE JXGB90S manuals
Add to My Manuals
Save this manual to your list of manuals |
Page 8 highlights
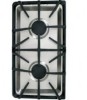
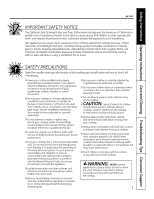
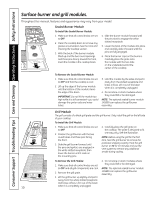
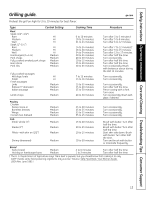
Consumer Support Troubleshooting Tips Care and Cleaning Operating Instructions Safety Instructions Using the gas surface burners. Throughout this manual, features and appearance may vary from your model. Electric Ignition Your surface burners are lit by electric ignition, eliminating the need for standing pilots with constantly burning flames. In case of a power outage, you can light the surface burners on your cooktop with a match. Hold a lit match to the burner, then turn the control knob to the high position. Use extreme caution when lighting the burners this way. Surface burners in use when an electrical power failure occurs will continue to operate normally. IN CASE OF A POWER FAILURE, THE VENTILATION SYSTEM WILL NOT OPERATE. DO NOT USE THE GRILL MODULE OR GRIDDLE IF THE VENTILATION SYSTEM IS NOT OPERATIONAL. Push the control knob down and turn it to the LITE position. How to Light a Gas Surface Burner Push the control knob down and turn it to the LITE position. You will hear a little clicking noise-the sound of the electric spark igniting the burner. After the burner ignites, turn the knob to adjust the flame size. To turn a burner off, turn the knob clockwise, as far as it will go, to the OFF position. If the flame is too low at the setting, the valve can be adjusted. Refer to Flames too high or too low at the LOW setting in the Troubleshooting Tips section. How to Select Flame Size For safe handling of cookware, never let the flames extend up the sides of the cookware. Watch the flame, not the knob, as you reduce heat. The flame size on a gas burner should match the cookware you are using. Any flame larger than the bottom of the cookware is wasted and only serves to heat the handle. If the burner has not been used recently, the flames may make a loud noise. This is normal, and it should dissipate after 4 to 5 minutes. Before Lighting a Gas Burner s Make sure all grates on the cooktop are in place before using any burner. s Only surface burners may be used on the right side. After Lighting a Gas Burner s Do not operate the burner for an s When trying to simmer delicate foods, extended period of time without use the right side of the unit for best cookware on the grate. The finish results. The LO setting on the left side on the grate may chip without is hotter to accommodate the grill cookware to absorb the heat. module. If you find that the LO setting s Check to be sure the burner you turn on is the one you want to use. is too hot, you can adjust the valve. See the Troubleshooting Tips section. s Be sure the burners and grates are cool before you place your hand, a pot holder, cleaning cloths or other materials on them. s Do not allow large pans to extend over the control knobs. Heat trapped between large pans and control knobs could cause possible damage to the control knobs. 8
-
 1
1 -
2
-
 3
3 -
 4
4 -
 5
5 -
 6
6 -
 7
7 -
 8
8 -
 9
9 -
 10
10 -
 11
11 -
 12
12 -
 13
13 -
14
-
15
-
16
-
17
-
18
-
19
-
20
-
21
-
22
-
23
-
24
-
25
-
26
-
27
-
28
-
29
-
30
-
31
-
32
-
33
-
34
-
35
-
36
-
37
-
38
-
39
-
40
-
41
-
42
-
43
-
44
-
45
-
46
-
47
-
48
-
49
-
50
-
51
-
52
-
53
-
54
-
55
-
56
-
57
-
58
-
59
-
60
-
61
-
62
-
63
-
64
-
65
-
66
-
67
-
68
-
69
-
70
-
71
-
72
-
73
-
74
-
75
-
76
-
77
-
78
-
79
-
80
 |
 |