GE PP9830SJSS Use and Care Manual - Page 21
Installation Instructions, INSTALLING THE COOKTOP, INSTALLATION INSTRUCTIONS
 |
View all GE PP9830SJSS manuals
Add to My Manuals
Save this manual to your list of manuals |
Page 21 highlights
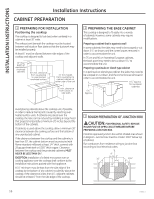
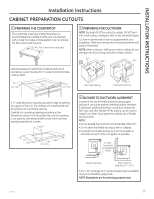
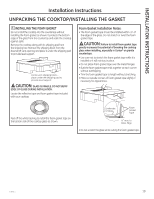
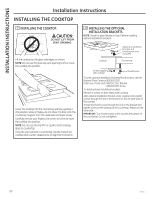
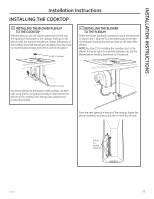
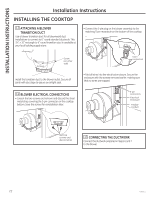
INSTALLATION INSTRUCTIONS Installation Instructions INSTALLING THE COOKTOP 11 INSTALLING THE BLOWER PLENUM TO THE COOKTOP Slide the plenum, with the blower opening on the left, into the opening in the bottom of the cooktop. Push up on the plenum until the stops on the plenum contact the bottom of the cooktop, and snap the plenum into place. (You may have to move the plenum back and forth to work it into place.) Install 2 screws 12 INSTALLING THE BLOWER TO THE PLENUM Orient the blower discharge opening to match the ductwork in Steps 6 and 7. Slide the four threaded studs on the side of the blower housing into the four holes on the side of the plenum. NOTE: See Step 13 for installing the transition duct to the blower. It may be easier to install the transition duct to the blower before installing the blower to the plenum. Install 4 screws Secure the plenum to the bottom of the cooktop, on each side, using the four (4) screws provided. Further secure the plenum to the cooktop, from the top side, using the two screws (2) provided. From the vent opening in the top of the cooktop, fasten the blower assembly securely to the plenum with four (4) nuts. 4 Nuts (7/16" socket required) 49-80635-1 21
-
 1
1 -
2
-
3
-
4
-
5
-
6
-
7
-
8
-
9
-
10
-
11
-
12
-
13
-
14
-
15
-
 16
16 -
 17
17 -
 18
18 -
 19
19 -
 20
20 -
 21
21 -
 22
22 -
 23
23 -
 24
24 -
 25
25 -
 26
26 -
27
-
28
-
29
-
30
-
31
-
32
-
33
-
34
-
35
-
36
-
37
-
38
-
39
-
40
-
41
-
42
-
43
-
44
-
45
-
46
-
47
-
48
-
49
-
50
-
51
-
52
-
53
-
54
-
55
-
56
 |
 |
