GE WSSH300GWW Owners Manual - Page 5
Control Panels, Control Settings - model
 |
UPC - 084691158936
View all GE WSSH300GWW manuals
Add to My Manuals
Save this manual to your list of manuals |
Page 5 highlights
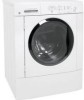
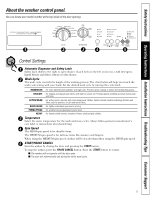
Safety Instructions Operating Instructions Installation Instructions Troubleshooting Tips Consumer Support About the washer control panel. You can locate your model number at the top inside of the door opening. 1 2 3 4 5 Control Settings 1 Automatic Dispenser and Safety Latch Safety latch slides to the right to open drawer. (Latch locks to the left on its own.) Add detergent, liquid bleach and fabric softener to this drawer. 2 Wash Cycle The wash cycle controls the length of the washing process. The chart below will help you match the wash cycle setting with your loads. Set the desired wash cycle by turning the cycle knob. HANDWASH For items labeled hand-washable with light soils. Provides gentle rocking to mimic the handwashing action. DELICATE For lingerie and special-care fabrics with light to normal soil. Provides gentle tumbling and soak during wash and rinse. ACTIVE WEAR For active sports, exercise and some casual wear clothes. Fabrics include modern technology finishes and fibers such as spandex, stretch and micro-fibers. QUICK WASH For lightly soiled items you need in a hurry. PERMA PRESS For wrinkle-free and permanent press items. HEAVY For heavily soiled cottons, household linens, work and play clothes. 3 Temperature Select the water temperature for the wash and rinse cycles. Always follow garment manufacturer's care label or instructions when laundering. 4 Spin Speed The HIGH spin speed is for durable items. The MEDIUM spin speed is for delicate items like sweaters and lingerie. When using the MEDIUM spin speed, clothes will be less dry than when using the HIGH spin speed. 5 START/PAUSE CANCEL Start the washer by closing the door and pressing the START button. To stop the washer, press the PAUSE CANCEL button. Press the START button to restart. I The washer will not operate with the door open. I The door will automatically lock during the entire wash cycle. 5
-
 1
1 -
 2
2 -
 3
3 -
 4
4 -
 5
5 -
 6
6 -
 7
7 -
 8
8 -
 9
9 -
 10
10 -
 11
11 -
12
-
13
-
14
-
15
-
16
-
17
-
18
-
19
-
20
-
21
-
22
-
23
-
24
-
25
-
26
-
27
-
28
-
29
-
30
-
31
-
32
-
33
-
34
-
35
-
36
-
37
-
38
-
39
-
40
-
41
-
42
-
43
-
44
-
45
-
46
-
47
-
48
 |
 |
