Genie ChainLift 600 Owner's Manual - Page 12
Nstallation, Header And Door, Mounting Brackets
 |
View all Genie ChainLift 600 manuals
Add to My Manuals
Save this manual to your list of manuals |
Page 12 highlights
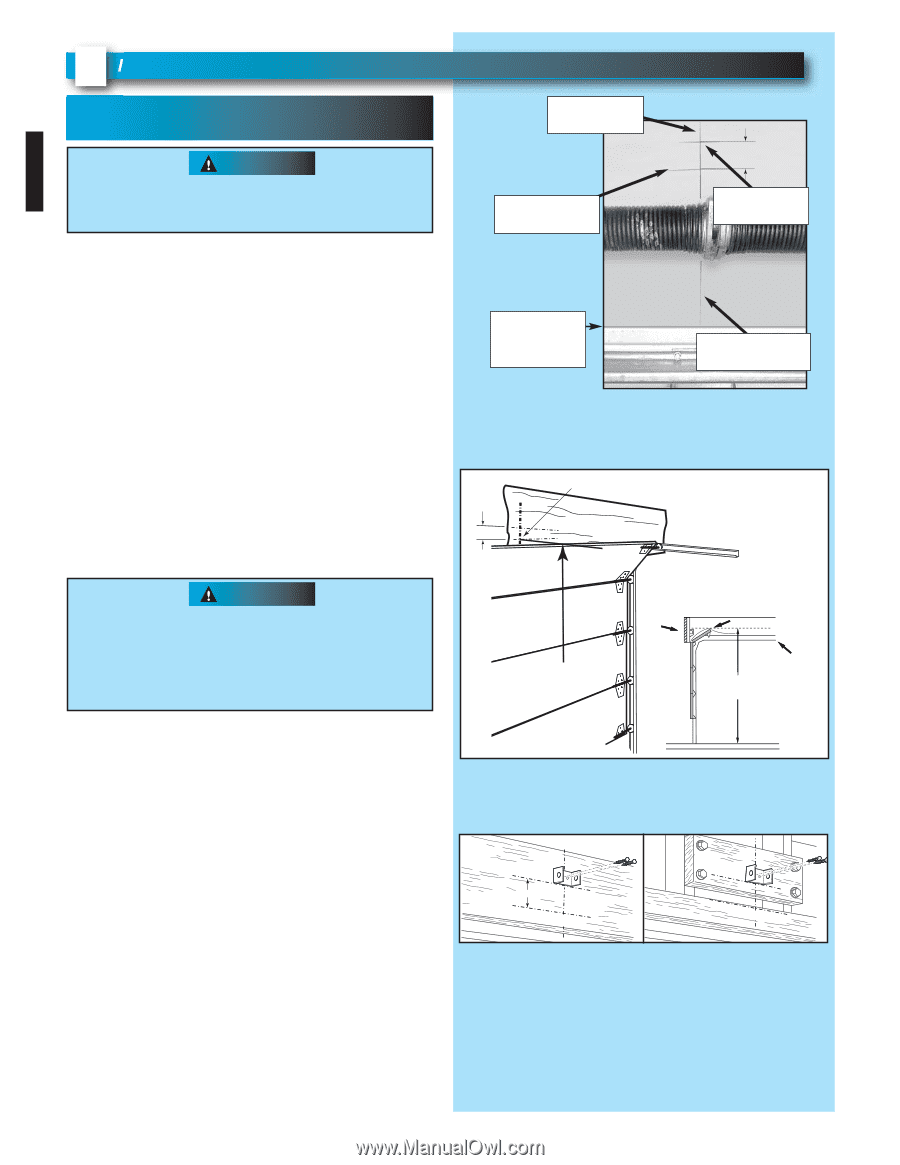
2 NSTALLATION HEADER AND DOOR MOUNTING BRACKETS: WARNING Header bracket must be fastened to garage framing. Do NOT fasten to drywall, particle board, plaster or other such materials. 1. Finding header bracket mounting location. • Close garage door. - Use a pencil and level. a) Mark center of garage door (one-half overall width) on the wall with 6" vertical line at top edge of door. b) Continue this line on wall above door for about 12" (Fig. 2-1, a). • Raise garage door until top edge of door reaches its maximum height (Fig. 2-2). • With door at highest point. - Measure height from top edge of door to floor (Fig. 2-2). • Close door again. • Mark height measurement on wall above door (Fig. 2-1, c). - Make your mark across vertical line made earlier. • Add 2-1/2" to height mark just made on wall. This is location for header bracket (Fig. 2-1, d). FOR HELP-1.800.354.3643 OR WWW.GENIECOMPANY.COM b) - extend vertical line 2-1/2" c) - door at highest point d) - final height mark top of door in closed position FIG. 2-1 Final height mark. a) - 6" vertical line 2-1/2" HIGHEST POINT OF TRAVEL HEADER TRACK WARNING Door springs are under high tension. If spring or its shaft is in the way, measure 2-1/2" above spring or shaft on the garage door centerline and mark this height as your location for header bracket. Do NOT move door spring! SECTIONAL DOOR FROM HERE TO FLOOR HEADER HIGHEST POINT OF TRAVEL SECTIONAL DOOR FROM HERE TO FLOOR TRACK NOTE: If header bracket location needs to be above header for garage door opening, you need to add a "mounting surface." A 2" x 6" board securely attached (board and fasteners not included) to wall studs on either side of your mark is sufficient (Fig. 2-3). FIG. 2-2 Finding highest point of travel. NOTE: For header bracket and bolts locate Bag 2 from Box 1. NOTE: The bolts supplied in Bag 2 are designed to be used on pressure treated lumber. 2. Mounting the header bracket. • Hold header bracket against wall (Fig. 2-3). • Position bracket as shown. - Place center on vertical line, - Bottom edge on final height line. • Mark screw hole locations on wall. • Drill 3/16" pilot holes at each screw hole mark. - Fasten header bracket with 2 lag screws (provided) (Fig. 2-3). final height mark 2 1/2" door at highest point finaml haerkight door at highest point FIG. 2-3 Header bracket mounting (on header & above header). 12 PN# 3642036534, 02/26/2010 REV. 1
-
 1
1 -
2
-
3
-
4
-
5
-
6
-
 7
7 -
 8
8 -
 9
9 -
 10
10 -
 11
11 -
 12
12 -
 13
13 -
 14
14 -
 15
15 -
 16
16 -
 17
17 -
18
-
19
-
20
-
21
-
22
-
23
-
24
-
25
-
26
-
27
-
28
-
29
-
30
 |
 |