Genie ChainLift 600 Owner's Manual - Page 22
Contact Reverse Test, Up/down Force, Erase - Open/close Travel Limit
 |
View all Genie ChainLift 600 manuals
Add to My Manuals
Save this manual to your list of manuals |
Page 22 highlights
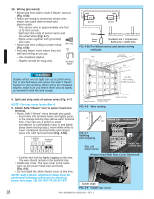
UP/DOWN FORCE 1. By turning the Close Force Control CLOSE clockwise, the CLOSE force can be increased. By turning the Close Force Control CLOSE counter-clockwise, the CLOSE force can be decreased. Set the CLOSE force level at the minimum force required to close door without reversing. 2. Once the desired level is selected, this stores the maximum force level for the CLOSE direction in memory. OPEN 3. By turning the Open Force Control clockwise, the OPEN force can be increased. By turning the Open OPEN Force Control counter-clockwise, the OPEN force can be decreased. Set the OPEN force level at the minimum force required to open door without stopping. 4. Once the desired level is selected, this stores the maximum force level for the OPEN direction in memory. ERASE - OPEN/CLOSE TRAVEL LIMIT 1. Press and hold both of the "SET" buttons ( SET & )SET together until the green indicator light blinks (about 5 seconds). 2. All close and open travel limit settings are erased. Then follow the steps on page 20 to reprogram close and open travel limits. NOTE: The opener will not close the door automatically unless the Safe-T-Beam® System is installed. FIG. 6-5 Up Force OPEN Control Adjustment FORCE (Increasing Force ROTATE CLOCKWISE (Decreasing Force CLOSE Down Force Control Adjustment ROTATE COUNTER-CLOCKWISE Force Control Adjustment. CONTACT REVERSE TEST The force adjustments and limit switch settings MUST BE COMPLETED before testing. 1. Testing. • Open garage door using wall button. - Place a 2" x 4" board (laid flat) under center of garage door opening (Fig. 6-6). • Close door using wall button. • When door contacts board, the door must stop (within 2 seconds) and reverse direction returning to open position. 2. Adjustment. • If the door does not properly reverse. - Check to see if door has "close" limit programmed. It should not have reached its "close" limit before hitting board. - If the door STOPS but does not reverse, decrease "CLOSE FORCE" control CLOSE setting slightly (turn it counter-clockwise). • Test again. Repeat as necessary until door reverses upon contacting board. FIG. 6-6 2 x 4 under center of door opening. 22 PN# 3642036534, 02/26/2010 REV. 1
-
 1
1 -
2
-
3
-
4
-
5
-
6
-
7
-
8
-
9
-
10
-
11
-
12
-
13
-
14
-
15
-
16
-
 17
17 -
 18
18 -
 19
19 -
 20
20 -
 21
21 -
 22
22 -
 23
23 -
 24
24 -
 25
25 -
 26
26 -
 27
27 -
28
-
29
-
30
 |
 |
