Genie ChainLift 600 Owner's Manual - Page 14
Door Bracket, Install Door Arms
 |
View all Genie ChainLift 600 manuals
Add to My Manuals
Save this manual to your list of manuals |
Page 14 highlights
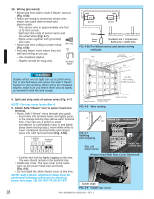
DOOR BRACKET: CAUTION Doors made of masonite, lightweight wood, fiberglass, and sheet metal must be properly braced before mounting door opener. Contact door manufacturer or distributor for a bracing kit. The Genie Company is not responsible for damage caused due to improperly braced door. NOTE: For door bracket and bolts locate Bag 4 from Box 2. 1. Finding door bracket mounting location. • Door bracket is mounted as high on door as possible along vertical centerline and NO LOWER THAN top set of rollers (Fig. 2-7). 2. Mounting the door bracket. • Proper bracing should be verified at this point. - Align door bracket centered on your vertical centerline (Fig. 2-8). - Attach using 3 self-drilling screws for sheet metal or other light weight material. - Use lag screws (not provided) for solid wooden sectional doors. centerline centerline even with or above top roller FIG. 2-7 Mounting door Bracket. centerline of top roller A B FIG. 2-8 Examples of door bracket positioning. NOTE: For solid wood doors, carriage bolts WITHOUT SLOTTED HEADS (not included) may also be used for attaching door bracket. INSTALL DOOR ARMS NOTE: For door arm nuts and bolts, clevis and cotter pins locate Bag 5 from Box 2. 1. Attach the arms. • Fasten short branch of curved door arm to door bracket using bolt and locking nut (Fig. 2-9). • Fasten straight arm to carriage using short clevis pin and cotter pin (Fig. 2-9). short clevis pin & cotter pin 2. Connecting the arms. • Slide carriage back and forth to adjust arm length. - Position the straight arm 50º down from the rail. • With the arms arranged in this position, fasten 50° arms together using bolts and nuts spaced as far apart as possible (Fig. 2-9). FIG. 2-9 Attaching door arms. bolts as far apart as possible 14 PN# 3642036534, 02/26/2010 REV. 1
-
 1
1 -
2
-
3
-
4
-
5
-
6
-
7
-
8
-
 9
9 -
 10
10 -
 11
11 -
 12
12 -
 13
13 -
 14
14 -
 15
15 -
 16
16 -
 17
17 -
 18
18 -
 19
19 -
20
-
21
-
22
-
23
-
24
-
25
-
26
-
27
-
28
-
29
-
30
 |
 |
