Gigabyte GA-2CEWH User Manual - Page 10
Step 1: Installing Processor and CPU Cooling Fan
 |
View all Gigabyte GA-2CEWH manuals
Add to My Manuals
Save this manual to your list of manuals |
Page 10 highlights
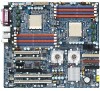
GA-2CEWH Motherboard Step 1: Installing Processor and CPU Cooling Fan Before installing the processor and cooling fan, adhere to the following cautions: 1. The processor will overheat without the heatsink and/or fan, resulting in permanent irreparable damage. 2. Never force the processor into the socket. 3. Apply thermal grease on the processor before placing cooling fan. 4. Please make sure the CPU type is supported by the motherboard. 5. If you do not match the CPU socket Pin 1 and CPU cut edge well, it will cause improper installation. Please change the insert orientation. Please use AMD approved cooling fan. Step1-1: Installing CPU Step 1. Rise the lever bar on the socket. Step 2. Aligning the pins of the processor with the socket, insert the processor into the socket. Step 3 Close the lever completely. Angling the Figure 1.Angling the rod to 65-degree maybe feel a rod to 650 kind of tight , and then continue pull the rod to 90degree when a noise "cough" made. Socket Figure 2. Pull the rod to the 90-degree directly. Actuation Lever 10
-
 1
1 -
2
-
3
-
4
-
 5
5 -
 6
6 -
 7
7 -
 8
8 -
 9
9 -
 10
10 -
 11
11 -
 12
12 -
 13
13 -
 14
14 -
 15
15 -
16
-
17
-
18
-
19
-
20
-
21
-
22
-
23
-
24
-
25
-
26
-
27
-
28
-
29
-
30
-
31
-
32
-
33
-
34
-
35
-
36
-
37
-
38
-
39
-
40
-
41
-
42
-
43
-
44
-
45
-
46
-
47
-
48
-
49
-
50
-
51
-
52
-
53
-
54
-
55
-
56
-
57
-
58
-
59
-
60
-
61
-
62
-
63
-
64
-
65
-
66
-
67
-
68
-
69
-
70
-
71
-
72
-
73
-
74
-
75
-
76
-
77
-
78
-
79
-
80
-
81
-
82
 |
 |
