Gigabyte GA-8I915P Dual Graphic Manual
Gigabyte GA-8I915P Dual Graphic Manual
 |
View all Gigabyte GA-8I915P Dual Graphic manuals
Add to My Manuals
Save this manual to your list of manuals |
Gigabyte GA-8I915P Dual Graphic manual content summary:
- Gigabyte GA-8I915P Dual Graphic | Manual - Page 1
VT6410 2 (1) Installing IDE hard drive(s) in your system 2 (2) Configuring VT6410 IDE controller mode and boot sequence in BIOS Setup 3 (3) Configuring RAID set in RAID BIOS 5 (4) Making a IDE RAID controller driver disk 10 (5) Installing IDE RAID controller driver during OS installation 12 - Gigabyte GA-8I915P Dual Graphic | Manual - Page 2
identical model and capacity). If you do not plan to create RAID with the VT6410 controller, you may prepare only one hard drive. (b) An empty formatted floppy disk. (c) Windows XP/2000 setup disk. (d) Driver CD for your motherboard. (1) Installing IDE hard drive(s) in your system Attach one end of - Gigabyte GA-8I915P Dual Graphic | Manual - Page 3
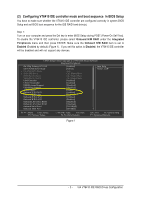
BIOS Setup and set BIOS boot sequence for the IDE RAID hard drive(s). Step 1: Turn on your computer and press the Del key to enter BIOS Set to USB Controller USB 2.0 Controller USB Keyboard Support USB Mouse Support Azalia Codec Onboard H/W RAID Onboard H/W 1394 Onboard H/W LAN1 Onboard H/W LAN2 - Gigabyte GA-8I915P Dual Graphic | Manual - Page 4
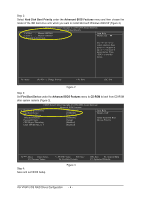
Advanced BIOS Features menu and then choose the Åé model of the IDE hard drive onto which you want to install Microsoft Windows 2000/XP (Figure BIOS Features ` Hard Disk Boot Priority First Boot Device Second Boot Device Third Boot Device Password Check CPU Hyper-Threading Limit CPUID Max. - Gigabyte GA-8I915P Dual Graphic | Manual - Page 5
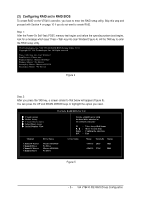
Power-On Self-Test (POST) memory test begins and before the operating system boot begins, look for a message which says "Press key into User Window"(Figure 4). Hit the TAB key to enter the RAID setup utility. VIA Technologies, Inc. VIA VT6410 RAID BIOS Setting Utility V2.11 Copyright (C) VIA - Gigabyte GA-8I915P Dual Graphic | Manual - Page 6
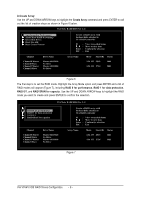
and press ENTER to call out the list of creation steps as shown in Figure 6 below. VIA Tech. RAID BIOS Ver 2.11 X Auto Setup For Performance X Array Mode RAID 0 (Striping) X Select Disk Drives X Block Size 64K X Start Create Process Channel Channel0 Master Channel0 Slave Channel1 Master Channel1 - Gigabyte GA-8I915P Dual Graphic | Manual - Page 7
selected from 4K to 64K Bytes (Figure 9). Use the arrow keys to highlight the block size you need and press ENTER. VIA Tech. RAID BIOS Ver 2.11 X Auto Setup For Performance X Array Mode RAID 0 (Stri4pKing) X Select Disk Drives 8K X Block Size 64K 16K X Start Create Process 32K 64K Create - Gigabyte GA-8I915P Dual Graphic | Manual - Page 8
select a disk array that has a boot mark (an asterisk) and press ENTER, then its boot setting will be cancelled (see Figure 11). VIA Tech. RAID BIOS Ver 2.11 X Create Array X Delete Array X Create/Delete Spare X Select Boot Array X Serial Number View The selected array will be destoried. Are you - Gigabyte GA-8I915P Dual Graphic | Manual - Page 9
. User can see the serial number of the selected drive at last column. Serial number is assigned by manufacturers of hard drives. VIA Tech. RAID BIOS Ver 2.11 X Create Array X Delete Array X Create/Delete Spare X Select Boot Array X Serial Number View View the serial number of hard disk, it is - Gigabyte GA-8I915P Dual Graphic | Manual - Page 10
, the hard disk may not be recognized during the Windows setup process. First of all, you have to copy the driver for the IDE RAID controller from the motherboard driver CD to ¤å a floppy disk. The instructions below explain how to copy the driver. Step 1: Find an available system and insert the - Gigabyte GA-8I915P Dual Graphic | Manual - Page 11
to Figure 16 will appear. Figure 16 Step 4: Insert an empty floppy disk and press H to select VIA 6410 RAID. Then it will take about one minute to copy the IDE RAID driver from the motherboard driver CD to the floppy disk. Step 5: Press 0 to exit when the procedure is completed (Figure 17). You have - Gigabyte GA-8I915P Dual Graphic | Manual - Page 12
be asked to select the IDE RAID controller on your motherboard. Windows Setup Setup could not determine the type of one or more mass storage devices installed in your system, or you have chosen to manually specify an adapter. Currently, Setup will load support for the following mass storage device - Gigabyte GA-8I915P Dual Graphic | Manual - Page 13
be found, please check the floppy disk or copy the correct IDE RAID driver again from the motherboard driver CD. "*" Please select the driver according to which of the following operating systems you want to install: Windows 2003 IA32, Windows XP, Windows 2000, or Windows NT4. - 13 - VIA VT6410 IDE - Gigabyte GA-8I915P Dual Graphic | Manual - Page 14
, you should see a screen similar to Figure 22 below. It indicates that you have installed the IDE RAID driver successfully. You can proceed with the Windows Åé 2000/XP installation. ¤¤ ¤å WindowsXP Professional Setup Welcome to Setup. This port of the Setup program prepares Microsoft
-
 1
1 -
 2
2 -
 3
3 -
 4
4 -
 5
5 -
 6
6 -
 7
7 -
8
-
9
-
10
-
11
-
12
-
13
-
14
 |
 |

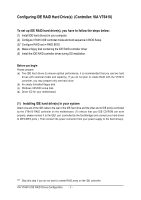
Table of Contents
Configuring IDE RAID Hard Drive(s)
(Controller: VIA VT6410)
....................................................
2
(1)
Installing IDE hard drive(s) in your system
................................................................................
2
(2)
Configuring VT6410 IDE controller mode and boot sequence
in BIOS Setup
.......................
3
(3)
Configuring RAID set in RAID BIOS
.............................................................................................
5
(4)
Making a IDE RAID controller driver disk
..................................................................................
10
(5)
Installing IDE RAID controller driver during OS installation
.....................................................
12