Gigabyte GA-8I915P Dual Graphic Manual - Page 6
A.Create Array, Create Array, RAID 0 for performance, RAID 1 for data protection, RAID 0/1, RAID
 |
View all Gigabyte GA-8I915P Dual Graphic manuals
Add to My Manuals
Save this manual to your list of manuals |
Page 6 highlights
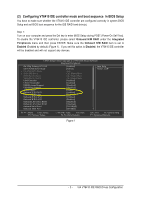
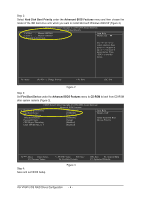
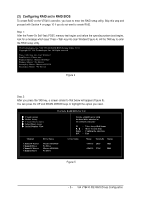
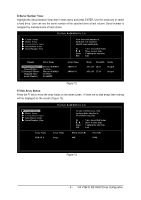
Ác A.Create Array: Use the UP and DOWN ARROW keys to highlight the Create Array command and press ENTER to call out the list of creation steps as shown in Figure 6 below. VIA Tech. RAID BIOS Ver 2.11 X Auto Setup For Performance X Array Mode RAID 0 (Striping) X Select Disk Drives X Block Size 64K X Start Create Process Channel Channel0 Master Channel0 Slave Channel1 Master Channel1 Slave Drive Name Maxtor 6E030L0 No Drive Maxtor 6E030L0 No Drive Create a RAID array with the hard disks attached to VIA RAID controller F1 : K, L : Enter : ESC : View Array/disk Status Move to next item Confirm the selection Exit Array Name Mode Size(GB) Status ATA 133 28.63 Hdd ATA 133 27.24 Hdd Figure 6 The first step is to set the RAID mode. Highlight the Array Mode option and press ENTER and a list of RAID modes will appear (Figure 7), including RAID 0 for performance, RAID 1 for data protection, RAID 0/1, and RAID SPAN for capacity. Use the UP and DOWN ARROW keys to highlight the RAID mode you want to create and press ENTER to confirm the selection. VIA Tech. RAID BIOS Ver 2.11 X Auto Setup For Data Security X ArRraAyIDM0odfeorRpAeIrDfo0rm(Satnrcipeing) X SeRleActIDis1kfoDrridvaetsa protection X BloRcAkISDiz0e/614K X StaRrAt ICDreSaPtAe NPrfocrecsaspacity Channel Channel0 Master Channel0 Slave Channel1 Master Channel1 Slave Drive Name Maxtor 6E030L0 No Drive Maxtor 6E030L0 No Drive Create a RAID array with the hard disks attached to VIA RAID controller F1 : K, L : Enter : ESC : View Array/disk Status Move to next item Confirm the selection Exit Array Name Mode Size(GB) Status ATA 133 28.63 Hdd ATA 133 27.24 Hdd Figure 7 VIA VT6410 IDE RAID Drives Configuration - 6 -
-
 1
1 -
 2
2 -
 3
3 -
 4
4 -
 5
5 -
 6
6 -
 7
7 -
 8
8 -
 9
9 -
 10
10 -
 11
11 -
 12
12 -
13
-
14
 |
 |
