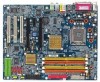
Gigabyte GA-8I915P Dual Graphic Manual - Page 14
It indicates that you have installed the IDE RAID driver successfully. You can proceed with
 |
View all Gigabyte GA-8I915P Dual Graphic manuals
Add to My Manuals
Save this manual to your list of manuals |
Page 14 highlights
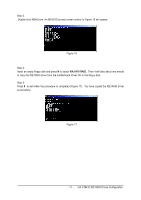
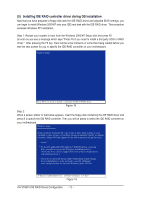
Ác After the IDE RAID driver installation is completed, you should see a screen similar to Figure 22 below. It indicates that you have installed the IDE RAID driver successfully. You can proceed with the Windows Åé 2000/XP installation. ¤¤ ¤å WindowsXP Professional Setup Welcome to Setup. This port of the Setup program prepares Microsoft(R) Windows (R) XP to run on your computer. To set up Windows XP now, press ENTER. To repair a Windows XP installation using Recovery Console, press R. To quit Setup without installing Windows XP, press F3. Enter= Continue R=Repair F3=Exit Figure 22 (Note: Each time you add a new hard drive to a RAID array, the RAID driver will have to be installed under Windows once for that hard drive. After that, the driver will not have to be installed.) VIA VT6410 IDE RAID Drives Configuration - 14 -
-
 1
1 -
2
-
3
-
4
-
5
-
6
-
7
-
8
-
 9
9 -
 10
10 -
 11
11 -
 12
12 -
 13
13 -
 14
14
 |
 |
