Gigabyte GA-8I915P Dual Graphic Manual - Page 7
Auto Setup, Select Disk Drives, Start Create Process
 |
View all Gigabyte GA-8I915P Dual Graphic manuals
Add to My Manuals
Save this manual to your list of manuals |
Page 7 highlights
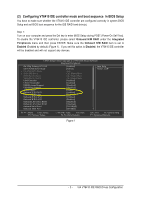
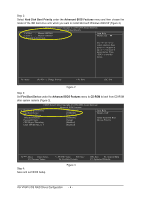
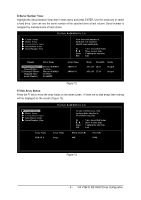
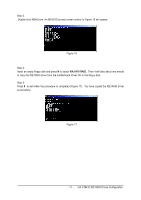
After selecting an array mode, you have to decide the way to create the array. There are two methods to create a disk array. One method is Auto Setup and the other is Select Disk Drives. Auto Setup lets BIOS select the disk drives and create array automatically but it does not duplicate the mirroring drives even user selects Create and duplicate for RAID 1 and 0+1. It is suitable when the disk drives with which you want to create an array are new ones. Select Disk Drives lets user select the array drives as required. When using the Select Disk Drives method, the channel column will be activated. Just highlight the target drives that you want to use and press ENTER to select them respectively. The selected hard drives will be marked with an asterisk (see Figure 8). VIA Tech. RAID BIOS Ver 2.11 X Auto Setup For Performance X Array Mode RAID 0 (Striping) X Select Disk Drives X Block Size 64K X Start Create Process Create a RAID array with the hard disks attached to VIA RAID controller F1 : K, L : Enter : ESC : View Array/disk Status Move to next item Confirm the selection Exit Channel [*] Channel0 Master Channel0 Slave [*] Channel1 Master Channel1 Slave Drive Name Maxtor 6E030L0 No Drive Maxtor 6E030L0 No Drive Array Name Mode Size(GB) Status ATA 133 28.63 Stripe0 ATA 133 27.24 Stripe1 Figure 8 Use the arrow keys to highlight the Block Size item and press ENTER , then a list of block size options will appear. The block size can be selected from 4K to 64K Bytes (Figure 9). Use the arrow keys to highlight the block size you need and press ENTER. VIA Tech. RAID BIOS Ver 2.11 X Auto Setup For Performance X Array Mode RAID 0 (Stri4pKing) X Select Disk Drives 8K X Block Size 64K 16K X Start Create Process 32K 64K Create a RAID array with the hard disks attached to VIA RAID controller F1 : K, L : Enter : ESC : View Array/disk Status Move to next item Confirm the selection Exit Channel [*] Channel0 Master Channel0 Slave [*] Channel1 Master Channel1 Slave Drive Name Maxtor 6E030L0 No Drive Maxtor 6E030L0 No Drive Array Name Mode Size(GB) Status ATA 133 28.63 Stripe0 ATA 133 27.24 Stripe1 Figure 9 Next, use the arrow keys to highlight Start Create Process and press ENTER to begin the creation of RAID array, then you should see a warning message which says "The data on the selected disks will be destroied. Continue? (Y/N) ]." Press Y to finish the creation, or press N to cancel the creation. The content of hard drive will be destroyed after array creation. - 7 - VIA VT6410 IDE RAID Drives Configuration
-
 1
1 -
 2
2 -
 3
3 -
 4
4 -
 5
5 -
 6
6 -
 7
7 -
 8
8 -
 9
9 -
 10
10 -
 11
11 -
 12
12 -
13
-
14
 |
 |
