Gigabyte GA-M52LT-D3P Manual - Page 77
Configuring S/PDIF In/Out
 |
View all Gigabyte GA-M52LT-D3P manuals
Add to My Manuals
Save this manual to your list of manuals |
Page 77 highlights
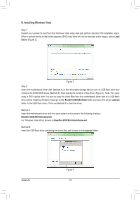
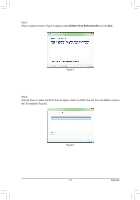
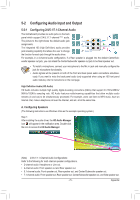
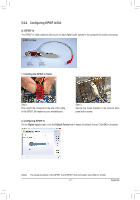
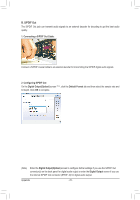
5-2-2 Configuring S/PDIF In/Out A. S/PDIF In The S/PDIF In cable (optional) allows you to input digital audio signals to the computer for audio processing. S/PDIF In Cable Optical S/PDIF In Coaxial S/PDIF In 1. Installing the S/PDIF In Cable: Step 1: First, attach the connector at the end of the cable to the SPDIF_IN header on your motherboard. Step 2: Secure the metal bracket to the chassis back panel with a screw. 2. Configuring S/PDIF In: On the Digital Input screen, click the Default Format tab to select the default format. Click OK to complete. (Note) The actual locations of the SPDIF In and SPDIF Out connectors may differ by model. - 77 - Appendix
-
 1
1 -
2
-
3
-
4
-
5
-
6
-
7
-
8
-
9
-
10
-
11
-
12
-
13
-
14
-
15
-
16
-
17
-
18
-
19
-
20
-
21
-
22
-
23
-
24
-
25
-
26
-
27
-
28
-
29
-
30
-
31
-
32
-
33
-
34
-
35
-
36
-
37
-
38
-
39
-
40
-
41
-
42
-
43
-
44
-
45
-
46
-
47
-
48
-
49
-
50
-
51
-
52
-
53
-
54
-
55
-
56
-
57
-
58
-
59
-
60
-
61
-
62
-
63
-
64
-
65
-
66
-
67
-
68
-
69
-
70
-
71
-
 72
72 -
 73
73 -
 74
74 -
 75
75 -
 76
76 -
 77
77 -
 78
78 -
 79
79 -
 80
80 -
 81
81 -
 82
82 -
83
-
84
-
85
-
86
-
87
-
88
 |
 |

- 77 -
Appendix
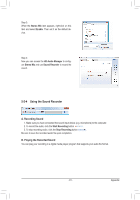
(Note)
The actual locations of the SPDIF In and SPDIF Out connectors may differ by model.
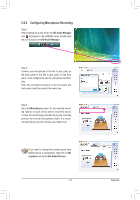
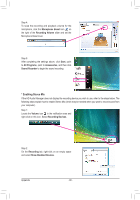
5-2-2
Configuring S/PDIF In/Out
A. S/PDIF In
The S/PDIF In cable (optional) allows you to input digital audio signals to the computer for audio processing.
1. Installing the S/PDIF In Cable:
2. Configuring S/PDIF In:
On the
Digital Input
screen, click the
Default Format
tab to select the default format. Click
OK
to complete.
S/PDIF In Cable
Optical
S/PDIF In
Coaxial
S/PDIF In
Step 1:
First, attach the connector at the end of the cable
to the SPDIF_IN header on your motherboard.
Step 2:
Secure the metal bracket to the chassis back
panel with a screw.