Gigabyte MSH61DK Manual
Gigabyte MSH61DK Manual
 |
View all Gigabyte MSH61DK manuals
Add to My Manuals
Save this manual to your list of manuals |
Gigabyte MSH61DK manual content summary:
- Gigabyte MSH61DK | Manual - Page 1
MSH61PI LGA1155 socket motherboard for Intel® Core™ i3 / Core™ i5 Core™ i7 processors/ Intel® Pentium® series processors User's Manual Rev. 1001 - Gigabyte MSH61DK | Manual - Page 2
this product, GIGABYTE provides the following types of documentations: For quick set-up of the product, read the Quick Installation Guide included with the product. For detailed product information, carefully read the User's Manual. For product-related information, check on our website at: http - Gigabyte MSH61DK | Manual - Page 3
Table of Contents Box Contents...4 MSH61PI Motherboard Layout 5 Chapter 1 Hardware Installation 7 1-1 Installation Precautions 7 1-2 Product Memory 13 1-5 Back Panel Connectors 14 1-6 Internal Connectors 16 Chapter 2 BIOS Setup 25 2-1 The Main Menu 27 2-2 Advanced Menu 29 2-2-1 - Gigabyte MSH61DK | Manual - Page 4
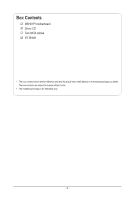
Box Contents MSH61PI motherboard Driver CD Two SATA cables I/O Shield • The box contents above are for reference only and the actual items shall depend on the product package you obtain. The box contents are subject to change without notice. • The motherboard image is for reference only. - 4 - - Gigabyte MSH61DK | Manual - Page 5
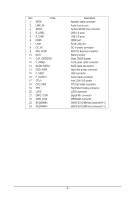
MSH61PI Motherboard Layout - 5 - - Gigabyte MSH61DK | Manual - Page 6
SODIMMB1 24 SODIMMA1 Description Speaker cable connector Audio Line In port Optical S/PDIF Out connector USB 3.0 ports USB 2.0 ports HDMI port RJ45 LAN port DC In power connector Mini PCi Express connector Battery socket Clear CMOS jumper Front panel cable connector SATA cable connectors Hard disk - Gigabyte MSH61DK | Manual - Page 7
MSH61PI LGA1155 socket motherboard for Intel® Core™ i3 / Core™ i5 Core™ i7 processors/ Intel® Pentium® series processors User's Manual Rev. 1001 - Gigabyte MSH61DK | Manual - Page 8
this product, GIGABYTE provides the following types of documentations: For quick set-up of the product, read the Quick Installation Guide included with the product. For detailed product information, carefully read the User's Manual. For product-related information, check on our website at: http - Gigabyte MSH61DK | Manual - Page 9
Table of Contents Box Contents...4 MSH61PI Motherboard Layout 5 Chapter 1 Hardware Installation 7 1-1 Installation Precautions 7 1-2 Product Specifications 8 1-3-2 Installing the CPU Cooler 11 1-4 Installing the Memory 12 1-4-1 Dual Channel Memory Configuration 12 1-4-2 Installing a Memory - Gigabyte MSH61DK | Manual - Page 10
Box Contents MSH61PI motherboard Driver CD Two SATA cables I/O Shield • The box contents above are for reference only and the actual items shall depend on the product package you obtain. The box contents are subject to change without notice. • The motherboard image is for reference only. - 4 - - Gigabyte MSH61DK | Manual - Page 11
MSH61PI Motherboard Layout - 5 - - Gigabyte MSH61DK | Manual - Page 12
SODIMMB1 24 SODIMMA1 Description Speaker cable connector Audio Line In port Optical S/PDIF Out connector USB 3.0 ports USB 2.0 ports HDMI port RJ45 LAN port DC In power connector Mini PCi Express connector Battery socket Clear CMOS jumper Front panel cable connector SATA cable connectors Hard disk - Gigabyte MSH61DK | Manual - Page 13
, carefully read the user's manual and follow these procedures: • Prior to installation, do not remove or break motherboard S/N (Serial Number) sticker or you are uncertain about any installation steps or have a problem related to the use of the product, please consult a certified computer technician. - Gigabyte MSH61DK | Manual - Page 14
Specifications CPU Chipset Memory Audio LAN ŠŠ Support for Intel® Core™ i7, Core™i5, Core™i3 processors/Intel® Pentium® processors in the LGA1155 package ŠŠ Support Up to 65W ŠŠ L3 cache varies with CPU ŠŠ Intel® H61 Express chipset ŠŠ Dual channel SODIMM DDR3 ŠŠ Support for DDR3 1333/1066 MHz - Gigabyte MSH61DK | Manual - Page 15
ŠŠ CPU/System temperature detection ŠŠ CPU fan speed detection ŠŠ 1 x 64 Mbit flash ŠŠ AMI BIOS Form Factor ŠŠ Mini ITX Form Factor; 170cm x 170cm * GIGABYTE reserves the right to make any changes to the product specifications and product-related information without prior notice. - 9 - Hardware - Gigabyte MSH61DK | Manual - Page 16
B. Follow the steps below to correctly install the CPU into the motherboard CPU socket. Before installing the CPU, make sure to turn off the computer and unplug the power cord from the power outlet power plug to - Gigabyte MSH61DK | Manual - Page 17
that the Male and Female push pins are joined closely. (Refer to your CPU cooler installation manual for instructions on installing the cooler.) Step 5: After the installation, check the back of the motherboard. If the push pin is inserted as the picture above shows, the installation is complete - Gigabyte MSH61DK | Manual - Page 18
motherboard supports the memory. It is recommended that memory of the same capacity, brand, speed, and chips be used. (Go to GIGABYTE's website for the latest supported motherboard provides two DDR3 memory sockets and supports Dual Channel Technology. After the memory is installed, the BIOS will - Gigabyte MSH61DK | Manual - Page 19
computer and unplug the power cord from the power outlet to prevent damage to the memory module. Be sure to install DDR3 DIMMs on this motherboard. Installation Step: Installation Step: Step 1. Align the memory with the DIMM module and insert the DIMM memory module into the DIM slot. Please note - Gigabyte MSH61DK | Manual - Page 20
of the LAN port LEDs. HDMI Port The HDMI (High-Definition Multimedia Interface) provides an all-digital audio/video interface to transmit the uncompressed audio/video signals and is HDCP compliant. Connect the HDMI audio/video device to this port. The HDMI Technology can support a maximum resolution - Gigabyte MSH61DK | Manual - Page 21
Connection/ Speed LED Activity LED LAN Port Connection/Speed LED: State Orange Green Off Description 1 to a back panel connector, first remove the cable from your device and then remove it from the motherboard. • When removing the cable, pull it straight out from the connector. Do not rock it side - Gigabyte MSH61DK | Manual - Page 22
devices. • After installing the device and before turning on the computer, make sure the device cable has been securely attached to the connector on the motherboard. - 16 - Hardware Installation - Gigabyte MSH61DK | Manual - Page 23
cathode(-) Power LED- Power LED Signal cathode(-) GND Ground Power Switch+ Power Button anode (+) RST Reset Button GND Ground LED_WLAN Wireless LAN active LED Signal anode (+) NA No Connect PCH_GPIO1 Brigtness up Button Signal PCH_GPIO6 Brigtness down Button Signal The front panel design - Gigabyte MSH61DK | Manual - Page 24
SATA 3Gb/s Connectors) The SATA connectors conform to SATA 3Gb/s standard and are compatible with SATA 1.5Gb/s standard. Each SATA connector supports a single SATA device. SATA2 7 SATA1 1 Pin No. 1 2 3 4 5 6 7 Definition GND TXP TXN GND RXN RXP GND 3) HDD_PWR (HDD Power Connector) 5 1 Pin No - Gigabyte MSH61DK | Manual - Page 25
5) CLR_PWD F_PANEL DPVRM F_AUDIO (Front Panel Audio Header) The front panel audio header supports Intel High Definition audio (HD) and AC'97 audio. You may connect your between the Smart module Card Reader connector and the motherboard header will make the device unable to work or even - Gigabyte MSH61DK | Manual - Page 26
design. When connecting a fan cable, be sure to connect it in the correct orientation (the black connector wire is the ground wire). The motherboard supports CPU fan speed control, which requires the use of a CPU fan with fan speed control design. For optimum heat dissipation, it is recommended - Gigabyte MSH61DK | Manual - Page 27
8) LVDS (LVDS Headers) LVDS stands for Low-voltage differential signaling, which uses high-speed analog circuit techniques to provide multigigabit data transfers on copper interconnects and is a generic interface standard for high-speed data transmission. Pin No. 1 2 3 4 5 6 7 8 9 10 11 12 13 14 15 - Gigabyte MSH61DK | Manual - Page 28
9) DMIC_CON (DMIC Headers) 1 Pin No. Definition 1 Power 2 DMICDATA 3 GND 4 4 DMICCLK 10) WEB_CON (WebCAM Headers) 1 Pin No. Definition 1 Power 2 USB D- 3 USB D+ 4 4 GND Hardware Installation - 22 - - Gigabyte MSH61DK | Manual - Page 29
4 Definition Speaker OUT LSpeaker OUT L+ Speaker OUT R+ Speaker OUT R- 12) BAT (Battery) The battery provides power to keep the values (such as BIOS configurations, date, and time information) in the CMOS when the computer is turned off. Replace the battery when the battery voltage drops to a low - Gigabyte MSH61DK | Manual - Page 30
the jumper. Failure to do so may cause damage to the motherboard. • After system restart, go to BIOS Setup to load factory defaults (select Load Optimized Defaults) or manually configure the BIOS settings (refer to Chapter 2, "BIOS Setup," for BIOS configurations). Hardware Installation - 24 - - Gigabyte MSH61DK | Manual - Page 31
or to activate certain system features. When the power is turned off, the battery on the motherboard supplies the necessary power to the CMOS to keep the configuration values in the CMOS. To access the BIOS Setup program, press the key during the POST when the power is turned on. To - Gigabyte MSH61DK | Manual - Page 32
the profile you wish to load, then press to complete. Advanced This setup page includes all the items of AMI BIOS special enhanced features. (ex: Auto detect fan and temperature status, automatically configure hard disk parameters.) Chipset Northbridge and Southbridge additional features - Gigabyte MSH61DK | Manual - Page 33
2-1 The Main Menu Once you enter the BIOS Setup program, the Main Menu (as shown below) appears on the screen. Use arrow keys stable as usual, select the Restore Defaults item to set your system to its defaults. • The BIOS Setup menus described in this chapter are for reference only and may differ by - Gigabyte MSH61DK | Manual - Page 34
version of the processor. Compliency Display compliency information. Project Version Display version number of the project. BIOS Build Date and Time Displays the date and time when the BIOS setup utility was created. MAC Address Displays the MAC address information. Total Memory Determines how much - Gigabyte MSH61DK | Manual - Page 35
Disabled. Launch Storage OPROM Enable/Disable Boot Option for Legacy Mass Storage device with option ROM. Options available: Enabled/Disabled. Default setting is Enabled. - 29 - BIOS Setup - Gigabyte MSH61DK | Manual - Page 36
2-2-1 ACPI Settings Enable ACPI Auto Configuration Enable/Disable BIOS ACPI Auto Configuration. Options available: Enabled/Disabled. Default setting is Disabled. Enable Hibernation /Disable Lock Legacy Resources. Options available: Enabled/Disabled. Default setting is Disabled. - 30 - BIOS Setup - Gigabyte MSH61DK | Manual - Page 37
2-2-2 CPU Configuration BIOS Setup - 31 - - Gigabyte MSH61DK | Manual - Page 38
This category includes all the information of CPU Speed and supported 64-Bit information. Hyper Threading The Intel Hyper Threading Technology allows a single processor to execute two or more , the OS Power Manager is responsible for coordinating the P-state among logical BIOS Setup - 32 - - Gigabyte MSH61DK | Manual - Page 39
Options available: HW_ALL/SW_ALL/SW_ANY. Default setting is HW_ALL. CPU C3/C6 Support (Note) Allows you to determine whether to let the CPU enter C3/C6 a CPU that supports this feature. For more information about Intel CPUs' unique features, please visit Intel's website. BIOS Setup - 33 - - Gigabyte MSH61DK | Manual - Page 40
2-2-2-1 Socket 0 CPU Information Spcket 0 CPU Information: The Socket 0 CPU information submenu is a simple display page for the installed processor ID information. Items on this window are non-configurable. BIOS Setup - 34 - - Gigabyte MSH61DK | Manual - Page 41
improper information for this category. Hard drive information should be labeled on the outside device casing. Enter the appropriate option based on this information. - 35 - BIOS Setup - Gigabyte MSH61DK | Manual - Page 42
available: Auto/Disabled. Default setting is Auto. S.M.A.R.T Mode This option enables/disables support for the hard disk's S.M.A.R.T. capability. The S.M.A.R.T. (Self Monitoring Analysis And Reporting) technology is supported by all current hard disks and it allows the early prediction and warning - Gigabyte MSH61DK | Manual - Page 43
2-2-4 Acoustic Management Configuration Automatic Acoustic Management Enable/Disable Automatic Acoustic Management function. Option available: Enabled/Disabled. Default setting is Disabled. BIOS Setup - 37 - - Gigabyte MSH61DK | Manual - Page 44
/ 1380x1050 LVDS/1920x1200 LVDS/1280x800 LVDS/1280x600 LVDS/ 2048x1536 LVDS Panel Scaling Options available: Auto/Force Scaling/Off. Backlight Control Support Options available: Both BLC & BIA Disabled/BLC Enabled. BIA Conttol Options available: VBIOS Default/Disabled/Level 1/Level 2/Level 3/Level - Gigabyte MSH61DK | Manual - Page 45
-B/SECAM-D/SECAM-G/SECAM-H/SECAM-K/1080i59/1080i60/ 33K 576i @50Hz/31K 576p @50Hz/ 1080i50/1080p50/720p59/720p60/480p60/480p59/480i60/480i59/1 080p60/1080p59/1080i60/1080i59 - 39 - BIOS Setup - Gigabyte MSH61DK | Manual - Page 46
2-2-6 Intel TXT(LT) Configuration Intel TXT(LT) Configuration The Intel Trusted Execution Technology (TXT) submenu is a display page for the Intel TXT information. Items on this window are non-configurable. - 40 - BIOS Setup - Gigabyte MSH61DK | Manual - Page 47
the information of installed USB devices in the system. Legacy USB Support Enables or disables support for legacy USB devices. Options available: Auto/Enabled/Disabled. Default . When this item is set to Manual, you can press numeric keys to configure desired values. Options available: Auto - Gigabyte MSH61DK | Manual - Page 48
2-2-8 Super IO Configuration Super IO Configuration The Super IO Configuration submenu is a display page for the Super IO chipset information. Items on this window are non-configurable. - 42 - BIOS Setup - Gigabyte MSH61DK | Manual - Page 49
on this window are non-configurable. System Temperature/CPU Temperature Displays current CPU and System temperature. FAN1 Speed (RPM) Displays current CPU fan speed. - 43 - BIOS Setup - Gigabyte MSH61DK | Manual - Page 50
. Watchdog Timer Enable/Disable Watchdog timer function. Options available: Enabled/Disabled. Default setting is Disabled. OS Watchdog Timer Press numeric key to adjust desire values. BIOS Watchdog Timer Press numeric key to adjust desire values - Gigabyte MSH61DK | Manual - Page 51
2-3 Chipset Menu - 45 - BIOS Setup - Gigabyte MSH61DK | Manual - Page 52
available: Enabled/Disabled. Default setting is Enabled. VT-d Enable/Disable Intel VD-d Technology function. Options available: Enabled/Disabled. Default setting is Disabled. Iniate Graphic Adapter Select device. Options available: Enabled/Disabled. Default setting is Enabled. - 46 - BIOS Setup - Gigabyte MSH61DK | Manual - Page 53
available: Enabled/Disabled. Default setting is Disabled. MRC Message Print Enable/Disable Print Message Initialize message. Options available: Enabled/Disabled. Default setting is Disabled. - 47 - BIOS Setup - Gigabyte MSH61DK | Manual - Page 54
2-3-2 South Bridge - 48 - BIOS Setup - Gigabyte MSH61DK | Manual - Page 55
S5 Deep Sx configuration. If this item set to enabled, the WOL from S5 will be disabled. Note: Mobile platforms support Deep S4/S5 in DC only and Desktop platforms support Deep S4/S5 in AC only. Options available: Disabled/Enabled in S5/Enabled in S4 and S5. Default setting is Enabled - Gigabyte MSH61DK | Manual - Page 56
/Disabled. Default setting is Enabled. USB Port Group #0/1/2/3 Enable/Dsiable specific USB Port in the chipset. Options available: Enabled/Disabled. Default setting is Enabled. - 50 - BIOS Setup - Gigabyte MSH61DK | Manual - Page 57
2-3-3 ME Subsystem - 51 - BIOS Setup - Gigabyte MSH61DK | Manual - Page 58
ICC Profile Index Display Current ICC Profile Index information. ICC Enabled Enable/Disable Integrated Clock Chip. Options available: Enabled/Disabled. Default setting is Disabled. - 52 - BIOS Setup - Gigabyte MSH61DK | Manual - Page 59
. Default setting is Enabled. CSM16 Module Version Displays the CSM16 Module Version information. GateA20 Active Upon Request: GA20 can be disabled using BIOS services. Always: do not allow disabling GA20; this option is useful when any RT code is executed above 1MB. Options available: Upon Request - Gigabyte MSH61DK | Manual - Page 60
Option ROM Messages Set display mode for Option ROM. Options available: Force BIOS/Keep Current . Default setting is Force BIOS. Interrupt 19 Capture Enable/Disable Interrupt 19 Capture Options available: Enabled/Disabled. Default setting is Disabled. - 54 - BIOS Setup - Gigabyte MSH61DK | Manual - Page 61
, System Date, and Set User Password fields. AdministratorPassword Press Enter to configure the Administrator password. User Password Press Enter to configure the user password. - 55 - BIOS Setup - Gigabyte MSH61DK | Manual - Page 62
any changes. Options available: Yes/No. Save Changes Active this option to save all the changes. Discard Changes Discards changes made and close the BIOS setup. Save as User Default Press on this item and then press the key to load user default settings. Options available: Yes/No - Gigabyte MSH61DK | Manual - Page 63
Options available: Yes/No. Restore as User Defaults Press on this item and then press the key to restore user default settings. Options available: Yes/No. Launch EFI Shell from filesystem device Press on this item to Launch EFI Shell from filesystem device. BIOS Setup - 57 -
-
 1
1 -
 2
2 -
 3
3 -
 4
4 -
 5
5 -
 6
6 -
 7
7 -
8
-
9
-
10
-
11
-
12
-
13
-
14
-
15
-
16
-
17
-
18
-
19
-
20
-
21
-
22
-
23
-
24
-
25
-
26
-
27
-
28
-
29
-
30
-
31
-
32
-
33
-
34
-
35
-
36
-
37
-
38
-
39
-
40
-
41
-
42
-
43
-
44
-
45
-
46
-
47
-
48
-
49
-
50
-
51
-
52
-
53
-
54
-
55
-
56
-
57
-
58
-
59
-
60
-
61
-
62
-
63
 |
 |

MSH61PI
LGA1155 socket motherboard for Intel
®
Core
™
i3 / Core
™
i5
Core
™
i7 processors/ Intel
®
Pentium
®
series processors
User's Manual
Rev. 1001