Gigabyte T1125P Manual - Page 17
Left View, 3 Right View - pro
 |
View all Gigabyte T1125P manuals
Add to My Manuals
Save this manual to your list of manuals |
Page 17 highlights
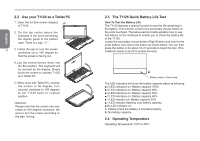
1.2 Left View 1.3 Right View T1125 SERIES USER'S MANUAL English 1 2 3 4 56 # Icon 1 2 3 4 5 6 / eSATA Item Description DC-in Jack Connects to an AC adapter. Ethernet Port Connects to an Ethernet 10/100/1000 Base-T Docking Port Connects to the Docking station for extension functions. External Display Connects to a display device such as (VGA) port external monitor or LCD projector. The combo port doubles as an eSATA\USB 2.0 eSATA and a USB port allowing USB Combo Port devices and External Hard Drives to be connected using just one port. Power Button Turns the computer on and off. 12 3 45 3 # Icon Item Description To activate the Function Key a) During the off mode, press "Fn" button to enter "Smart Setup" menu. You can choose BIOS Setup 1 Function Key Utility, System Recovery, and other functions in this setup menu. b) In the Windows operation system, press "Fn" button to initiate "Smart Manager". Supports Secure Digital (SD), 2 Multi Card Reader Multi Media Card (MMC), Memory Stick (MS), Memory Stick PRO (MS PRO) card. Connects to USB devices such as USB 3 USB Port mouse, USB printers and USB external HDD. 4 HDMI Port Supports high definition digital video connections. 5 Kensington Lock Connects computer to a Kensington-compatible security lock.
-
 1
1 -
2
-
3
-
4
-
5
-
6
-
7
-
8
-
9
-
10
-
11
-
 12
12 -
 13
13 -
 14
14 -
 15
15 -
 16
16 -
 17
17 -
 18
18 -
 19
19 -
 20
20 -
 21
21 -
 22
22 -
23
-
24
-
25
-
26
-
27
-
28
-
29
-
30
-
31
-
32
-
33
-
34
-
35
-
36
-
37
-
38
 |
 |
