Gigabyte X299-WU8 User Manual - Page 120
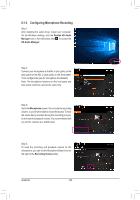
C. Configuring Sound Effect, B. Enabling Smart Headphone Amp
 |
View all Gigabyte X299-WU8 manuals
Add to My Manuals
Save this manual to your list of manuals |
Page 120 highlights
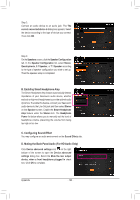
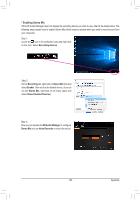
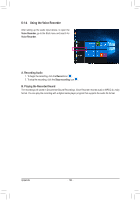
Step 2: Connect an audio device to an audio jack. The The current connected device is dialog box appears. Select the device according to the type of device you connect. Then click OK. Step 3: On the Speakers screen, click the Speaker Configuration tab. In the Speaker Configuration list, select Stereo, Quadraphonic, 5.1 Speaker, or 7.1 Speaker according to the type of speaker configuration you wish to set up. Then the speaker setup is completed. B. Enabling Smart Headphone Amp The Smart Headphone Amp feature automatically detects impedance of your head-worn audio device, whether earbuds or high-end headphones to provide optimal audio dynamics. To enable this feature, connect your head-worn audio device to the Line Out jack and then select Stereo on the Speaker screen. Enable the Smart Headphone Amp feature under the Stereo item. The Headphone Power list below allows you to manually set the level of headphone volume, preventing the volume from being too high or too low. C. Configuring Sound Effect You may configure an audio environment on the Sound Effects tab. D. Muting the Back Panel Audio (For HD Audio Only) Click Device advanced settings icon on the right bottom of the screen to open the Device advanced settings dialog box. Select the Mute the rear output device, when a front headphone plugged in check box. Click OK to complete. Appendix - 120 -
-
 1
1 -
2
-
3
-
4
-
5
-
6
-
7
-
8
-
9
-
10
-
11
-
12
-
13
-
14
-
15
-
16
-
17
-
18
-
19
-
20
-
21
-
22
-
23
-
24
-
25
-
26
-
27
-
28
-
29
-
30
-
31
-
32
-
33
-
34
-
35
-
36
-
37
-
38
-
39
-
40
-
41
-
42
-
43
-
44
-
45
-
46
-
47
-
48
-
49
-
50
-
51
-
52
-
53
-
54
-
55
-
56
-
57
-
58
-
59
-
60
-
61
-
62
-
63
-
64
-
65
-
66
-
67
-
68
-
69
-
70
-
71
-
72
-
73
-
74
-
75
-
76
-
77
-
78
-
79
-
80
-
81
-
82
-
83
-
84
-
85
-
86
-
87
-
88
-
89
-
90
-
91
-
92
-
93
-
94
-
95
-
96
-
97
-
98
-
99
-
100
-
101
-
102
-
103
-
104
-
105
-
106
-
107
-
108
-
109
-
110
-
111
-
112
-
113
-
114
-
 115
115 -
 116
116 -
 117
117 -
 118
118 -
 119
119 -
 120
120 -
 121
121 -
 122
122 -
 123
123 -
 124
124 -
 125
125 -
126
-
127
-
128
-
129
-
130
-
131
-
132
-
133
-
134
-
135
-
136
 |
 |
