Gigabyte X299-WU8 User Manual - Page 87
IntelR Virtual RAID on CPU, Peripherals\IntelR Virtual RAID
 |
View all Gigabyte X299-WU8 manuals
Add to My Manuals
Save this manual to your list of manuals |
Page 87 highlights
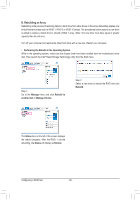
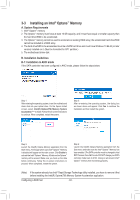
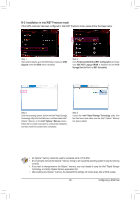
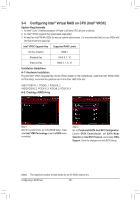
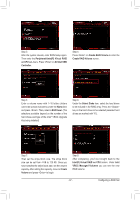
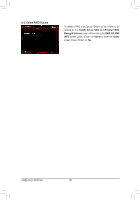
Step 3: After the system reboots, enter BIOS Setup again. Then enter the Peripherals\Intel(R) Virtual RAID on CPU sub-menu. Press on All Intel VMD Controller. Step 4: Press on Create RAID Volume to enter the Create RAID Volume screen. Step 5: Enter a volume name with 1~16 letters (letters cannot be special characters) under the Name item and press . Then, select a RAID level. (The selections available depend on the number of the hard drives and type of the Intel® VROC Upgrade Key being installed) Step 6: Under the Select Disks item, select the hard drives to be included in the RAID array. Press the key on the hard drives to be selected (selected hard drives are marked with "X"). Step 7: Then set the stripe block size. The stripe block size can be set from 4 KB to 128 KB. Once you have selected the stripe block size, set the volume capacity. After setting the capacity, move to Create Volume and press to begin. Step 8: After completing, you'll be brought back to the Intel(R) Virtual RAID on CPU screen. Under Intel VROC Managed Volumes you can see the new RAID volume. - 87 - Configuring a RAID Set
-
 1
1 -
2
-
3
-
4
-
5
-
6
-
7
-
8
-
9
-
10
-
11
-
12
-
13
-
14
-
15
-
16
-
17
-
18
-
19
-
20
-
21
-
22
-
23
-
24
-
25
-
26
-
27
-
28
-
29
-
30
-
31
-
32
-
33
-
34
-
35
-
36
-
37
-
38
-
39
-
40
-
41
-
42
-
43
-
44
-
45
-
46
-
47
-
48
-
49
-
50
-
51
-
52
-
53
-
54
-
55
-
56
-
57
-
58
-
59
-
60
-
61
-
62
-
63
-
64
-
65
-
66
-
67
-
68
-
69
-
70
-
71
-
72
-
73
-
74
-
75
-
76
-
77
-
78
-
79
-
80
-
81
-
 82
82 -
 83
83 -
 84
84 -
 85
85 -
 86
86 -
 87
87 -
 88
88 -
 89
89 -
 90
90 -
 91
91 -
 92
92 -
93
-
94
-
95
-
96
-
97
-
98
-
99
-
100
-
101
-
102
-
103
-
104
-
105
-
106
-
107
-
108
-
109
-
110
-
111
-
112
-
113
-
114
-
115
-
116
-
117
-
118
-
119
-
120
-
121
-
122
-
123
-
124
-
125
-
126
-
127
-
128
-
129
-
130
-
131
-
132
-
133
-
134
-
135
-
136
 |
 |
