Gigabyte X299X AORUS MASTER User Manual - Page 70
C-2. Configuring Legacy RAID ROM, CSM Support, Enabled, Storage Boot Option Control, Legacy
 |
View all Gigabyte X299X AORUS MASTER manuals
Add to My Manuals
Save this manual to your list of manuals |
Page 70 highlights
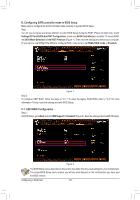
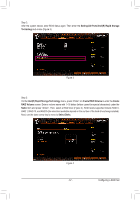
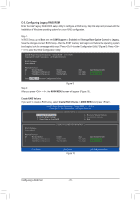
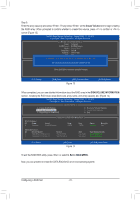
C-2. Configuring Legacy RAID ROM Enter the Intel® legacy RAID BIOS setup utility to configure a RAID array. Skip this step and proceed with the installation of Windows operating system for a non-RAID configuration. Step 1: In BIOS Setup, go to Boot and set CSM Support to Enabled and Storage Boot Option Control to Legacy. Save the changes and exit BIOS Setup. After the POST memory test begins and before the operating system boot begins, look for a message which says "Press to enter Configuration Utility" (Figure 9). Press + to enter the RAID Configuration Utility. Intel(R) Rapid Storage Technology - Option ROM - 17.5.0.4136 Copyright (C) Intel Corporation. All Rights Reserved. RAID Volumes : None defined. Physical Devices : ID Device Model 1 TOSHIBA DT01ACA1 2 TOSHIBA DT01ACA1 Serial # 763Z67WFS 763ZM7MFS Size 931.5GB 931.5GB Type/Status(Vol ID) Non-RAID Disk Non-RAID Disk Press to enter Configuration Utility... Figure 9 Step 2: After you press + , the MAIN MENU screen will appear (Figure 10). Create RAID Volume If you want to create a RAID array, select Create RAID Volume in MAIN MENU and press . Intel(R) Rapid Storage Technology - Option ROM - 17.5.0.4136 Copyright (C) Intel Corporation. All Rights Reserved. 1. Create RAID Volume 2. Delete RAID Volume 3. Reset Disks to Non-RAID [ MAIN MENU ] 4. Recovery Volume Options 5. Acceleration Options 6. Exit RAID Volumes : None defined. Physical Deivces : ID Device Model 1 TOSHIBA DT01ACA1 2 TOSHIBA DT01ACA1 [ DISK/VOLUME INFORMATION ] Serial # 763Z67WFS 763ZM7MFS Size 931.5GB 931.5GB Type/Status(Vol ID) Non-RAID Disk Non-RAID Disk [hi]-Select [ESC]-Exit Figure 10 [ENTER]-Select Menu Configuring a RAID Set - 70 -
-
 1
1 -
2
-
3
-
4
-
5
-
6
-
7
-
8
-
9
-
10
-
11
-
12
-
13
-
14
-
15
-
16
-
17
-
18
-
19
-
20
-
21
-
22
-
23
-
24
-
25
-
26
-
27
-
28
-
29
-
30
-
31
-
32
-
33
-
34
-
35
-
36
-
37
-
38
-
39
-
40
-
41
-
42
-
43
-
44
-
45
-
46
-
47
-
48
-
49
-
50
-
51
-
52
-
53
-
54
-
55
-
56
-
57
-
58
-
59
-
60
-
61
-
62
-
63
-
64
-
 65
65 -
 66
66 -
 67
67 -
 68
68 -
 69
69 -
 70
70 -
 71
71 -
 72
72 -
 73
73 -
 74
74 -
 75
75 -
76
-
77
-
78
-
79
-
80
-
81
-
82
-
83
-
84
-
85
-
86
-
87
-
88
-
89
-
90
-
91
-
92
-
93
-
94
-
95
-
96
-
97
-
98
-
99
-
100
-
101
-
102
-
103
-
104
-
105
-
106
-
107
-
108
-
109
-
110
-
111
-
112
-
113
-
114
-
115
-
116
-
117
-
118
-
119
-
120
-
121
-
122
-
123
-
124
-
125
-
126
-
127
-
128
-
129
-
130
-
131
-
132
 |
 |