Gigabyte X299X AORUS MASTER User Manual - Page 80
B-2: Installation in Intel RST Premium mode, Support, USE RST Legacy OROM, PCIe Storage Dev on Port
 |
View all Gigabyte X299X AORUS MASTER manuals
Add to My Manuals
Save this manual to your list of manuals |
Page 80 highlights
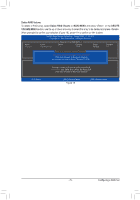
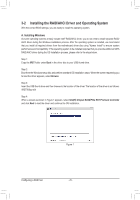
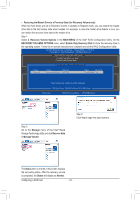
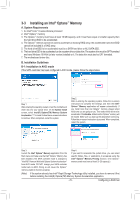
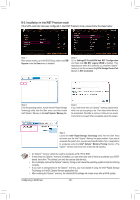
B-2: Installation in Intel RST Premium mode If the SATA controller has been configured in Intel RST Premium mode, please follow the steps below: Step 1: After system restarts, go to the BIOS Setup, make sure CSM Support under the Boot menu is disabled. Step 2: Go to Settings\IO Ports\SATA And RST Configuration and make sure USE RST Legacy OROM is disabled. Then depending on which M.2 connector you install the Optane™ memory in, set the corresponding PCIe Storage Dev on Port XX item to RST Controlled. Step 3: Enter the operating system, launch the Intel® Rapid Storage Technology utility from the Start menu, and then enable Intel® Optane™ Memory on the Intel® Optane™ Memory tab. Step 4: If you install more than one Optane™ memory, please select which one you are going to use. Then select which drive to be accelerated. Click Yes to continue. Follow the on-screen instructions to proceed. When completed, restart the system. Step 5: Launch the Intel® Rapid Storage Technology utility from the Start menu and make sure the Intel® Optane™ Memory has been enabled. If you want to accelerate the system drive, you can select specific folders, files, or applications to accelerate using the Intel® Optane™ Memory Pinning function. (The Optane™ memory used must have at least 32 GB capacity.) •• An Optane™ memory cannot be used to accelerate an M.2 PCIe SSD. •• If more than one Optane™ memory is installed, you can select only one of them to accelerate your SATA- based boot drive. The other(s) can only be used as data drive(s). •• Do not abruptly remove the Optane™ memory. Doing so will cause the operating system to stop functioning correctly. •• If you want to change/remove the Optane™ memory, you must disable it using the Intel® Rapid Storage Technology or Intel(R) Optane Memory application first. •• After enabling the Optane™ memory, the related BIOS settings will remain even after a BIOS update. Configuring a RAID Set - 80 -
-
 1
1 -
2
-
3
-
4
-
5
-
6
-
7
-
8
-
9
-
10
-
11
-
12
-
13
-
14
-
15
-
16
-
17
-
18
-
19
-
20
-
21
-
22
-
23
-
24
-
25
-
26
-
27
-
28
-
29
-
30
-
31
-
32
-
33
-
34
-
35
-
36
-
37
-
38
-
39
-
40
-
41
-
42
-
43
-
44
-
45
-
46
-
47
-
48
-
49
-
50
-
51
-
52
-
53
-
54
-
55
-
56
-
57
-
58
-
59
-
60
-
61
-
62
-
63
-
64
-
65
-
66
-
67
-
68
-
69
-
70
-
71
-
72
-
73
-
74
-
 75
75 -
 76
76 -
 77
77 -
 78
78 -
 79
79 -
 80
80 -
 81
81 -
 82
82 -
 83
83 -
 84
84 -
 85
85 -
86
-
87
-
88
-
89
-
90
-
91
-
92
-
93
-
94
-
95
-
96
-
97
-
98
-
99
-
100
-
101
-
102
-
103
-
104
-
105
-
106
-
107
-
108
-
109
-
110
-
111
-
112
-
113
-
114
-
115
-
116
-
117
-
118
-
119
-
120
-
121
-
122
-
123
-
124
-
125
-
126
-
127
-
128
-
129
-
130
-
131
-
132
 |
 |
