Gigabyte X299X AORUS XTREME WATER User Manual - Page 17
is securely attached. After completing the steps above, connect your water cooling components.
 |
View all Gigabyte X299X AORUS XTREME WATER manuals
Add to My Manuals
Save this manual to your list of manuals |
Page 17 highlights
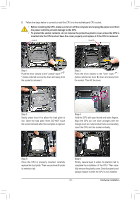
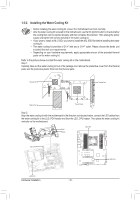
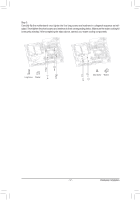
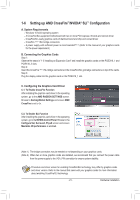
Step 3: Carefully flip the motherboard over, tighten the four long screws and washers in a diagonal sequence as indicated. Then tighten the short screws and washers to their corresponding holes. Make sure the water cooling kit is securely attached. After completing the steps above, connect your water cooling components. Long Screw Washer Short Screw Washer - 17 - Hardware Installation
-
 1
1 -
2
-
3
-
4
-
5
-
6
-
7
-
8
-
9
-
10
-
11
-
 12
12 -
 13
13 -
 14
14 -
 15
15 -
 16
16 -
 17
17 -
 18
18 -
 19
19 -
 20
20 -
 21
21 -
 22
22 -
23
-
24
-
25
-
26
-
27
-
28
-
29
-
30
-
31
-
32
-
33
-
34
-
35
-
36
-
37
-
38
-
39
-
40
-
41
-
42
-
43
-
44
-
45
-
46
-
47
-
48
-
49
-
50
-
51
-
52
-
53
-
54
-
55
-
56
-
57
-
58
-
59
-
60
-
61
-
62
-
63
-
64
-
65
-
66
-
67
-
68
-
69
-
70
-
71
-
72
-
73
-
74
-
75
-
76
-
77
-
78
-
79
-
80
-
81
-
82
-
83
-
84
-
85
-
86
-
87
-
88
-
89
-
90
-
91
-
92
-
93
-
94
-
95
-
96
-
97
-
98
-
99
-
100
-
101
-
102
-
103
-
104
-
105
-
106
-
107
-
108
-
109
-
110
-
111
-
112
-
113
-
114
-
115
-
116
-
117
-
118
-
119
-
120
-
121
-
122
-
123
-
124
-
125
-
126
-
127
-
128
-
129
-
130
-
131
-
132
-
133
-
134
-
135
-
136
 |
 |

- 17 -
Hardware Installation
Step 3:
Carefully flip the motherboard over, tighten the four long screws and washers in a diagonal sequence as indi
-
cated. Then tighten the short screws and washers to their corresponding holes. Make sure the water cooling kit
is securely attached. After completing the steps above, connect your water cooling components.
Long Screw
Washer
Short Screw
Washer