HTC Verizon Wireless XV6800 User Manual - Page 76
Synchronizing Your Device with the Exchange Server, Set up an Exchange Server connection
 |
View all HTC Verizon Wireless XV6800 manuals
Add to My Manuals
Save this manual to your list of manuals |
Page 76 highlights
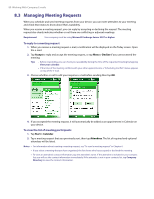
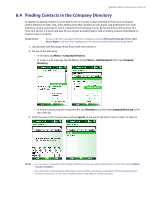
76 Working With Company E-mails 8.1 Synchronizing Your Device with the Exchange Server To keep up-to-date with your company e-mails while you're out of the office, you can connect your XV6800 to the Internet wirelessly and synchronize it with your company's Exchange Server. You can also access your company address book anytime. Your company must have a mail server that is running Microsoft Exchange Server with Exchange ActiveSync. Set up an Exchange Server connection Before you can start to synchronize with or access information from the Exchange Server, you need to set up an Exchange Server connection on your XV6800. Get the following information from your network administrator and enter them on your device: • Exchange Server name (must be the Outlook Web Access server name) • Domain name • User name and password that you use at work If you have not synchronized your device with your PC, follow these steps to set up an Exchange Server connection. 1. Tap Start > Messaging > Setup E-mail: 2. Enter your e-mail address and password, select the Save password option, then tap Next. 3. Clear the Try to get e-mail settings automatically from the Internet check box, then tap Next. 4. Select Exchange server in the Your e-mail provider list, then tap Next. 5. Tap Next again. 6. In the next screen, select the Attempt to detect Exchange Server Settings automatically check box, then tap Next. 7. In the User Information screen, enter your Exchange Server credentials including your user name, password, and domain, then tap Next. The E-mail Setup Wizard then connects to the Exchange Server and downloads the settings. 8. When prompted, enter the server address, then tap Next. 9. Select the items that you want to sync with the Exchange Server. Notes • To change synchronization settings of an information item, for example, E-mail, select the item, then tap Settings. • To change the rules for resolving synchronization conflicts, tap Menu > Advanced. 10.Tap Finish. Note If you synchronized e-mails with your computer before, open ActiveSync on your device, then tap Menu > Add Server Source to set up an Exchange Server connection. When prompted to select information types for synchronization, you must first clear the E-mail check box under the Windows PC item before you can select E-mail under Exchange Server. Tip To change Exchange Server settings, open ActiveSync then tap Menu > Configure Server. Start synchronization Before you start synchronizing with the Exchange Server, make sure Wi-Fi is enabled or your device has been set up with a data connection to the Internet. For more information about connections, see Chapter 11. After you finish setting up an Exchange Server connection, your device automatically starts synchronization. You can manually start synchronization anytime by tapping Sync in ActiveSync.
-
 1
1 -
2
-
3
-
4
-
5
-
6
-
7
-
8
-
9
-
10
-
11
-
12
-
13
-
14
-
15
-
16
-
17
-
18
-
19
-
20
-
21
-
22
-
23
-
24
-
25
-
26
-
27
-
28
-
29
-
30
-
31
-
32
-
33
-
34
-
35
-
36
-
37
-
38
-
39
-
40
-
41
-
42
-
43
-
44
-
45
-
46
-
47
-
48
-
49
-
50
-
51
-
52
-
53
-
54
-
55
-
56
-
57
-
58
-
59
-
60
-
61
-
62
-
63
-
64
-
65
-
66
-
67
-
68
-
69
-
70
-
 71
71 -
 72
72 -
 73
73 -
 74
74 -
 75
75 -
 76
76 -
 77
77 -
 78
78 -
 79
79 -
 80
80 -
 81
81 -
82
-
83
-
84
-
85
-
86
-
87
-
88
-
89
-
90
-
91
-
92
-
93
-
94
-
95
-
96
-
97
-
98
-
99
-
100
-
101
-
102
-
103
-
104
-
105
-
106
-
107
-
108
-
109
-
110
-
111
-
112
-
113
-
114
-
115
-
116
-
117
-
118
-
119
-
120
-
121
-
122
-
123
-
124
-
125
-
126
-
127
-
128
-
129
-
130
-
131
-
132
-
133
-
134
-
135
-
136
-
137
-
138
-
139
-
140
-
141
-
142
-
143
-
144
-
145
-
146
 |
 |