Haier LY19Z6 User Manual - Page 34
Photo Viewing & Music
 |
View all Haier LY19Z6 manuals
Add to My Manuals
Save this manual to your list of manuals |
Page 34 highlights
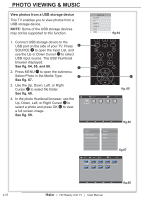
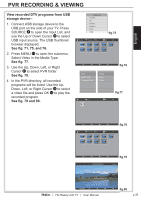
PHOTO VIEWING & MUSIC View photos from a USB storage device This TV enables you to view photos from a USB storage device. NOTE: Some of the USB storage devices may not be supported to this function. Input List SCART PC HDMI 1 HDMI 2 DVD USB fig.64 1. Connect USB storage device to the USB port on the side of your TV. Press 8 SOURCE 8 to open the Input List, and Vol use the Up or Down Cursor 31 to select USB input source. The USB thumbnail browser displayed. See fig. 64, 65, and 66. 11 2. Press MENU 11 to open the submenu. Select Photo in the Media Type. 12 31 See fig. 67. 3. Use the Up, Down, Left, or Right Cursor 31 to select file folder. See fig. 68. 4. In the photo thumbnail browser, use the Up, Down, Left, or Right Cursor 31 to select a photo and press OK 12 to view a full screen image. See fig. 69. fig. 65 File name 1 01/01 Photo File name 1 File name 2 File name 3 File name 4 File name 5 fig.66 Sort Media Type Thumbnail Size Photo Music Video fig.67 File name 1 File name (1) Size 01/01 Photo File name (1) File name (2) File name (3) File name (4) File name (5) File name (6) File name (7) File name (8) File name (9) fig.68 p.32 | HD Ready LCD TV | User Manual
-
 1
1 -
2
-
3
-
4
-
5
-
6
-
7
-
8
-
9
-
10
-
11
-
12
-
13
-
14
-
15
-
16
-
17
-
18
-
19
-
20
-
21
-
22
-
23
-
24
-
25
-
26
-
27
-
28
-
 29
29 -
 30
30 -
 31
31 -
 32
32 -
 33
33 -
 34
34 -
 35
35 -
 36
36 -
 37
37 -
 38
38 -
 39
39 -
40
-
41
-
42
-
43
-
44
-
45
-
46
-
47
-
48
-
49
-
50
-
51
-
52
-
53
-
54
-
55
-
56
 |
 |
