Harman Kardon AVR 350 Owners Manual - Page 35
What EzSet/EQ Does
 |
View all Harman Kardon AVR 350 manuals
Add to My Manuals
Save this manual to your list of manuals |
Page 35 highlights
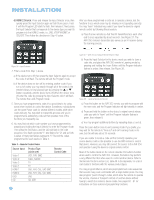
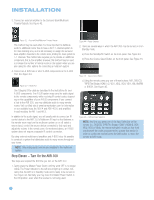
surround back speaker to the left Surround Back Speaker Output, and then configure the surround back speaker manually, as described in the Advanced Functions section. However, we do not recommend the 6.1-channel configuration. If you have forgotten to plug in the EzSet/EQ microphone, the warning screen shown in Figure 55 will appear as a reminder. INITIAL SETUP Figure 55 - EzSet/EQ: Warning to Plug in Microphone NOTE: As shown in Figures 53, 54 and 56-59, while EzSet/EQ is in progress a Cancel setting is highlighted. You may interrupt EzSet/EQ at any time by simply pressing the Set Button. What EzSet/EQ Does EzSet/EQ will send test signals to the various speakers and perform the measurements described in this section, adjusting the AVR 350's settings to match EzSet/EQ's internal references. Set Master Volume Level: EzSet/EQ sends test tones to the front speakers and adjusts the system's volume level to enable it to take the remaining measurements correctly. EzSet/EQ uses the left front speaker to set the master volume level, and then it proceeds directly to measuring the speaker output levels. Speaker Level: During this test, EzSet/EQ ensures that all speakers sound equally loud at the listening position. During a multichannel presentation, it is common for the surround channels to sound less prominent, or not to be used at all at times. A screen similar to the one shown in Figure 56 will appear, with the speaker position changing as EzSet/EQ measures the levels for each speaker. You may occasionally hear EzSet/EQ send a tone back to the front left speaker. This enables EzSet/EQ to compare the level of the speaker being measured to the reference level it set for the front left speaker. Figure 56 - EzSet/EQ: Speaker Level Test If at any time the test tone is not heard from the speaker indicated on screen, press the Set Button to stop EzSet/EQ. Turn off the AVR using the Master Power Switch and check your speaker connections. Make sure all wires are connected to the correct speakers and Speaker Outputs on the AVR, and that you have observed the correct polarity (+ terminals connected to + terminals, and - terminals connected to - terminals). NOTE: EzSet/EQ can detect only the presence of a speaker, not its location within the room. If your speakers are not placed reasonably close to the positions shown in the Speaker Placement Section on page 23, EzSet/EQ may not be able to perform this test correctly. If EzSet/EQ detects only one speaker in a pair (e.g., surround back left but no surround back right or no main speakers), it will generate an error and stop. If that happens, check that you have placed your speakers in their correct locations, and that you have wired each speaker to its correct set of speaker terminals. Speaker Distance: During this test, EzSet/EQ measures the distance from each speaker to the listening position. If the speakers are placed at different distances from the listener, the sound from speakers placed closer needs to be delayed so that it reaches the listener at the same time as the sounds from the other speakers. This preserves the clarity and directionality of surround sound presentations. During the Speaker Distance test a screen similar to the one shown in Figure 57 will appear. The speaker position will change as EzSet/EQ measures the distance for each speaker. Figure 57 - EzSet/EQ: Speaker Distance Test NOTE: The AVR 350 is also capable of setting a different type of delay, called A/V Sync Delay. A/V Sync Delay is used to compensate for lip sync problems that may occur when a video 35
-
 1
1 -
2
-
3
-
4
-
5
-
6
-
7
-
8
-
9
-
10
-
11
-
12
-
13
-
14
-
15
-
16
-
17
-
18
-
19
-
20
-
21
-
22
-
23
-
24
-
25
-
26
-
27
-
28
-
29
-
 30
30 -
 31
31 -
 32
32 -
 33
33 -
 34
34 -
 35
35 -
 36
36 -
 37
37 -
 38
38 -
 39
39 -
 40
40 -
41
-
42
-
43
-
44
-
45
-
46
-
47
-
48
-
49
-
50
-
51
-
52
-
53
-
54
-
55
-
56
-
57
-
58
-
59
-
60
-
61
-
62
-
63
-
64
-
65
-
66
-
67
-
68
-
69
-
70
-
71
-
72
-
73
-
74
-
75
-
76
 |
 |
