Harman Kardon AVR 350 Owners Manual - Page 37
AVR's Component Video Monitor Outputs to your video display.
 |
View all Harman Kardon AVR 350 manuals
Add to My Manuals
Save this manual to your list of manuals |
Page 37 highlights
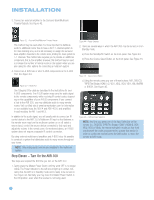
INITIAL SETUP The first line indicates that the receiver is currently set to the DVD source. Press the Set Button, and then use the › to view the next source. The sources will be selected in the following order: Video 1, Video 2, Video 3, Video 4, HDMI 1, HDMI 2, 6CH Direct, 8CH Direct, DMP/ The Bridge, Tape, CD, TUNER and XM. Pressing the ‹ Button selects the sources in the reverse order. For each of these sources, you may adjust the following settings. At a minimum, you should make sure that sources connected to any of the component video or digital audio inputs have the correct settings. Other settings are optional, and you may adjust them at a later time when you have more experience with the AVR. Refer to the Table A4 worksheet in the appendix that you filled out during installation as you assign inputs to each source. TITLE: You may change the display name for any source except the tuner and XM Radio. Not only does this enable you to customize your system; it helps you to select the correct source device even when you have forgotten which physical connections were used. Move the cursor down to the TITLE line and press the Set Button. The screen shown in Figure 62 will appear. NOTES: • Only upper case letters are available for titles. • Normally both the source input and the digital (or analog) audio input selection appear on the upper line of the semiOSD and front-panel displays. When The Bridge source is selected, its status as CONNECTED or UNPLUGGED appears in place of the audio input selection. However, when a source input is retitled, the audio input selection (or status of The Bridge) no longer appears unless you press the Digital Input Selector on the remote or front panel. VIDEO IN: This setting reflects the video input that is assigned to the source. The default assignment for all sources is COMPOSITE except as shown in Table 5: Table 5 - Default Video Inputs Source Input Default Video Input DVD Component 1 Video 1 Component 2 Video 2 Component 3 HDMI 1 HDMI 1 HDMI 2 HDMI 2 Figure 62 - Retitling a Source Input Use the Navigation Buttons to highlight the desired letter (or other character), and press the Set Button to add it to the new title, which will be displayed in the bar at the top of the screen. You may use the Navigation Buttons, or select the left or right arrow and press the Set Button, to move the cursor within the new title. To add a space either move the cursor one character to the right as described above, or highlight the SPACE indicator on screen and press the Set Button. You may edit a title by inserting or deleting characters. To insert a new character between two existing characters, move the cursor to highlight the character to the right of the insertion point in the bar at the top of the screen. Then highlight the INS indicator on screen and press the Set Button. You may now select a character to insert in the new space. Delete a character by moving the cursor to highlight the unwanted character in the bar at the top of the screen. Then highlight the DEL indicator on screen and press the Set Button. When you have finished entering the new title, highlight the OK indicator and press the Set Button to return to the Input Setup menu. Although the Source Input name will remain the same in the Input Setup menu, the new title will appear in the semi-OSD displays and the front-panel display as appropriate. We recommend that you leave the setting for the HDMI sources as is. For the other sources, change this setting to reflect use of the Component 1, 2 or 3 Video Input as appropriate. If you used the composite or S-video input for any source, make sure this setting is COMPOSITE. (There is no separate selection for S-video.) NOTE: If your video display has an HDMI input, then you only need to connect the AVR's HDMI Output to the display. The AVR 350 transcodes analog source video signals up to 720p from composite, S-video or component video to the HDMI format, and is also capable of upscaling the signal up to 720p to match your display's capabilities. The only exception to this rule is for analog 1080i/p sources, which are not available at the HDMI Output, but 1080i signals are passed, as is, to the Component Video Outputs. If your source device is a Microsoft Xbox 360 or an older set-top box that outputs 1080i or higher video via component video outputs, then set the source to output 720p video, or connect the AVR's Component Video Monitor Outputs to your video display. If your display does not have an HDMI input, but does have component video inputs, you only need to connect the AVR's Component Video Monitor Outputs to the display. The AVR 350 transcodes composite and S-video signals to the component video format. Similarly, if your display's best-quality video input is S-video, you do not need to connect the Composite Video Monitor Output to the display; any composite video source signals will be converted to S-video format, and S-video signals may be converted to composite video format if your video display is not equipped with an S-video input. 37
-
 1
1 -
2
-
3
-
4
-
5
-
6
-
7
-
8
-
9
-
10
-
11
-
12
-
13
-
14
-
15
-
16
-
17
-
18
-
19
-
20
-
21
-
22
-
23
-
24
-
25
-
26
-
27
-
28
-
29
-
30
-
31
-
 32
32 -
 33
33 -
 34
34 -
 35
35 -
 36
36 -
 37
37 -
 38
38 -
 39
39 -
 40
40 -
 41
41 -
 42
42 -
43
-
44
-
45
-
46
-
47
-
48
-
49
-
50
-
51
-
52
-
53
-
54
-
55
-
56
-
57
-
58
-
59
-
60
-
61
-
62
-
63
-
64
-
65
-
66
-
67
-
68
-
69
-
70
-
71
-
72
-
73
-
74
-
75
-
76
 |
 |
