Harman Kardon CP 15 Owners Manual - Page 2
Rcp 2 System Remote - arm
 |
View all Harman Kardon CP 15 manuals
Add to My Manuals
Save this manual to your list of manuals |
Page 2 highlights
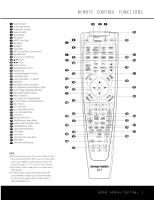
RCP 2 SYSTEM REMOTE 2 RCP 2 System Remote 2 Using EzSet 3 Remote Control Functions 7 Programming the Remote 7 Programming Product Codes 7 Direct Code Entry 7 Auto Search Method 7 Code Readout 7 Learning Codes 8 Macro Programming 9 Volume Punch-Through 9 Channel Control Punch-Through 9 Transport Control Punch-Through 9 Reassigning Device Control Selectors 10 Resetting the RCP 2's Memory 10 Programmed Device Functions 11 Function List 13 Setup Code Tables Trademark acknowledgements on page 23. Typographical Conventions The typographical conventions used in this manual are the same as those found in the owner's manuals packed with the individual AVR and DVD components that make up this CP Series system. Please note that the "Number in an Oval" icons (e.g., a) used in this manual refer to the numbers shown for the RCP 2 as they appear on page 3 of this manual, not the numbers used in the AVR owner's manual. RCP 2 System Remote A key feature of your Harman Kardon CP Series home theater system is a unified remote that operates both the AVR and DVD player included with your system, as well as other products such as VCRs. This remote replaces the individual AVR and DVD remotes that would normally be present. As an added benefit of purchasing the CP system instead of separately purchasing each component, the RCP 2 remote features Harman Kardon's exclusive, patented EzSet feature, which makes it easier than ever to properly calibrate your new system for maximum performance, and which is not available on the original AVR 135 remote. Also, its learning capability enables it to be programmed with remote codes for other devices, which is not available on the original remotes for the AVR 135, AVR 235 or AVR 335. Since the RCP 2 remote is an upgraded version of the remote that was originally included with the AVR, the instructions are slightly different. This manual replaces the sections of the AVR manual that explain the programming and operation of the remote. The visual differences between the original AVR remote and the RCP 2 are the relocation of the SPL Selector Button and the addition of a Learn Button. • The button that is labeled d has no function on the original AVR remote, but on the RCP 2 it has the same function as the AVR 235's SPL Selector Button. Use this button to activate the EzSet feature, which is explained in the AVR 235 manual, and below for CP 15 users. CP 35 users should use the EzSet+ function described in the AVR 335 owner's manual. • The button that is labeled e is the SPL Selector Button on the original AVR 235 remote, but on the RCP 2 that function has been changed to button d. Button e is now the Learn Button. We hope that you enjoy the added features of the RCP 2 remote, and wish you many years of listening and viewing pleasure with your new CP system. Using EzSet Harman Kardon's EzSet remote makes it possible to quickly and accurately set the AVR's output levels without the use of a sound-pressure-level meter. These instructions are provided for the benefit of CP 15 system users, for whom EzSet is an added feature that is not described in the AVR 135 owner's manual. We recommend that CP 35 users refer to the AVR 335 manual for its description of EzSet+, and use the more comprehensive setup features EzSet+ provides. Follow these steps while seated in the listening position: 1. Make certain that all speaker positions have been properly configured for their "large" or "small" settings, and exit the OSD system. 2. Adjust the volume so that it is at -10dB. 3. Hold the remote in fron4t9of yo4u7at a4rm5's le4n3gth, be4in9g su4re7not4to5cov4e4r38the E4z6Set S4e4nso4r 2 M4ic8roph4o6ne 44 at4t32h5e top3o7f the39remo4te1. 4. Pre3s5s and37hold 3th9e SP4L31S4elec3to6r Bu3t8ton 40 for 37 tlitSfffihhorto.Preyr3333322emWoL64289301e7u.iIttr1nshhBesd/ienu7yci3322223ctsfo.ftr16ti1a67890noovetdennmoostprs.r l2222232ieeesRc rcf8432105taecotloseniopinadfnefs333333ss4yi.gat,eoo2333322765430Tkupupi2eh89301rtrresree.wdssftyhlsaefseo3s22223s3333333ttnhhert1678902731654eimt5ntohg.5ne1ise222222a3344BPonc432105w80u91rpdooitelnltgrrofebairg33333344n4444mateiuo2765432m73654ar rhneien/doasrr4455d8091333333231654 5. EzSet will take over, adjusting the output level of each channel so that all levels are equal and at the set reference point. This process may take a few minutes. is heard from a channel other than the one shown in the indicator, press the Test Button i TWICE to stop the adjustment. Then, turn the unit off and verify that all speakers are connected to the proper outputs. • As the individual channels are set, the channel name and the adjustment offset will appear in the on-screen display (if connected) and the Lower Display Line ¯. While the level is changing, the Program/SPL Indicator c will change colors to reflect the output level in relation to the reference. A red indication shows that the level is too high, while an amber indication shows that the level is too low. When the indicator is green, the level is correct, and the test noise will move to the next channel. • While adjustments are being made, the red LED under the AVR Selector f will flash. 7. After the test noise has circulated once through each channel, it will send the tone to each channel once again, to verify the settings. 8. After two complete circulations of the tone, the levels are set. The Program/SPL Indicator c will remain green at each channel, then it will flash green twice and go out. The tone will stop and the AVR will return to normal operation. If you find that the output levels chosen by EzSet are either uncomfortably low or high, you may repeat the procedure. Return to Step 2 and adjust the master volume to accommodate your particular room layout and your tastes. You may repeat this procedure as many times as necessary to achieve a desired result. In order to prevent possible damage to your hearing or your equipment, we emphasize that you should avoid setting the master volume above 0dB. Manual output adjustment is available by first pressing 4th1e Te4s7t Ton5e1Button i, then pressing and releas4in0g the46SPL5S0elector Button d. EzSet will still indi3ca9te w4h5ethe4r t9he channel level is too high or low, but 3yo8u m4ay4adj4us8t it yourself using the ⁄/¤ Navig4a3tion Buttons n. NOTE4: 2The subwoofer output is not adjusted when the test tone is in use. To adjust the subwoofer output, you must use an external source, following the instructions in the Advanced Features Section of the AVR owner's manual. 6. As the adjustment proceeds, a few things will happen simultaneously: • The channel position will flash in the Speaker/ Channel Input Indicators ˆ. If the test noise 2 TABLE OF CONTENTS
-
 1
1 -
 2
2 -
 3
3 -
 4
4 -
 5
5 -
 6
6 -
 7
7 -
 8
8 -
9
-
10
-
11
-
12
-
13
-
14
-
15
-
16
-
17
-
18
-
19
-
20
-
21
-
22
-
23
-
24
 |
 |
