Harman Kardon CP 15 Owners Manual - Page 7
Programming The Remote - home theater system
 |
View all Harman Kardon CP 15 manuals
Add to My Manuals
Save this manual to your list of manuals |
Page 7 highlights
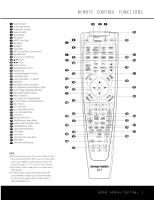
PROGRAMMING THE REMOTE Your new Harman Kardon CP Series System is equipped with the powerful RCP 2 remote control that will control not only the receiver's functions, but also most popular brands of audio and video equipment, including CD players, cassette decks, TV sets, cable boxes, VCRs, satellite receivers and other home theater equipment. Once the RCP 2 is programmed with the codes for the products you own, it is possible to eliminate most other remotes and replace them with the convenience of a single universal remote control. Programming Product Codes different combinations of codes, so it is a good idea to make certain that not only the power control, but the volume, channel and transport controls work as they should. If functions do not work properly, you may need to use a different remote code. 7. If a code cannot be entered to turn the unit off, if the code for your product does not appear in the tables in this manual, or if not all functions operate properly, try programming the remote with the Auto Search Method. The RCP 2 is factory-programmed for all AVR functions, as well as for those of most Harman Kardon CD changers, DVD players, CD players and cassette decks. In addition, by following one of the methods below, you may program the remote to operate a wide range of devices from other manufacturers. Direct Code Entry This method is the easiest way to program your remote to work with different products. 1. Use the tables in the following pages to determine the three-digit code or codes that match both the product type (e.g., VCR, TV) and the specific brand name. If there is more than one number for a brand, make note of the different choices. 2. Turn on the unit you wish to program into the RCP 2. 3. Press and hold both the Input Selector e for the product you wish to control (e.g., VCR, TV) and t4h9e Mu4te7 Bu4tt5on 43 at the same time. When48the r4ed6ligh4t4unde4r2the Input Selector e stutarnyss3al5itmabned3r t7ahnedP3breo9ggirnas4mf1la/SshPinLgI,nrdeilecaasteorthc e butto3n4s. It is36impo3rt8ant th4a0t you b3e7gin t4h1e ne4xt7 51 step 3w3ithin 206 se2co5nds.37 36 40 46 50 4. Pgroainmt33mth21eedR, aC22nP78d2ento22tew43ratrhdes33fti65hrset 35 39 45 uthnriet3eto-4dbigeit3pc8rood-e4n4um- 49 48 ber u3si0ng th2e9Num2e2ric 3Ke4ys r33. If the unit4tu3rns off, th2e9corre3c0t cod2e1has3b3een en3te2red. Press4th2e Inpu2t 8Selec3t1or e 20 ag3ai2n, and 3no1te that the red light will flash three times before going dark to con- firm the entry. 5. If the device to be programmed in does NOT turn off, continue to enter three-digit code numbers until the equipment turns off. At this point, the correct code has been entered. Press the Input Selector e again and note that the red light under the Input Selector e will flash three times before going dark to confirm the entry. 6. Try all of the functions on the RCP 2 to make certain that the product operates properly. Keep in mind that many manufacturers use a number of Auto Search Method If the unit you wish to include in the RCP 2 is not listed in the code tables in this manual or if the code does not seem to operate properly, you may wish to program the correct code using the Auto Search method that follows: 1. Turn on the unit that you wish to include in the RCP 2. 2. Press the Input Selector e for the type of product to be entered (e.g., VCR, TV) and the 49 Mu4t7e Bu4tt5on 43 at the same time. Hold both 48 bu4tto6ns u4n4til the4r2ed light under the Input Selector 35 e tur3ns7satmay3bse9lirt aann4dd1btheegiPnrsofglarsahmin/gS.PTLheInndeixctastoterpc 34 mu3s6t tak3e 8place4w0hile th3e7red4lig1ht is4o7n, a5nd1 it 33 mu2st6beg2in5with3in720 se3c6onds4a0fter 4th6e lig5ht0 32 app2e7ars.24 36 35 39 45 49 331. Poi2nt8the2R3CP 235toward3th4e un3it8to b4e 4prog4ra8mmed, 30 and29pres2s 2eithe3r ⁄ 4 or ¤33Button n43. Each press 29 will3s0end2o1ut a s3e3ries of3c2odes from 4th2e RCP 2's 28 bui3lt-1in da2t0abas3e.2When 3th1e unit being programmed turns off, release ⁄/¤ Button n, as that is your indication that the correct code is in use. 4. Press the Input Selector e; the red light under the Input Selector will flash three times before going dark to confirm the entry. 5. Try all of the functions on the RCP 2 to make certain that the product operates. Keep in mind that many manufacturers use a number of different combinations of codes, and it is a good idea to make certain that not only the power control works, but also the volume, channel and transport controls, as appropriate. If all functions do not work properly, you may need to Auto-Search for a different code, or enter a code via the Direct Code Entry method. Code Readout When the code has been entered using the Auto Search method, it is always a good idea to find out the exact code so that it may be easily reentered if necessary. You may also read the codes to verify which device has been programmed to a specific Control Selector button. 1. Press and hold both the Input Selector e for the device you wish to find the code for and t4he9 Mu4te7 Bu4tt5on 43 at the same time. The P4r8ogra4m6/SP4L4Indi4c2ator c will turn amber Ia3nn5pdubteS3ge7inlefclat3soh9rine g,4a1nwdillthsetaryedlit.ligRhetleuansdeetrhtehebutt3on4s an3d6beg3in8the4n0ext ste3p7with4in1204s7econ5d1s. 2. PtI333hnrade231tsiccsaotrht222roeer678sSpc eotn222dB435suwttioltlot333thhne765enp thbrlein.ek333T-dhg654iergeitPecnr334ooi809dngera,awms444eit/654qhSuaPeLno445cne809es3e0cond2p9ause2b2etwe3e4n each3d3igit. Count 4th3e numb2e9r of b3lin0ks b2e1twee3n 3each p3au2se to dete4rm2ine the d2ig8it of 3th1e co2de0. On3e2blink is3th1e number 1, two blinks is the number 2, and so forth. Ten blinks are used to indicate a "0." Example: One blink, followed by a one-second pause, followed by six blinks, followed by a one-second pause, followed by ten blinks indicates that the code has been set to 160. For future reference, enter the setup codes for the equipment in your system here: DVD CD VID1/VCR __________ VID2/CBL __________ VID2/SAT ________ VID3/TV __________ VID4 TAPE * The AVR 135 has no Video 4 source input; therefore, remote commands associated with the VID4 button will not have any effect on the AVR 135, although you may use the remote to operate another component. Learning Codes In addition to using codes from the remote's internal code library, the RCP 2 is able to "learn"codes from remotes that may not be in the code library. In addition, this function will allow you to program additional codes from the DVD remote or to "learn over" the codes from a preprogrammed device to add functions not included in the preprogrammed codes. To learn or transfer codes from an IR remote to the RCP 2, follow these steps: 1. Place the front of the original remote with the code being sent so that it is facing the IR Transmitter Window b on the RCP 2 "head-to-head." The two remotes should be between one and three inches apart. 2. Select the button on the RCP 2 that you wish to use as the device selector for the codes about to be entered. This may be any of the Input Selectors e. PROGRAMMING THE REMOTE 7
-
 1
1 -
 2
2 -
 3
3 -
 4
4 -
 5
5 -
 6
6 -
 7
7 -
 8
8 -
 9
9 -
 10
10 -
 11
11 -
 12
12 -
13
-
14
-
15
-
16
-
17
-
18
-
19
-
20
-
21
-
22
-
23
-
24
 |
 |
