Harman Kardon CP 15 Owners Manual - Page 5
Logic 7 Mode Select/Video Off Button - present
 |
View all Harman Kardon CP 15 manuals
Add to My Manuals
Save this manual to your list of manuals |
Page 5 highlights
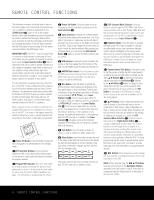
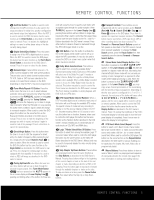
REMOTE CONTROL FUNCTIONS p Set/Enter Button: This button is used to enter settings into the AVR's memory. It is also used in the setup procedures for delay time, speaker configuration and channel output level adjustment. When the RCP 2 is used to control the DVD, this button has the same function as the Enter Button as described in the DVD owner's manual. Press it to activate the highlighted setting in a menu for either player setup or the disc currently being played. q Digital Select/Eject Button: Press this button to assign one of the AVR's digital inputs to a source. When the RCP 2 is used to control the DVD player, this button has the same function as the Eject (Open/ Close) Button as described in the DVD owner's manual. Press it to open or close the disc drawer. r Numeric Keys: These buttons serve as a 10button numeric keypad to enter tuner preset positions. They are also used to select channel numbers when TV, VCR, Cable or SAT has been selected on the remote, or to select track numbers on the DVD, depending on how the RCP 2 has been programmed. s Tuner Mode/Repeat A-B Button: Press this button when the tuner is in use to select between automatic tuning and manual tuning. When the button is pressed so that MANUAL appears in the Lower Display Line ¯, pressing the Tuning Buttons u9 will move the frequency up or down in singlestep increments. When the FM band is in use, pressing this button when a station's signal is weak will change to monaural reception. When used to control the DVD player, this button has the same function as the Repeat A-B Button described in the DVD owner's manual. Press it once to mark the beginning of the passage you wish to repeat, and press it again to mark the end of the passage. Press it a third time to cancel the repeated play. t Direct/Angle Button: Press this button when the tuner is in use to start the sequence for direct entry of a station's frequency. After pressing the button, simply press the proper Numeric Keys r to select a station. When the remote is used to control the DVD, this button has the same function as the Angle Button as described in the DVD owner's manual. Press it to change the viewing angle on discs equipped with that capability. It may also be used to rotate a JPEG still image as described in the DVD owner's manual. u Tuning Up/Down/Pic +/-: When the tuner is in use, these buttons will tune up or down through the selected frequency band. If the Tuner Mode Button s& has been pressed so that AUTO appears in the on-screen display and Lower Display Line ¯, pressing and holding either of the buttons for three sec- onds will cause the tuner to seek the next station with acceptable signal strength for quality reception. When MANUAL appears in the Lower Display Line ¯, pressing these buttons will tune stations in single-step increments. When used to control the DVD player, these buttons have the same function as the Pic+ and Pic - Buttons described in the DVD owner's manual. Press either button to advance forward or backward through the JPEG still images stored on a disc. v OSD Button: Press this button to activate the On-Screen Display (OSD) system used to set up or adjust the AVR's parameters. It may also be used to access the DVD's on-screen menu system when that device has been selected. w Dolby Mode Selector/Zoom: This button is used to select from among the available Dolby* Surround processing modes. Each press of this button will select one of the Dolby Pro Logic* II modes or Dolby 3 Stereo, Dolby Pro Logic IIx or Dolby Virtual speaker, when available. When a Dolby Digital-encoded source is in use, the Dolby Digital mode may also be selected. This button may also be used to control the Zoom feature as described in the DVD owner's manual. The Zoom feature is available, to varying degrees, with DVD, VCD and JPEG discs. x DTS Digital Mode Selector/Random: When a DTS®-encoded digital source is selected, each press of this button will scroll through the available DTS modes. The specific choice of modes will vary according to whether or not the source material contains DTS-ES® 6.1 Discrete encoding. When a DTS source is not in use, this button has no function. However, when used to control the DVD player, this button has the same function as the Random Button described in the DVD owner's manual, enabling you to randomize play of audio tracks on CDs, MP3 and WMA discs. y Logic 7 Mode Select/Video Off Button: Press this button to select from among the available Logic 7® surround modes. When used to control the DVD player, this button has the same function as the Video Off Button described in the DVD Owner's Manual, and may be used to temporarily disable the video circuits during audio playback. z Skip Chapter Up/Down Buttons: These buttons are preprogrammed to have the same function as the Skip Buttons as described in the DVD Owner's Manual. Pressing these buttons will go to the beginning of the current chapter or track or the start of the next chapter or track, depending on whether a DVD or CD is playing. Press the button again to step back or forward through the available chapters or tracks on the disc. To step one frame at a time, press the Pause Button `, then select either the Skip Up or Skip Down buttons. ` Transport Controls: These buttons are pre- programmed with the same functions as the Search (Rev) ‹‹, Play ›, Search (Fwd) ››, Stop Í and Pause ± buttons on the DVD player. Press them to o4p9erate47the r4e5spec4ti3ve transport functions. The Record b4u8tton 4m6ay b4e4use4d2when a VCR, tape deck, CDR or o3th5er r3ec7ord3in9g de4vi1ce has been selected. The F3o4rwa3rd6 an3d8Rev4e0rse Se3a7rch4B1utto4n7s o5pe1rate at f3as3t spe2e6ds a2s5des3c7ribed i3n6the 4D0VD o4w6ner5's0manual w3h2en p2re7sse2d4repe3a6tedly. 3To5eng3a9ge 4th5e Sl4o9w SrS332eeep901aaerracctehh223d890sBlypuepte222troed321snss,. pth33ree54sdsetshiere33Pd34aFuosr3ew8Barud44tt3o4ornRfi4ers8vte, rthseen 33 32 42 28 S3te1reo2M0 od3e2Selec3t/1Display Button: When the button is pressed so that DSP SURR OFF appears in the Lower Display Line ¯, the AVR will operate in a bypass mode with true, fully analog, two- channel left/right stereo mode with no surround pro- cessing or bass management, as opposed to other modes where digital processing is used. When the button is pressed so that SURROUND OFF appears in the Lower Display Line ¯, you may enjoy a two-channel presentation of the sound along with the benefits of bass management. Depending on whether your system is configured for 5.1 or 6.1/7.1 channels, the next press of the button will cause either 5 CH STEREO or 7 CH STEREO to a4p9pear,4a7nd 4th5e ste4r3eo signal will be routed to all five (4or8sev4en6) sp4e4aker4s.2When used to control the DVD p3la5yer, 3th7is b3ut9ton h4a1s the same function as the D3i4spla3y6But3to8n as40describ3e7d in4t1he D4V7D o5w1ner's m3a3nual2. 6Pres2s5it to3r7educe3th6e b4rig0htn4es6s of5t0he DVD's fprr33e3aos201nntoet-lrpeda222itnsh789peelladdy222iisso432ppffllaacyyo333ttmoo654pfhulaellltfe,b333laryi.n354gdPhtrane33gesssa89sini.t t4o5turn4t9he fronto4n4ce m4o8re to 43 29 D3T0S N2e1o:6 M33ode S3e2lect/Repe4a2t: Press this b2u8tton ta4k9e a 43ttwo71os-eclh24eac05nt nae3Dl4s2T3tSereNoe-o3o:16r mode. These modes matrix surround-encoded s4o8urce4a6nd c4re4ate 4a2full five-, six- or seven-channel s3o5und 3fie7ld. W39hen 4u1sed to control the DVD player, this b3u4tton 3h6as th3e8sam4e0funct3io7n as4t1he R4e7pea5t1Button dtpo333reo231srgecrpraibem222aetdm678peinlad222ythp435oelafyDali333VsctD765.haopwtenre333, rt654'istlem, 334tar809ancuka,l444,f654eonldaeb445r,li809ndgiscyoour 30 M2a9cro2B2utto3n4s: Pre3ss3these bu4tto3ns to store or re2c9all a3"0Mac2ro1", wh3ic3h is a3p2reprogram4m2ed sequence o2f 8com3m1and2s 0store3d2in the3r1emote. (See page 8 for more information on storing and recalling macros.) REMOTE CONTROL FUNCTIONS 5
-
 1
1 -
 2
2 -
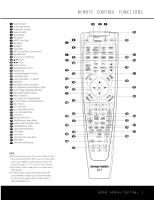 3
3 -
 4
4 -
 5
5 -
 6
6 -
 7
7 -
 8
8 -
 9
9 -
 10
10 -
 11
11 -
12
-
13
-
14
-
15
-
16
-
17
-
18
-
19
-
20
-
21
-
22
-
23
-
24
 |
 |
