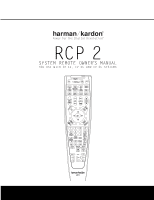
Harman Kardon CP 15 Owners Manual - Page 6
Press it while playing a DVD, VCD, SVCD, MP3, WMA - cp 35
 |
View all Harman Kardon CP 15 manuals
Add to My Manuals
Save this manual to your list of manuals |
Page 6 highlights
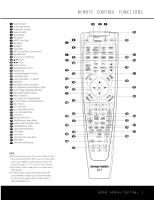
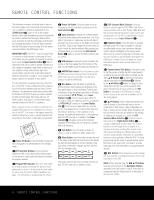
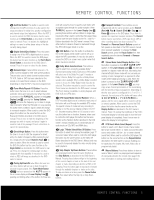
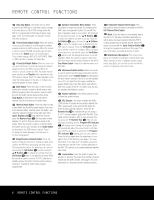
49 47 45 43 48 46 44 42 R35E3M7 O39TE41 CONTROL FUNCTIONS 34 36 38 40 37 41 47 51 33 26 25 37 36 40 46 50 49 47 45 43 32 27 24 36 35 39 45 49 48 46 44 42 49 47 45 43 31 D2is8c S2k3ip Bu3t5ton: T3hi4s bu3tt8on h4a4s no4d8irect 35 37 S3p9eak4er1Select/Disc Menu Button:4P8ress46 44 42 6-Channel/8-Channel Direct Input: Press fu43n90ction4279for t42he52AV3R443but is3m3ost often4u3sed to change 34 t3hi6s bu3tt8on to40begin3th7e p4ro1ces4s7of c5o1nfigur3in5g th3e7 39 th4i1s button to select the device connected to the AVR's to4289the n43e60xt d42is41c in 34a32CD or3D2VD chang4e2r when the 33 A2V6R's 2b5ass-3m7anage3m6ent4s0yste4m6for5u0se w3ith4 the36 38 64/08-Cha3n7nel D41irec4t 7Inpu5ts1. R32C58P 233is71pro32g90ramm3421ed for3th1at type of device. (See 32 p3a4ge 1306for 3m8ore 4in0forma3tio7n on41usin4g7the5re1mote 31 w3it3h other 26 products.) 25 37 36 40 46 50 30 32 P2re7set2D4ow3n/6Statu3s5But3to9n: W45hen 4th9e tuner is 29 in31use, 2pr8ess2t3his b3u5tton to3s4croll3t8hrou4g4h th4e8stations 28 p3ro0gram2m9ed2i2nto t3he4AVR'3s 3memory. W43hen the remote is429used43t7o0 co42n51trol t34h33e DVD3, t2his button4h2as the same fu42n8ction4361as th42e40Sta34t22us but3to1n on the DVD player. P3re5ss it3w7hile3p9layin4g1a DVD, VCD, SVCD, MP3, WMA o3r4JPEG36sele3c8tion 4to0displa3y7the4S1tatu4s7Bar.51 49 47 tSttoyo222epn789steehBolaeu222fsct432sttbpoteheneea333np kc654ephrrsaensuanssgee333ealdd354iny, o,iunuas33neywod89tiushurhes444set⁄ yo354stht/se¤ eemt44⁄ .u89BpOu/.¤ tntPco34433r3eBne859231ussthstn teoth344n222be677us678t- 4255 424 3293 n 30 to21sele3ct3the s3pe2aker size4, 2as describe33d40in t3h2e69 3282 A3V1R o2w0ner's32manua3l.1Press the Set Button3239p23to60 2251 select another channel to configure. When 32al28l adj32us17t- 2240 ments have been completed, press the Set31Butt4o29n8 2437 p twice to exit the settings and return to3n0orm42a8l9 2426 operation. When the remote is used to con2tr9ol th33e50 2317 D4V5D, th4i3s button has the same function as t2h8e DV33D41's 2306 3473 Mu3te6: Pr4e0ss th4is6but5to0n to momentarily silence t34he62AVR 3o5r TV3s9et b4ei5ng c4o9ntrolled, depending on w34h51ich de3v4ice h3a8s be4e4n se4le8cted. When the RCP 2 is3440being p33r73ogra4m1me4d473to o5pe1rate another device, this btm333334ou2o76535tbtroeengini4insf33o33tprh26541rmeesapstir334eood809ngrwoainmt444hp2m654trhoinegg445rInap809mproumcteinSsges.lteh(SceetoreermpBaougtetet.o)7nfoe r 3444 Ez4S23et3Sensor 4M3icrophone: The sensor microp33h39one 4fo13r2the EzSet4m2icrophone is behind these slots. W3328hen u4s03in1g th3e7rem4o1te to4c7alib5ra1te speaker output 33 P2re6set2U5p/P3la7ylist B3u6tton4:0Wh4e6n the50tuner4i8s in 46 u3s2e, pre2s7s th2is4butt3o6n to sc3ro5ll up39thro4u5gh th4e9stati3o5ns 37 Dogprs3443e322arrrVmado859m8901Dmegoerrmtoaetfmwh3443u223eienn677sd1m890cetueptrrias'odlsa2222344ecnykdim4953210nlsiastatostoanopttu3333c444hhfpaoe2543e213etln.raPaAtPrrcVlorakoeRlysnst'3333lshsiisnt2314ehmitsteDtebteoVdmua3Didtss8ot,o.ecr,nltyeh.oci4d44Wsrte234tbphsoucleatrpnyti4bolbaten8haydcehakainpsin333332rtoth42930h1t-ehee 34 Cl3e6ar B3u8tton:4P0ress t3hi7s bu4tto1n to4c7lear5in1corre42c89t patuestbCUmho33344333333322tnnrelpaeraee48592289303011tdtattrpwnsihaioDdeesueerenirVsoaMlre'itBDdsn3344lh3222222223wn.sDe,ueee6677ft1678967890hPramistt0esheitrNtinreoi1qipnoosedusnunl22222222334422rdisuaabmecy84954324321055saniyuna/isntisedAntcttttoLatorogyuod3tri.inicd3sn333333333te4444otW0rhhiese2nh7654765430213oweKecmha,tihe˜ rAeBslralioaebynVnuftvtmselhRdaett,ydeht's3o3333333333r osoaeaththsi27n331654654uennnpaer:adermtwontetoPmhnwsifetres3344334poh-edeoihsrt8080r919etfisthDerucesemttisnrVrnhoceisitcsgeeDthe4444444444fltamyhtiiinuosvhps2733654654otseenosirmbswseenirguisaydsntdbe.enetse4455445etenutr3334433oF322ctorutt8080t919ionh'ao48592t8930o1rns.oscenfutrnttooda,htm.hnsdeteT3344te3333433u32222223birownon6677e485218930167890toleer r 36 26 27 28 29 30 4371 4456 4347 3396 3286 2257 2248 2239 2320 2311 20 D4i4sc M4e2nu Button. Press it to view the menu o3n3a D3V9D d4is1c. 32 38 M4u0ltiroo3m7/Su4b1title4B7utto5n1: When the remo3t1e is25used3t7o cont3ro6l the40DVD4p6laye5r,0this button has t3h0e s2a4me f3un6ction 3a5s the39Sub4ti5tle B4u9tton as describe2d9in t2he3DV3D5owne3r's4ma3n8ual.4P4ress4it8to turn the subti2tle8s ogAt2224o44nuVn321045aRogare3cost333344ivf52ft4323,ah,toaeartsstthotph3e33aes231redtMliesouccfltttmihfrroeaooymCm44oP2t3fhsfe3yers5.tvWeasmryhiso.etuensmussuoebndtliytw,letithhlaisnth-beut- 4329 V4ol1ume Up/Down: Press these buttons to raise o43r18lowe4r0the sy3st7em 4vo1lum4e7. 51 4205 S3PL737Sele43c16tor:44T7h0is b54u16tton5a0ctivates the AVR's E32z74Set f3u6n3c6tion43to05qu4i3c69kly a54n05d ac4c9urately calibrate the A32V63R's o3u53tp5ut le33v94els.43P5r8ess44a94nd h4o8ld the button for t3h2r52ee s3ec43o4nds33a83nd t4he4n re44le83ase it. Press the "7" N6in3322.su43110tma/7lle.o3r31in2-c33lcy23Khfaievnyen33r es21pl espa44ektoea23krisen,rdw4isciy2tahstteenmotharwetaiytrhosutuharerroeAuVunRsdi.ncIgfhyaaonun3e2l, pres3s1the "5" Numeric Key r. The test tone 26 27 28 29 30 31 lre2evm5eolsteu3si7ninga 24 36 Ez3S6et, b4e0sure46that5y0ou do not wa3y5that3c9ove4rs5the4se9 slots. hold the 23 35 34 38 44 48 22 34 33 43 21 33 32 42 20 32 31 s2ta9tion.3W0hen21the r3e3mote i3s2used to c4o2ntrol the DVD, th2is8 but3to1n ha2s0the3s2ame fu3n1ction as the Audio Button will begin circulating, and the Program/SPL Indicator c will change colors. During this sequence, EzSet 49 a4s7des4cr5ibed4i3n the DVD owner's manual. Press it 48 to46chan4g4e th4e2audio language or format type on 35 th3e7dis3c9bein4g1played. will automatically adjust the output levels for all channels until they are equal, as shown by the Program/ SPL Indicator c lighting green for each channel. Press this button again when the adjustment is com- 34 36 D3e8lay/P4r0eviou3s7Cha4n1nel4B7utto5n1: Press this plete to turn off the test tone. See page 2 for more 33 b2u6tton2to5be3gi7n the p3r6oces4s0for 4se6tting50the delay times information. If you have a CP 35 system, we recom- 32 u2se7d b2y4the 3A6VR wh3en5 pro3c9essi4n5g su4rr9ound sound. mend that you use the EzSet+ function described in 31 A2ft8er p2re3ssin3g5this bu3t4ton,3th8e d4el4ay ti4m8es ar4e9ente4re7d 45 th4e3AVR 335 manual, as it provides additional benefits 30 29 28 b⁄ S23ye90/tp¤Breu22sBts21utiontntgo33tnp hs43e n Seagt3a3Bti2on3uttcothoacnnogp mep44tleh23teaenstdehtetthinpegrno. cPu34esr85esinssg.sWtt34hhhe67een 44 39 th3e1rem2o0te is32used to31control a TV, VCR, cab3le4box3o6r 38 o4v2er EzSet. 41 Learn Button: Press this button to begin the p4ro0cess 3of7"lea4rn1ing4" 7the c5o1des from another product's satellite receiver, this button functions as the 3Pr3eviou2s6 25 r3em7ote in3t6o the40AVR4's6rem5o0te. (See page 7 for more Channel or "Flashback" button when properly32 27 24 in3f6ormati3on5on3u9sing4t5he r4em9 ote's learning function.) programmed. 31 28 23 35 34 38 44 48 30 29 22 34 33 43 29 30 21 33 32 42 28 31 20 32 31 6 REMOTE CONTROL FUNCTIONS
-
 1
1 -
 2
2 -
 3
3 -
 4
4 -
 5
5 -
 6
6 -
 7
7 -
 8
8 -
 9
9 -
 10
10 -
 11
11 -
 12
12 -
13
-
14
-
15
-
16
-
17
-
18
-
19
-
20
-
21
-
22
-
23
-
24
 |
 |
