Harman Kardon CR151 Owners Manual - Page 4
Installation
 |
View all Harman Kardon CR151 manuals
Add to My Manuals
Save this manual to your list of manuals |
Page 4 highlights
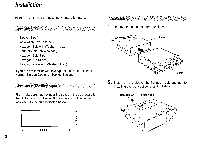
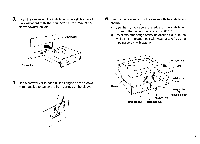
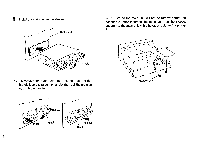
Installation Install the unit using the accessory installation parts. Sleeve (1 pc.) Installation Fixture (1 pc.) Hexagon Bolt with Washer (1 pc.) Countersunk Screw (4 pcs.) Hexagon Bolt (1 pc.) Hexagon Nut (3 pcs.) Tapping Screw with Washer (1 pc.) If you are not familiar with this type of installation, consult a Harman Kardon Dealer or Service Station. rst tita 0 Tie First, make sure that the installing space in the dashboard is the DIN size shown below. If the space is not big enough, increase it to the size indicated below. • lAr.44- 1. Remove the main unit from the sleeve. Sleeve C.- 1 1 Handle 2. Install on the sleeve the hexagon bolt and nut for installing the rear section fastening fixture. Hexagon Nut Hexagon bolt *=, n 4 3 182mm
-
 1
1 -
 2
2 -
 3
3 -
 4
4 -
 5
5 -
 6
6 -
 7
7 -
 8
8 -
 9
9 -
 10
10 -
11
-
12
-
13
-
14
-
15
-
16
-
17
-
18
-
19
-
20
 |
 |

Installation
Install
the
unit
using
the
accessory
installation
parts.
1
.
Remove
the
main
unit
from
the
sleeve.
Sleeve
(1
pc.)
Sleeve
Installation
Fixture
(1
pc.)
Hexagon
Bolt
with
Washer
(1
pc.)
Countersunk
Screw
(4
pcs.)
C.-
Hexagon
Bolt
(1
pc.)
Hexagon
Nut
(3
pcs.)
Tapping
Screw
with
Washer
(1
pc.)
1
1
If
you
are
not
familiar
with
this
type
of
installation,
consult
a
Harman
Kardon
Dealer
or
Service
Station.
rst
tita
0
Tie
First,
make
sure
that
the
installing
space
in
the
dashboard
is
the
DIN
size
shown
below.
If
the
space
is
not
big
enough,
increase
it
to
the
size
indicated
below.
4
182mm
•
lAr.44-
Handle
2.
Install
on
the
sleeve
the
hexagon
bolt
and
nut
for
installing
the
rear
section
fastening
fixture.
Hexagon
Nut
Hexagon
bolt
*=,
n
3