Harman Kardon CR151 Owners Manual - Page 5
installation
 |
View all Harman Kardon CR151 manuals
Add to My Manuals
Save this manual to your list of manuals |
Page 5 highlights
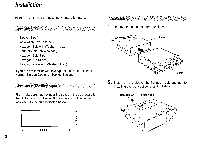
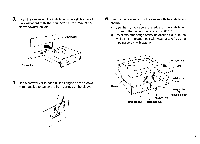
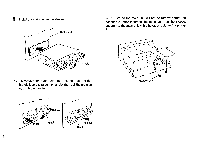
3. Insert the sleeve into the installation space (DIN size) of the dashboard with the connector at the rear of the sleeve toward the left. Dashboard 5. Secure the rear section of the sleeve with the installation fixture. CD, Use the nut to secure the edge of the installation fixture to the bolt on the rear of the sleeve. © Install the other edge of the installation fixture to the wall using a hexagon bolt with washer and nut, or a tapping screw with washer. Connector 4. Use a screwdriver to bend all the flanges on the sleeve to the outside to fasten the front surface of the sleeve. Sleeve Hexagon Nut Wall Hexagon Nut ,e5 O a a Installation fixture Hexagon Nut Hexagon bolt Hexagon bolt or tapping screw 4
-
 1
1 -
 2
2 -
 3
3 -
 4
4 -
 5
5 -
 6
6 -
 7
7 -
 8
8 -
 9
9 -
 10
10 -
 11
11 -
12
-
13
-
14
-
15
-
16
-
17
-
18
-
19
-
20
 |
 |

3.
Insert
the
sleeve
into
the
installation
space
(DIN
size)
of
5.
Secure
the
rear
section
of
the
sleeve
with
the
installation
the
dashboard
with
the
connector
at
the
rear
of
the
fixture.
sleeve
toward
the
left.
CD
,
Use
the
nut
to
secure
the
edge
of
the
installation
fixture
to
the
bolt
on
the
rear
of
the
sleeve.
Dashboard
©
Install
the
other
edge
of
the
installation
fixture
to
the
wall
using
a
hexagon
bolt
with
washer
and
nut,
or
a
tapping
screw
with
washer.
4.
Hexagon
Nut
Connector
Wall
,
e5
Use
a
screwdriver
to
bend
all
the
flanges
on
the
sleeve
to
the
outside
to
fasten
the
front
surface
of
the
sleeve.
Sleeve
O
a
a
Installation
fixture
Hexagon
bolt
or
Hexagon
Nut
Hexagon
Nut
Hexagon
bolt
tapping
screw
4