Hayward Aqua Connect® Aqua Connect® Installation Manual - Page 12
Update, Dashboard, Account Settings, Create Sub Account, Pool Settings, Manage Access
 |
View all Hayward Aqua Connect® manuals
Add to My Manuals
Save this manual to your list of manuals |
Page 12 highlights
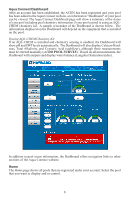
Data History This page shows historical data for the selected pool. Do Pool Survey Use this page to manually enter information about your pool. Chemistry values entered here will shown on the Dashboard and used to calculate water balance. • Enter the three chemical values, Calcium Hardness, Total Alkalinity, and Cyanuric Acid (stabilizer), on the appropriate lines of the survey form. • Make sure to enter date and time. You can leave the remainder of the form blank. • Go to the bottom of the form and select Update. You will be returned to the top of the form where a message should be displayed saying that the update was successful. • Go to the bottom of the form and select Dashboard. This will return you to the Dashboard page where the readings you just entered should now be displayed. View Pool Surveys This page shows a summary of all past pool surveys. Account Settings Use this page to make changes to your account or password as well as setting up SubAccounts. Sub-Accounts grant other people access to pools registered to your account. To create a Sub-Account: • Select Account Settings from the left navigation bar. • Scroll down to the bottom field of the Account Settings page, called Account Management. Select the Create Sub Account link within this field. • This will take you to the Create Sub Account page. Fill in all of the required informa- tion. The account description should be meaningful to you, so that when you look at a list of sub accounts you can identify the owner of this account. • You may want to allow the person for whom this account is intended to select their own username and password. Note that they can change their password at any time, but they are stuck with the username that you give them. • You select the access privileges of the account. Select User for a full access ac- count or View Only for a limited access account. • You will be required to enter a primary email address for the sub-account. This can be changed later by the account owner. • When all of the information has been added, click the Add button at the bottom of the page. Unless you get an error message, the account has been added. You will be returned to the Dashboard page. • Select Pool Settings from the Dashboard page. Scroll down to the bottom of this page and select Manage Access. You should now see a table of all of the subaccounts created beneath your account. Make sure that the new sub-account is in the table. • The rightmost column in the table is "Account Unit Access Level". Go to the drop down box and set the desired access level for this account. Check the Notification box if you would like this sub-account to get alarm warning emails from this pool. If you do not check the box then no alarm emails will be sent to this account. • Log out of your account and log into the newly created sub-account. Verify that it is configured as you intended. 10
-
 1
1 -
2
-
3
-
4
-
5
-
6
-
 7
7 -
 8
8 -
 9
9 -
 10
10 -
 11
11 -
 12
12 -
 13
13 -
 14
14 -
 15
15 -
 16
16
 |
 |
