HealthRider H30x Bike English Manual - Page 20
How To Adjust The Drive Belt
 |
View all HealthRider H30x Bike manuals
Add to My Manuals
Save this manual to your list of manuals |
Page 20 highlights
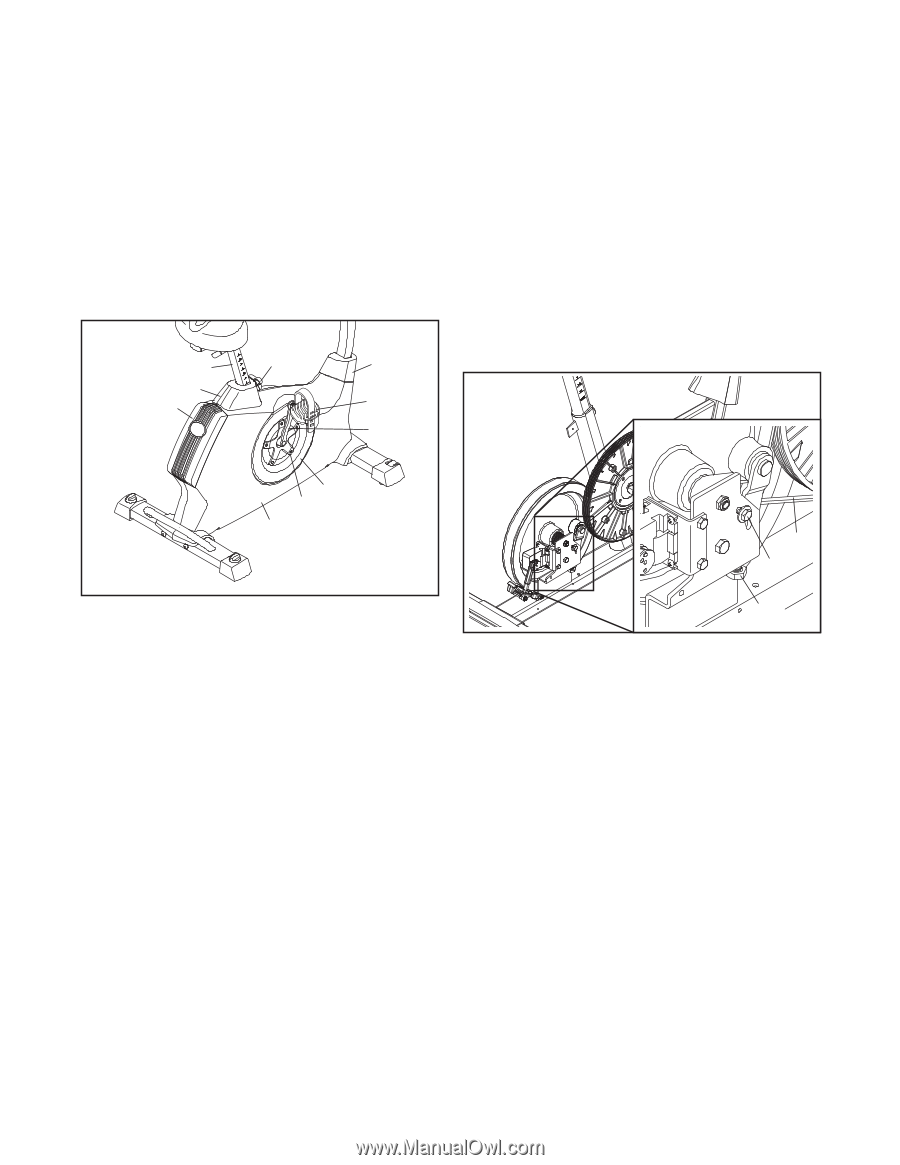
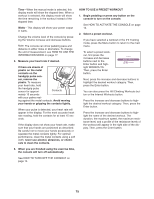
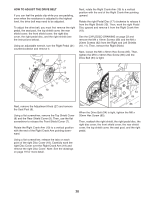
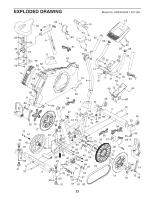
HOW TO ADJUST THE DRIVE BELT If you can feel the pedals slip while you are pedaling, even when the resistance is adjusted to the highest level, the drive belt may need to be adjusted. To adjust the drive belt, you must first remove the right pedal, the seat post, the top shield cover, the rear shield cover, the front shield cover, the right disc cover, the right pedal disc, and the right shield (see the instructions below). Using an adjustable wrench, turn the Right Pedal (21) counterclockwise and remove it. 27 6 7 8 9 21 19 Next, rotate the Right Crank Arm (19) to a vertical position with the end of the Right Crank Arm pointing upward. Rotate the right Pedal Disc (17) clockwise to release it from the Right Shield (10). Then, work the right Pedal Disc upward and remove it from the Right Crank Arm (19). See the EXPLODED DRAWING on page 23 and remove the M4 x 19mm Screws (89) and the M4 x 25mm Screws (62) from the Right and Left Shields (10, 11). Then, remove the Right Shield. Next, loosen the M6 x 20mm Hex Screw (85). Then, tighten the M10 x 50mm Hex Screw (86) until the Drive Belt (54) is tight. 17 18 10 54 85 Next, remove the Adjustment Knob (27) and remove the Seat Post (6). Using a flat screwdriver, remove the Top Shield Cover (8) and the Rear Shield Cover (9). Then, use the flat screwdriver to release the Front Shield Cover (7). Rotate the Right Crank Arm (19) to a vertical position with the end of the Right Crank Arm pointing downward. Using a flat screwdriver, release the tabs on each point of the right Disc Cover (18). Carefully work the right Disc Cover over the Right Crank Arm (19) and remove the right Disc Cover. Note: See the drawings on page 19 for more detail. 86 When the Drive Belt (54) is tight, tighten the M6 x 20mm Hex Screw (85). Then, reattach the right shield, the right pedal disc, the right disc cover, the front shield cover, the rear shield cover, the top shield cover, the seat post, and the right pedal. 20
-
 1
1 -
2
-
3
-
4
-
5
-
6
-
7
-
8
-
9
-
10
-
11
-
12
-
13
-
14
-
 15
15 -
 16
16 -
 17
17 -
 18
18 -
 19
19 -
 20
20 -
 21
21 -
 22
22 -
 23
23 -
 24
24
 |
 |