HealthRider S150 Treadmill English Manual - Page 12
Follow your progress with the four displays.
 |
View all HealthRider S150 Treadmill manuals
Add to My Manuals
Save this manual to your list of manuals |
Page 12 highlights
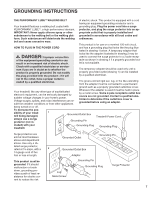
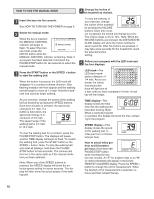
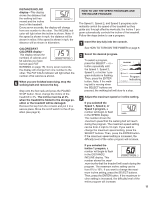
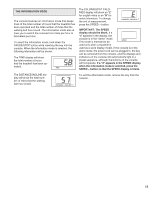
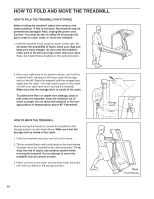
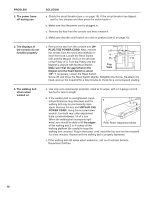
4 Press the START button or the SPEED + button to start the program. A moment after the button is pressed, the walking belt will begin to move. (If the incline program is selected, the treadmill will also adjust to the first incline setting of the program.) Hold the handrails and carefully begin walking. The Speed 1 and Speed 2 programs consist of twenty, one-minute periods; the Speed 3 and Incline 1 programs consist of thirty, one-minute periods. If a speed program is selected, one speed setting is programmed for each period; if the incline program is selected, one incline setting is programmed for each period. The speed or incline settings will be shown in the LED matrix. The CURRENT PERIOD speed or incline setting for the first period will be shown in the flash- ing CURRENT PE- RIOD column. The settings for the next seven periods will be shown in the seven columns to the right. When only three seconds remain in the first period of the program, both the CURRENT PERIOD column and the column to the right will flash and a series of tones will sound. All speed or incline settings will then move one column to the left. The setting for the second period will then be shown in the CURRENT PERIOD column and the treadmill will automatically adjust to that setting. If a speed program is selected, the incline of the treadmill can be changed during the program with the INCLINE buttons. The speed of the walking belt can be adjusted during the current period, if desired, with the SPEED buttons; however, when the next period begins, the treadmill will automatically adjust to the speed setting for the next period. If an incline program is selected, the speed of the treadmill can be changed with the SPEED buttons. The incline of the treadmill can be adjusted during the current period, if desired, with the INCLINE buttons; however, when the next period begins, the treadmill will automatically adjust to the incline setting for the next period. The program will continue until the speed or incline setting for the last period is shown in the CURRENT PERIOD column of the LED matrix and the TIME display counts down to zero. The walking belt will then slow to a stop. To stop the program for a moment, press the STOP button. The displays will pause and the TIME display will begin to flash. To restart the program, press the START button or the SPEED + button. To end the program at any time, hold down the STOP button for two seconds. The MANUAL mode will then be selected. 5 Follow your progress with the four displays. See step 5 on pages 10 and 11. 6 When you are finished exercising, remove the key. Make sure that the incline of the treadmill is at 3%. The incline must be at 3% when the treadmill is folded to the storage position or the treadmill will be damaged. Remove the key from the console and put it in a secure place. In addition, move the on/off switch to the off position (see page 9). 12
-
 1
1 -
2
-
3
-
4
-
5
-
6
-
 7
7 -
 8
8 -
 9
9 -
 10
10 -
 11
11 -
 12
12 -
 13
13 -
 14
14 -
 15
15 -
 16
16 -
 17
17 -
18
-
19
-
20
-
21
-
22
 |
 |