HealthRider S150 Treadmill English Manual - Page 17
E2, E3, or E4
 |
View all HealthRider S150 Treadmill manuals
Add to My Manuals
Save this manual to your list of manuals |
Page 17 highlights
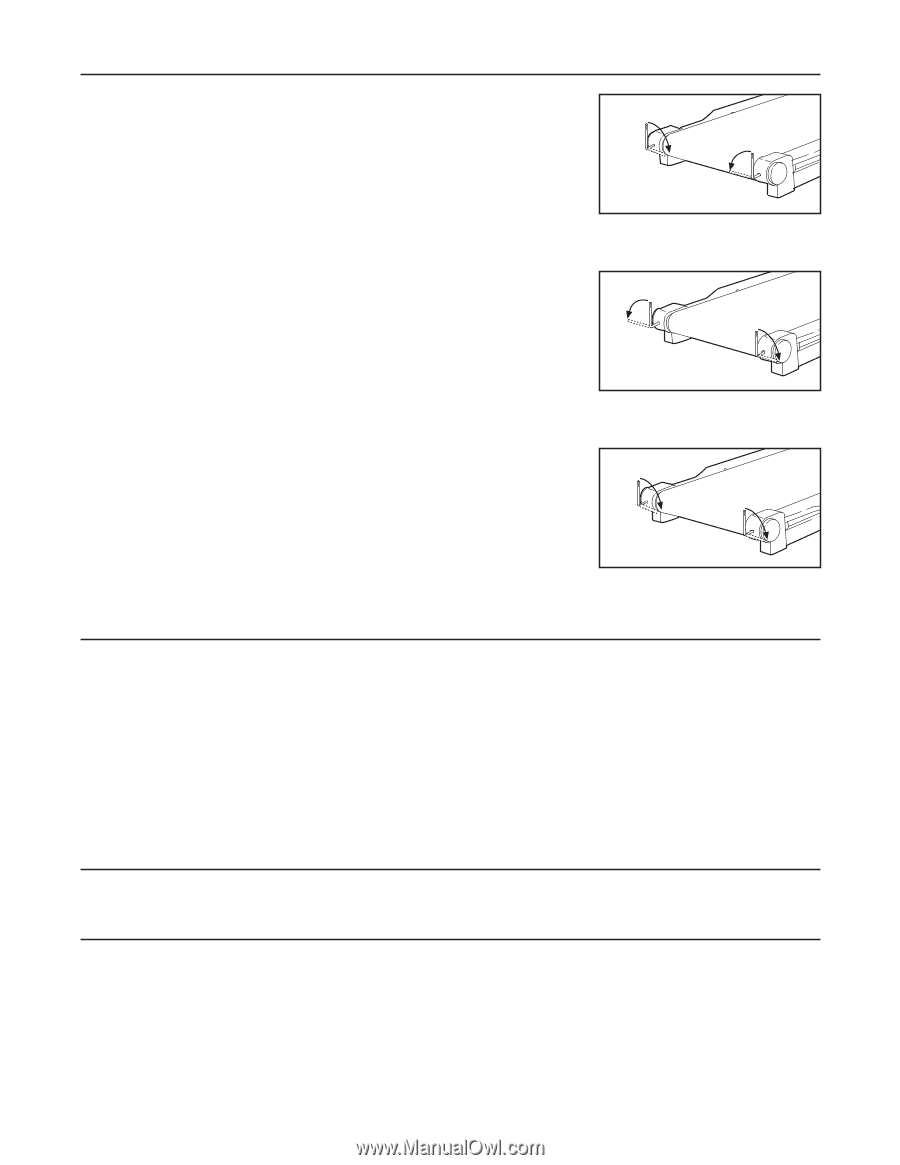
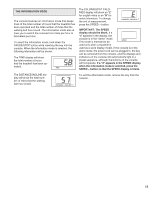
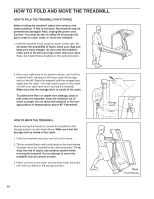
PROBLEM 5. The walking belt is off-center or slips when walked on SOLUTION a. If the walking belt has shifted to the left, first remove the key and UNPLUG a THE POWER CORD. Using the allen wrench, turn the left rear roller adjustment bolt clockwise, and the right bolt counter- clockwise, 1/4 of a turn each. Be careful not to overtighten the walking belt. Plug in the power cord, insert the key and run the treadmill for a few minutes. Repeat until the walking belt is centered. b. If the walking belt has shifted to the right, b first remove the key and UNPLUG THE POWER CORD. Using the allen wrench, turn the left rear roller adjustment bolt counterclockwise, and the right bolt clock- wise, 1/4 of a turn each. Be careful not to overtighten the walking belt. Plug in the power cord, insert the key and run the treadmill for a few minutes. Repeat until the walking belt is centered. c. If the walking belt slips when walked on, first remove the key and UNPLUG THE c POWER CORD. Using the allen wrench, turn both rear roller adjustment bolts clock- wise, 1/4 of a turn. When the walking belt is correctly tightened, you should be able to lift the edges of the walking belt 3 to 4 inches off the walking platform. Be careful to keep the walking belt centered. Plug in the power cord, insert the key and run the treadmill for a few minutes. Repeat until the walking belt is properly tightened. 6. An error code ("E1," "E2," "E3," or "E4,") appears in the SPEED display a. If error code "E1," "E2," or "E3" appears in the SPEED display, remove the key, wait for ten seconds, and then reinsert it. If the error code appears again, call our Customer Service Department. Do not operate the treadmill until the problem is corrected. b. Error code "E4" may appear in the SPEED display if the walking belt is moving at a slow speed and there is excessive stress on the motor. If this occurs, remove the key, wait for ten seconds, and then reinsert it. If you weigh over 200 pounds, it may also be helpful to increase the incline of the treadmill. If the error code appears again, call our Customer Service Department. Do not operate the treadmill until the problem is corrected. 7. The walking belt becomes soiled a. Use a color-fast upholstery cleaner to clean the walking belt. Test the cleaner on a small area before cleaning the entire belt. 8. Bubbles form in the walking belt a. Due to variations in humidity and temperature, there is a possibility that bubbles may form in the walking belt. Although the bubbles will disappear with time, you may unplug the power cord, carefully insert a needle into the bubbles, and push the air out of the bubbles. 17
-
 1
1 -
2
-
3
-
4
-
5
-
6
-
7
-
8
-
9
-
10
-
11
-
 12
12 -
 13
13 -
 14
14 -
 15
15 -
 16
16 -
 17
17 -
 18
18 -
 19
19 -
 20
20 -
 21
21 -
 22
22
 |
 |