HP 2000c HP 2000C Professional Series Color Printer - English User's Manual - Page 31
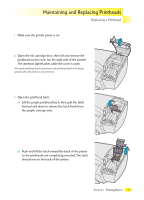
Holding the printhead by its handle, match
 |
View all HP 2000c manuals
Add to My Manuals
Save this manual to your list of manuals |
Page 31 highlights
Maintaining and Replacing Printheads Replacing a Printhead B C M Y B C M Y 4 Grasp the top of the used printhead by its handle, and pull it up and out of its socket. Caution: Keep new and used printheads out of the reach of children. 5 Remove the new HP No. Printhead from its package and hold it by its colored handle. Being careful not to touch the gold-colored metallic strip on the printhead, gently remove the transparent protective tape covering the electrical contacts and ink nozzles. B C M Y B C M Y 6 Holding the printhead by its handle, match the printhead label color to the socket label color. The ink connector pin should be positioned toward the front of the printer. Insert the printhead into its socket, pushing it down firmly. Then, lower its handle back to the flat position. All four printheads must be correctly installed for the printer to operate. 32 Section 1 Printing Basics
-
 1
1 -
2
-
3
-
4
-
5
-
6
-
7
-
8
-
9
-
10
-
11
-
12
-
13
-
14
-
15
-
16
-
17
-
18
-
19
-
20
-
21
-
22
-
23
-
24
-
25
-
 26
26 -
 27
27 -
 28
28 -
 29
29 -
 30
30 -
 31
31 -
 32
32 -
 33
33 -
 34
34 -
 35
35 -
 36
36 -
37
-
38
-
39
-
40
-
41
-
42
-
43
-
44
-
45
-
46
-
47
-
48
-
49
-
50
-
51
-
52
-
53
 |
 |
