HP 220mx HP SureStore 220mx Optical Jukebox User's Guide - Page 17
Identifying Rear Panel Features
 |
View all HP 220mx manuals
Add to My Manuals
Save this manual to your list of manuals |
Page 17 highlights
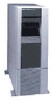
Setting Up the Jukebox Setting up the Jukebox Identifying Rear Panel Features The numbers below correspond to the numbers in Figure 1-1 on the previous page. 1 Power receptacle 2 Standby/on switch 3 SCSI ports Used to connect the power cord to the jukebox. The ON position appplies power to the robotics and electronics in the jukebox. The STANDBY position removes power from the robotics and electronics of the jukebox but power remains ON inside the power supply enclosure on the rear of the jukebox. To remove power completely from the jukebox, you must remove the power cable either from the rear input on the jukebox or at the wall/floor electrical outlet. Two 68-pin high-density connectors that allow connection to either a single-ended or low-voltage differential SCSI bus. A terminator must be plugged into one of these connectors when the jukebox is the last physical device on a SCSI bus. The terminator shipped with the jukebox is a single-ended / low-voltage differential terminator. For the most flexible configuration, use a self-configuring single-ended / low-voltage differential terminator (SE/LVD) even though the jukebox is may be originally configured onto a low-voltage differential bus. Chapter 1 1- 5
-
 1
1 -
2
-
3
-
4
-
5
-
6
-
7
-
8
-
9
-
10
-
11
-
 12
12 -
 13
13 -
 14
14 -
 15
15 -
 16
16 -
 17
17 -
 18
18 -
 19
19 -
 20
20 -
 21
21 -
 22
22 -
23
-
24
-
25
-
26
-
27
-
28
-
29
-
30
-
31
-
32
-
33
-
34
-
35
-
36
-
37
-
38
-
39
-
40
-
41
-
42
-
43
-
44
-
45
-
46
-
47
-
48
-
49
-
50
-
51
-
52
-
53
-
54
-
55
-
56
-
57
-
58
-
59
-
60
-
61
-
62
-
63
-
64
-
65
-
66
-
67
-
68
-
69
-
70
-
71
-
72
-
73
-
74
-
75
-
76
-
77
-
78
-
79
-
80
-
81
-
82
-
83
-
84
-
85
-
86
-
87
-
88
-
89
-
90
-
91
-
92
-
93
-
94
-
95
-
96
-
97
-
98
-
99
-
100
-
101
-
102
-
103
-
104
-
105
-
106
-
107
-
108
 |
 |
