HP 3330mfp HP LaserJet 3300mfp Series - User Guide - Page 69
To use the scan to button via USB or parallel connection, To reprogram the scan to button destinations
 |
UPC - 088698451328
View all HP 3330mfp manuals
Add to My Manuals
Save this manual to your list of manuals |
Page 69 highlights
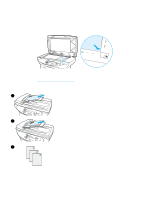
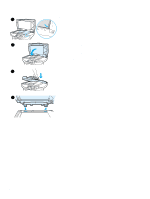
Note EN 1 Load the originals to be scanned face up in the ADF input tray and adjust the media guides. OR Lift the flatbed cover and load the original to be scanned face down on the flatbed scanner with the top left corner of the document located in the lower right corner of the glass. Gently close the lid. 2 To start scanning, press start scan on the product's control panel. To scan to a particular destination, you can program the start scan button or use the scan to button on the product's control panel. For more information, see To reprogram the start scan button and To reprogram the scan to button destinations. To use the scan to button via USB or parallel connection To scan to a destination using the scan to button on the product's control panel, use the following instructions: 1 Press scan to on the control panel. 2 Use the < and > buttons to select a destination. 3 Press start scan or menu/enter. To use the scan to button via network connection To use scan to through a network connection, the Display Name must be configured. The Display Name is configured as follows: 1 From the HP LaserJet Director, click the Customize button to open the Customize property sheet. 2 Select the Monitor Device tab. 3 Enter the text that you wish to use to identify your PC in the Display Name edit box (9 characters maximum). 4 Click Apply to make the changes and keep the Customize dialog box open, or OK to keep the changes and return to the HP LaserJet Series Director. New destinations that include this Display Name will now appear in the device scan to destinations list. 5 Follow the instructions in To use the scan to button via USB or parallel connection to scan to this destination. To reprogram the scan to button destinations 1 From the HP LaserJet Director, click the Customize button to open the Customize property sheet. 2 Select the Monitor Device tab. 3 From the Device Scan To Button Settings group box, select the desired destinations, one at a time, and click the Add button to add to the scan to list. 4 To edit the device display string or update the e-mail address for a recipient, select the destination in the scan to list and click the Edit button. 5 To remove a destination from the scan to list, select the destination and click the Remove button. 6 Click Apply to make the changes and keep the Customize dialog box open, or OK to keep the changes and return to the HP LaserJet Director. Scanning from the product's control panel 67
-
 1
1 -
2
-
3
-
4
-
5
-
6
-
7
-
8
-
9
-
10
-
11
-
12
-
13
-
14
-
15
-
16
-
17
-
18
-
19
-
20
-
21
-
22
-
23
-
24
-
25
-
26
-
27
-
28
-
29
-
30
-
31
-
32
-
33
-
34
-
35
-
36
-
37
-
38
-
39
-
40
-
41
-
42
-
43
-
44
-
45
-
46
-
47
-
48
-
49
-
50
-
51
-
52
-
53
-
54
-
55
-
56
-
57
-
58
-
59
-
60
-
61
-
62
-
63
-
 64
64 -
 65
65 -
 66
66 -
 67
67 -
 68
68 -
 69
69 -
 70
70 -
 71
71 -
 72
72 -
 73
73 -
 74
74 -
75
-
76
-
77
-
78
-
79
-
80
-
81
-
82
-
83
-
84
-
85
-
86
-
87
-
88
-
89
-
90
-
91
-
92
-
93
-
94
-
95
-
96
-
97
-
98
-
99
-
100
-
101
-
102
-
103
-
104
-
105
-
106
-
107
-
108
-
109
-
110
-
111
-
112
-
113
-
114
-
115
-
116
-
117
-
118
-
119
-
120
-
121
-
122
-
123
-
124
-
125
-
126
-
127
-
128
-
129
-
130
-
131
-
132
-
133
-
134
-
135
-
136
-
137
-
138
-
139
-
140
-
141
-
142
-
143
-
144
-
145
-
146
-
147
-
148
-
149
-
150
-
151
-
152
-
153
-
154
-
155
-
156
-
157
-
158
-
159
-
160
-
161
-
162
-
163
-
164
-
165
-
166
-
167
-
168
-
169
-
170
-
171
-
172
-
173
-
174
-
175
-
176
-
177
-
178
-
179
-
180
-
181
-
182
-
183
-
184
-
185
-
186
-
187
-
188
-
189
-
190
-
191
-
192
-
193
-
194
-
195
-
196
-
197
-
198
-
199
-
200
-
201
-
202
-
203
-
204
-
205
-
206
-
207
-
208
-
209
-
210
-
211
-
212
-
213
-
214
-
215
-
216
-
217
-
218
-
219
-
220
-
221
-
222
-
223
-
224
-
225
-
226
-
227
-
228
-
229
-
230
-
231
-
232
-
233
-
234
-
235
-
236
-
237
-
238
-
239
-
240
-
241
-
242
-
243
-
244
-
245
-
246
-
247
-
248
-
249
-
250
-
251
-
252
-
253
-
254
-
255
-
256
-
257
-
258
-
259
 |
 |
