HP 6820s HP Compaq 6820s Notebook PC - Maintenance and Service Guide - Page 66
by lifting it straight up., Remove the TouchPad button board cable
 |
UPC - 883585963447
View all HP 6820s manuals
Add to My Manuals
Save this manual to your list of manuals |
Page 66 highlights
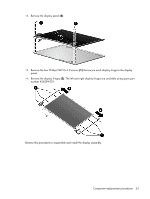
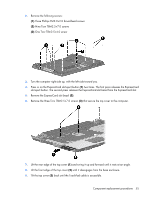
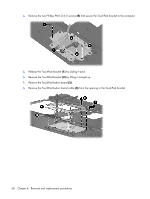
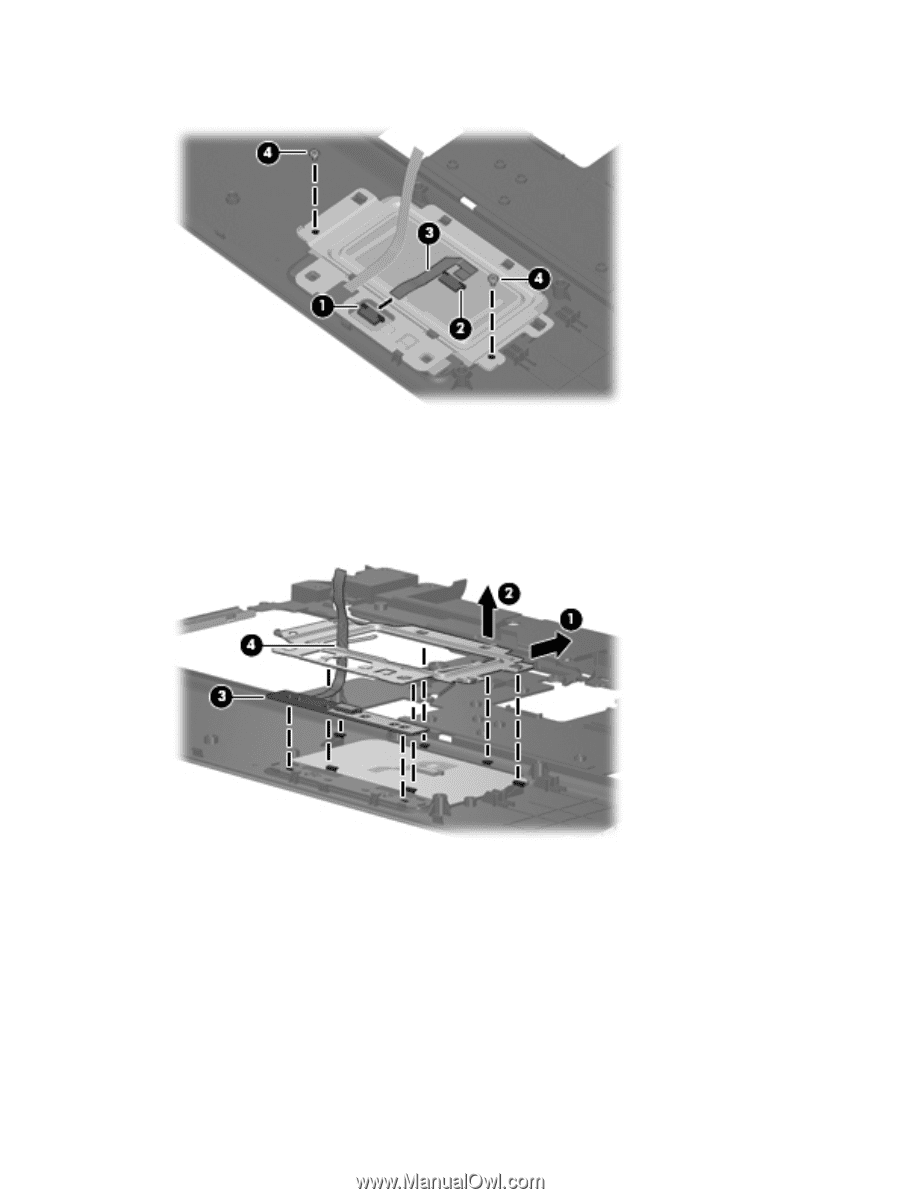
4. Remove the two Phillips PM2.0×4.0 screws (4) that secure the TouchPad bracket to the computer. 5. Release the TouchPad bracket (1) by sliding it back. 6. Remove the TouchPad bracket (2) by lifting it straight up. 7. Remove the TouchPad button board (3). 8. Remove the TouchPad button board cable (4) from the opening in the TouchPad bracket. 58 Chapter 4 Removal and replacement procedures
-
 1
1 -
2
-
3
-
4
-
5
-
6
-
7
-
8
-
9
-
10
-
11
-
12
-
13
-
14
-
15
-
16
-
17
-
18
-
19
-
20
-
21
-
22
-
23
-
24
-
25
-
26
-
27
-
28
-
29
-
30
-
31
-
32
-
33
-
34
-
35
-
36
-
37
-
38
-
39
-
40
-
41
-
42
-
43
-
44
-
45
-
46
-
47
-
48
-
49
-
50
-
51
-
52
-
53
-
54
-
55
-
56
-
57
-
58
-
59
-
60
-
 61
61 -
 62
62 -
 63
63 -
 64
64 -
 65
65 -
 66
66 -
 67
67 -
 68
68 -
 69
69 -
 70
70 -
 71
71 -
72
-
73
-
74
-
75
-
76
-
77
-
78
-
79
-
80
-
81
-
82
-
83
-
84
-
85
-
86
-
87
-
88
-
89
-
90
-
91
-
92
-
93
-
94
-
95
-
96
-
97
-
98
-
99
-
100
-
101
-
102
-
103
-
104
-
105
-
106
-
107
-
108
-
109
-
110
-
111
-
112
-
113
-
114
-
115
-
116
-
117
-
118
-
119
-
120
-
121
-
122
-
123
-
124
-
125
-
126
-
127
-
128
-
129
-
130
-
131
-
132
-
133
-
134
-
135
-
136
-
137
-
138
-
139
-
140
-
141
-
142
-
143
-
144
-
145
-
146
-
147
 |
 |
4
.
Remove the two Phillips PM2.0×4.0 screws
(4)
that secure the TouchPad bracket to the computer.
5
.
Release the TouchPad bracket
(1)
by sliding it back.
6
.
Remove the TouchPad bracket
(2)
by lifting it straight up.
7
.
Remove the TouchPad button board
(3)
.
8
.
Remove the TouchPad button board cable
(4)
from the opening in the TouchPad bracket.
58
Chapter
4
Removal and replacement procedures