HP 7650 User's Manual - Page 10
Scan text for editing, Scan pictures - manual
 |
UPC - 829160621579
View all HP 7650 manuals
Add to My Manuals
Save this manual to your list of manuals |
Page 10 highlights
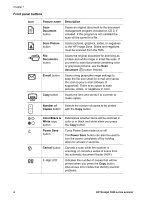
click Done. After you click Done, the software sends the scanned file to the specified location. Note If Show Preview was selected, you must click the Accept button in the preview screen to initiate the scan. When prompted, click Yes to scan additional pages, or click No to send the scanned page(s) to the specified location. Scan text for editing The scanning software uses optical character recognition (OCR) to convert text on a page to text that you can edit within a word processing program. The OCR software is installed automatically when you install the HP Image Zone software. To scan a document for editable text: 1 In the HP Scanning dialog box, click Yes for Scan for editable text. 2 Select a word processing program from the Scan to: box. 3 Click Scan. 4 The text that appears in the word processing program will be editable. For more information about using the OCR software, see Scan text for editing in the onscreen Help. Scan pictures Use the Scan Picture button ( ) to scan photos, graphics, slides, or negatives. For scanning slides or negatives, see How to scan slides and negatives. Note If you want to preview scans before they are sent to their destination, select Show Preview in the HP Scanning dialog box. Also see Preview a scanned image in the onscreen Help. 1 Place the original face down on the scanner glass, as indicated by the reference marks, and close the lid. 2 Press the Scan Picture button ( ). The HP Scanning dialog box appears. Ensure the Scan original from glass or feeder button is selected. Click Scan. 3 When the scan is finished, place an item on the scanner glass and then click Scan to scan another picture, or click Done. The software saves the scan to the My Scans folder located within the My Documents folder. The scanned image is also sent to HP Image Zone by default. Note If Show Preview was selected, you must click the Accept button in the preview screen to initiate the scan. When prompted, click Yes to scan additional pictures, or click No to send the scanned image(s) to the specified location. Tip The HP Scanning software can automatically correct your pictures or restore faded colors in old pictures. To turn picture correction on or off, select Auto Correct Photos from the Basic menu of the HP Scanning software, and then choose the options you want. To use this feature, Show Preview must be selected. User's manual 7
-
 1
1 -
2
-
3
-
4
-
 5
5 -
 6
6 -
 7
7 -
 8
8 -
 9
9 -
 10
10 -
 11
11 -
 12
12 -
 13
13 -
 14
14 -
 15
15 -
16
-
17
-
18
-
19
-
20
-
21
-
22
-
23
-
24
-
25
-
26
-
27
-
28
-
29
-
30
-
31
-
32
-
33
 |
 |
