HP 8/20q HP StorageWorks 8/20q Fibre Channel Switch installation and reference - Page 33
Install the transceivers, Con the workstation - default ip
 |
View all HP 8/20q manuals
Add to My Manuals
Save this manual to your list of manuals |
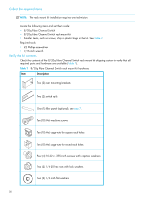
Page 33 highlights
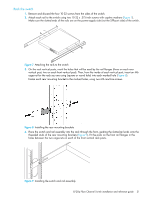
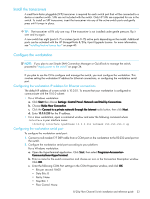
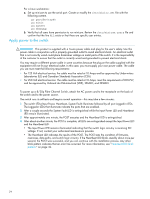
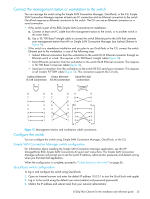
Install the transceivers A small form-factor pluggable (SFP) transceiver is required for each switch port that will be connected to a device or another switch. SFPs are not included with the switch. Only HP SFPs are supported for use in the switch. To install an SFP transceiver, insert the transceiver into any of the active switch ports and gently press until it snaps in place. TIP: The transceiver will fit only one way. If the transceiver is not installed under gentle pressure, flip it over and try again. A new switch has eight (ports 0-7) or sixteen (ports 0-15) active ports depending on the model. Additional ports can be activated with the HP StorageWorks 8/20q 4-port Upgrade License. For more information, see "Installing feature license keys" on page 40. Configure the workstation NOTE: If you plan to use Simple SAN Connection Manager or QuickTools to manage the switch, proceed to "Apply power to the switch" on page 34. If you plan to use the CLI to configure and manage the switch, you must configure the workstation. This involves setting the workstation IP address for Ethernet connections, or configuring the workstation serial port. Configuring the workstation IP address for Ethernet connections The default IP address of a new switch is 10.0.0.1. To ensure that your workstation is configured to communicate with the 10.0.0 subnet: • For a Windows workstation: a. Click Start then choose Settings>Control Panel>Network and Dial-Up Connections. b. Choose Make New Connection. c. Click the Connect to a private network through the Internet radio button, then click Next. d. Enter 10.0.0.253 for the IP address. • For a Linux workstation, open a command window and enter the following command where interface is your interface name: ifconfig interface ipaddress 10.0.0.253 netmask 255.255.255.0 up Configuring the workstation serial port To configure the workstation serial port: 1. Connect a null modem F/F DB9 cable from a COM port on the workstation to the RS-232 serial port on the switch. 2. Configure the workstation serial port according to your platform: For a Windows workstation: a. Open the HyperTerminal application. Click Start, then select Programs>Accessories> Communications>HyperTerminal. b. Enter a name for the switch connection and choose an icon in the Connection Description window. Click OK. c. Enter the following COM Port settings in the COM Properties window, and click OK. • Bits per second: 9,600 • Data Bits: 8 • Parity: None • Stop Bits: 1 • Flow Control: None 8/20q Fibre Channel Switch installation and reference guide 33
-
 1
1 -
2
-
3
-
4
-
5
-
6
-
7
-
8
-
9
-
10
-
11
-
12
-
13
-
14
-
15
-
16
-
17
-
18
-
19
-
20
-
21
-
22
-
23
-
24
-
25
-
26
-
27
-
 28
28 -
 29
29 -
 30
30 -
 31
31 -
 32
32 -
 33
33 -
 34
34 -
 35
35 -
 36
36 -
 37
37 -
 38
38 -
39
-
40
-
41
-
42
-
43
-
44
-
45
-
46
-
47
-
48
-
49
-
50
-
51
-
52
-
53
-
54
-
55
-
56
-
57
-
58
-
59
-
60
-
61
-
62
-
63
-
64
-
65
-
66
-
67
-
68
-
69
-
70
-
71
-
72
 |
 |