HP 9650 HP Deskjet 9600 - Getting Started Guide - Page 7
Schritt 4 Schließen Sie das Netzkabel an.
 |
UPC - 808736660075
View all HP 9650 manuals
Add to My Manuals
Save this manual to your list of manuals |
Page 7 highlights
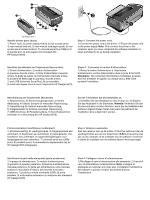
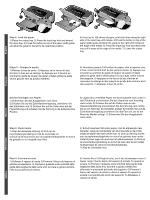
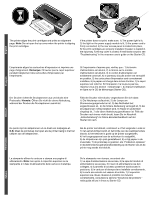
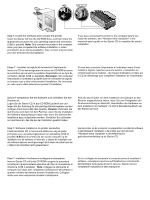
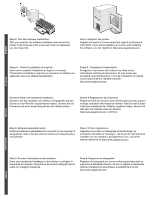
2 1 Identify printer parts (back). 1) Power input, 2) power supply module 3) rear access panel, 4) rear manual feed slot, 5) rear manual feed paper guide, 6) rear access panel release buttons, 7) universal serial bus (USB) port, 8) parallel port, 9) auto-duplex unit (included with HP Deskjet 9670). Step 4: Connect the power cord. 1) Connect the power cord to the printer. 2) Plug in the power cord to the power supply. Note: Only connect the printer to the computer when you have completed the software installation or when prompted to do so during installation. Identifiez les éléments de l'imprimante (face arrière). 1) Entrée d'alimentation, 2) module d'alimentation 3) panneau d'accès arrière, 4) fente d'alimentation manuelle arrière, 5) guide de papier de l'alimentation manuelle arrière, 6) boutons de déblocage du panneau d'accès arrière, 7) port USB (Universal Serial Bus), 8) port parallèle, 9) unité auto-duplex (fournie avec l'imprimante HP Deskjet 9670). Etape 4 : Connectez le cordon d'alimentation. 1) Reliez le cordon d'alimentation à l'imprimante. 2) Branchez le cordon d'alimentation dans la prise d'électricité. Remarque : Ne connectez l'imprimante à l'ordinateur qu'après avoir fini d'installer le logiciel, ou lorsque vous y êtes invité pendant l'installation. Beschreibung der Druckerteile (Rückseite) 1) Netzanschluss, 2) Stromversorgungsmodul, 3) hintere Abdeckung, 4) hinterer Schacht für manuellen Papiereinzug, 5) Papierführung für hinteren manuellen Papiereinzug, 6) Freigabetasten für hinteren manuellen Papiereinzug, 7) USB-Anschluss, 8) Parallelanschluss, 9) Auto-Duplexeinheit (enthalten im Lieferumfang des HP Deskjet 9670). Schritt 4 Schließen Sie das Netzkabel an. 1) Schließen Sie das Netzkabel an den Drucker an. 2) Stecken Sie das Netzkabel in die Steckdose. Hinweis: Verbinden Sie den Drucker erst dann mit dem Rechner, wenn Sie die Installation der Software abgeschlossen haben oder wenn Sie während der Installation dazu aufgefordert werden. Printeronderdelen identificeren (achterkant) 1) stroomaansluiting, 2) voedingsmodule, 3) toegangspaneel aan achterkant, 4) handinvoer aan achterkant, 5) papiergeleider voor handinvoer aan achterkant, 6) ontgrendelingsknoppen voor toegangspaneel aan achterkant, 7) universal serial bus (USB)poort, 8) parallelle poort, 9) automatische duplexmodule (bij de HP Deskjet 9670 inbegrepen). Stap 4: Netsnoer aansluiten Sluit het netsnoer aan op de printer. 2) Sluit het netsnoer naar de voedingsmodule aan op een stopcontact. N.B.Sluit de printer pas aan op de computer na de installatie van de software of wanneer u tijdens de installatie van de software daarom wordt gevraagd. Identificare le parti della stampante (parte posteriore). 1) Ingresso di alimentazione, 2) modulo di alimentazione 3) pannello di accesso posteriore, 4) fessura di alimentazione manuale posteriore, 5) guida per alimentazione carta manuale posteriore, 6) pulsanti di rilascio del pannello di accesso posteriore, 7) porta bus seriale universale (USB), 8) porta parallela, 9) unità duplex automatico (in dotazione alle stampanti HP Deskjet 9670). Fase 4: Collegare il cavo di alimentazione 1) Ricollegare il cavo di alimentazione alla stampante. 2) Inserire il cavo di alimentazione all'alimentatore. Nota: collegare la stampante al computer solo dopo aver completato l'installazione del software o quando richiesto dal sistema durante l'installazione.
-
 1
1 -
 2
2 -
 3
3 -
 4
4 -
 5
5 -
 6
6 -
 7
7 -
 8
8 -
 9
9 -
 10
10 -
 11
11 -
 12
12 -
13
-
14
-
15
-
16
-
17
-
18
-
19
-
20
-
21
-
22
-
23
-
24
 |
 |
