HP Brocade 8/24c Brocade Web Tools Administrator's Guide v6.1.0 (53-1000606-02 - Page 61
Configuring signed firmware, Managing licensed features
 |
View all HP Brocade 8/24c manuals
Add to My Manuals
Save this manual to your list of manuals |
Page 61 highlights
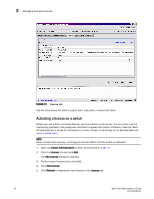
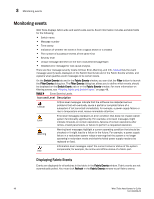
Managing licensed features 3 1. Open the Switch Administration window as described on page 31. 2. Disable the switch as described in "Enabling and disabling a switch" on page 36. 3. Click the Configure tab and click the System subtab. 4. Select the Disable RLS Probing check box to disable RLS probing. Clear the check box to enable RLS probing. 5. Click Apply. 6. Enable the switch as described in "Enabling and disabling a switch" on page 36. Configuring signed firmware When the firmware is downloaded to a device, the system can validate the firmware based on a configuration setting. By default, the signed firmware download is not validated. NOTE During the first download, the system ignores the signed firmware. After the first download, the public key is downloaded and then, in subsequent downloads, you can turn on the feature. You can view the public key on the Firmware Download tab in the Switch Administration window. 1. Open the Switch Administration window as described on page 31. 2. Click the Configure tab and click the Firmware subtab. 3. Select the Enable Signed Firmware Download check box. 4. Click Apply. Managing licensed features The licensed features currently installed on the switch are listed in the License tab of the Switch Administration window, as shown in Figure 21. If the feature is listed, it is installed and immediately available. When you enable some licenses, such as ISL Trunking, you might need to change the state of the port to enable the feature on the link. For time-based licenses, the expiry date is included. Scroll to the right to check the expiry date for a time-based license. Web Tools Administrator's Guide 41 53-1000606-02
-
 1
1 -
2
-
3
-
4
-
5
-
6
-
7
-
8
-
9
-
10
-
11
-
12
-
13
-
14
-
15
-
16
-
17
-
18
-
19
-
20
-
21
-
22
-
23
-
24
-
25
-
26
-
27
-
28
-
29
-
30
-
31
-
32
-
33
-
34
-
35
-
36
-
37
-
38
-
39
-
40
-
41
-
42
-
43
-
44
-
45
-
46
-
47
-
48
-
49
-
50
-
51
-
52
-
53
-
54
-
55
-
 56
56 -
 57
57 -
 58
58 -
 59
59 -
 60
60 -
 61
61 -
 62
62 -
 63
63 -
 64
64 -
 65
65 -
 66
66 -
67
-
68
-
69
-
70
-
71
-
72
-
73
-
74
-
75
-
76
-
77
-
78
-
79
-
80
-
81
-
82
-
83
-
84
-
85
-
86
-
87
-
88
-
89
-
90
-
91
-
92
-
93
-
94
-
95
-
96
-
97
-
98
-
99
-
100
-
101
-
102
-
103
-
104
-
105
-
106
-
107
-
108
-
109
-
110
-
111
-
112
-
113
-
114
-
115
-
116
-
117
-
118
-
119
-
120
-
121
-
122
-
123
-
124
-
125
-
126
-
127
-
128
-
129
-
130
-
131
-
132
-
133
-
134
-
135
-
136
-
137
-
138
-
139
-
140
-
141
-
142
-
143
-
144
-
145
-
146
-
147
-
148
-
149
-
150
-
151
-
152
-
153
-
154
-
155
-
156
-
157
-
158
-
159
-
160
-
161
-
162
-
163
-
164
-
165
-
166
-
167
-
168
-
169
-
170
-
171
-
172
-
173
-
174
-
175
-
176
-
177
-
178
-
179
-
180
-
181
-
182
-
183
-
184
-
185
-
186
-
187
-
188
-
189
-
190
-
191
-
192
-
193
-
194
-
195
-
196
-
197
-
198
-
199
-
200
-
201
-
202
-
203
-
204
-
205
-
206
-
207
-
208
-
209
-
210
-
211
-
212
-
213
-
214
-
215
-
216
-
217
-
218
-
219
-
220
-
221
-
222
-
223
-
224
-
225
-
226
-
227
-
228
-
229
-
230
-
231
-
232
-
233
-
234
-
235
-
236
-
237
-
238
-
239
-
240
-
241
-
242
-
243
-
244
-
245
-
246
-
247
-
248
-
249
-
250
-
251
-
252
-
253
-
254
-
255
-
256
-
257
-
258
-
259
-
260
-
261
-
262
-
263
-
264
-
265
 |
 |